Easy Digital Downloads is dedicated to providing an easy-to-use eCommerce system for WordPress users. We work hard to achieve that goal on a daily basis. However, due to its extensibility and the inevitable variation of customer needs, a lot of functionality is left to the daunting task of custom development.
One of the most common needs we see in our support channel is an easy way to create custom checkout forms. For non-developers, custom form building is difficult enough. Bring eCommerce functionality into the picture and even the do-it-yourself crowd struggles.
The goal of this article is to help every Easy Digital Downloads user, regardless of skill level, learn how to build custom checkout forms without writing any code.
Minimum required plugins
There are at least four plugins that must work together to make this happen. I’ll explain each of them below.
Easy Digital Downloads
While Easy Digital Downloads has its own core checkout functionality, the basic system only supports one “universal” checkout form. Even if you customize the form, it will still be the same form for all transactions regardless of what is in the cart.
Gravity Forms
Gravity Forms is an advanced form builder for WordPress. You can use it to create anything from the most basic contact form to complex forms that serve any purpose. With features like conditional field logic, entry organization and presentation, and add-on support, it is no doubt one of the most popular premium WordPress plugins on the market.
Gravity Forms Checkout
Gravity Forms Checkout is the bridge between Easy Digital Downloads and Gravity Forms. In order to create multiple custom checkout forms for your products, this Easy Digital Downloads extension is a necessary piece of the puzzle.
Gravity Forms Payment Add-On
Lastly, custom checkout forms created through Gravity Forms require that you use Gravity Forms add-ons to add additional functionality to the forms themselves. That means Easy Digital Downloads payment gateways will not work with Gravity Forms Checkout.
To process payments, you must use payment gateways built for Gravity Forms. In this article, we will reference the Gravity Forms PayPal Payments Standard add-on. There are additional options available like Stripe and Authorize.net.
Creating custom checkout forms
Now that you have all of the required plugins, let’s get started. We will walk through the creation of a basic checkout form for a single product. Follow along with the steps if you are prepared to do so.
At this point, you should already have products in your store that you are wanting to sell. Please note that even if you have the aforementioned tools activated or in use, your Easy Digital Downloads store will still function in its original manner.
Custom checkout forms with Gravity Forms Checkout simply adds another option. Your products can still be purchased the traditional way.
Create new forms with Gravity Forms
For the form creation process, think of it as Easy Digital Downloads integrating with Gravity Forms, instead of the other way around. With that approach, it makes sense that to create a new custom checkout form, you would first need to create a new form in Gravity Forms.
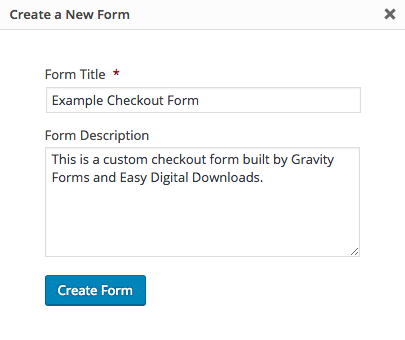
With Gravity Forms activated, go to Forms -> New Form in your WordPress dashboard. You will be prompted to give the form a title and optional description. Do so and create the form.
Adding basic fields
At this stage, you have a form entry created but it does not have any fields. All it has is a title and a description which will automatically output by default, though you can hide them if you choose to do so.
You will need to collect at least an email address from your customers. So we will add an email address field to our form to get things started.
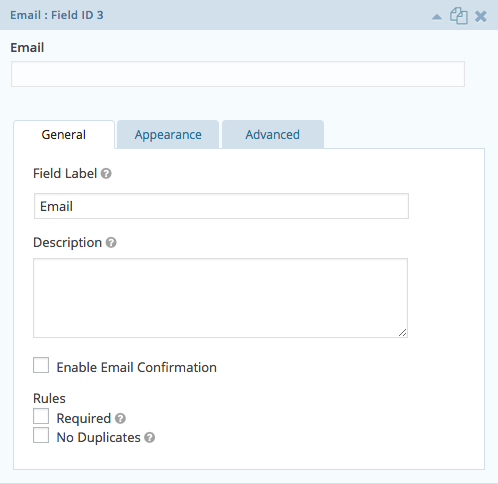
On the right side of the screen, you will see several expandable sections of field groupings. The Email field can be found in the Advanced Fields section. To add the Email field to your form, simply click button labeled Email.
Clicking the button will add the field to your form (left side of the screen) with minimal default content. Move your cursor over the new field and when you see the visual indicator that you are hovering, single click the field to view its options.
The Email field is very simple and only needs one adjustment. Under the Rules section, mark the field as Required. With this configuration in place, the checkout form will not submit without an email address.
Many of you will also want to add fields like first and last name. We will not discuss those in this article but the process is very similar to adding the Email field.
Now that we have a required email address field, let’s add one more field before moving to product related fields.
Just for structure and becoming more familiar with Gravity Forms, we’ll add a field to the form called a Section. Sections are an easy way to break your form down into visual sections that help with the flow of filling out the form.
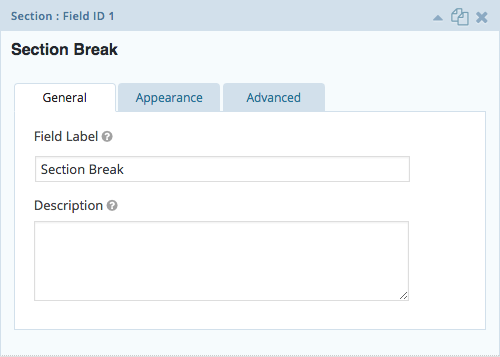
The Section field can be found in the Standard Fields section. Add it to your form and expand it to view its options.
Based on the field type and the fact that we will be adding a Product field next, let’s consider this Section field as a heading for the product field display.
Adjust the Field Label and Description fields to your liking. Something along the lines of “Product Information” as the Field Label and any small details you want to disclose about the product itself as the Description.
At any time during the creation process, you can preview the structure of your form by clicking the Preview link located in the navigation menu just above the form builder. Please note that some fields require that you update the form to preview.
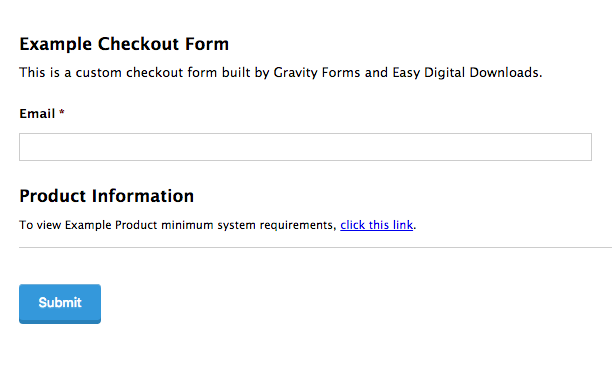
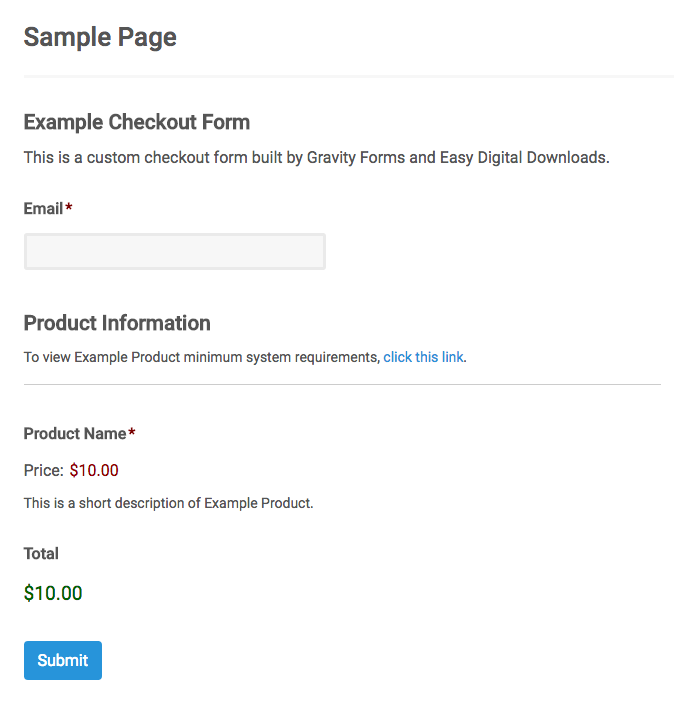
The preview of your form is not a representation of how it will be designed on the front end. Instead, use the preview to look at the structure and functionality. As of now, we have nothing more than an email field, a section title (label), and a description.
If you are not already familiar with Gravity Forms, what you have done here so far is how you would use the form builder for any type of form that you create, not just with Easy Digital Downloads. If you are unclear on how the basic form builder functions, please visit the Gravity Forms documentation.
At this stage of the process, your form preview should look similar to this:
With the form title, form description, email field, and product information section in place, we can add a product to the form.
Adding product fields
Remember, this is an extremely basic form and its purpose is to serve as the checkout for one particular product. For those who would rather have a custom checkout form for a specific product rather than using its Add to Cart button and traditional checkout, this form would be an ideal replacement.
That said, we will add and display the Product field to the form for informational purposes. The customer is being informed about which product the form will grant him or her access to along with its price.
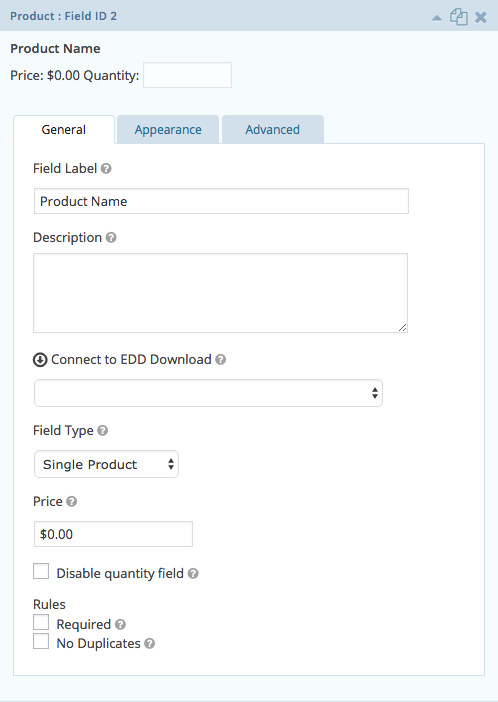
On the right side of the screen, find the Pricing Fields section. In that section, select to add a new Product field by clicking the button labeled Product. Once added, expand the field.
I will be selling a product called “Example Product,” which has already been created as a Download entry. After filling out the Field Label and Description sections, I will connect my Product field to Easy Digital Downloads by selecting “Example Product” from the Connect to EDD Download select menu.
Continuing with the settings, I will set my Field Type to “Single Product” with a Price of $10. Please note that because I am in full control of the form, I must set the price myself. It is not pulled from the Download entry.
Lastly, I will check the Disable quantity field box, and set the only Rules as Required.
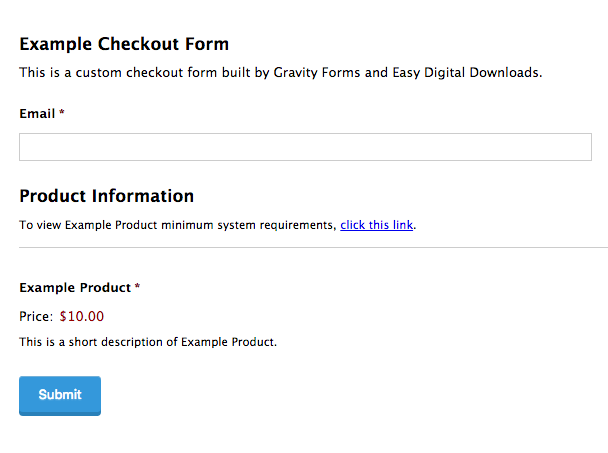
Let’s take a look at an up-to-date preview of my custom checkout form.
With just those fields in place, you have created a form that is prepared to sell “Example Product” to your customers. All you have to do now is add fields to accept the payment.
Please note that displaying the Product field is optional. While the field must be present in order to connect the form to the product, you can select “Hidden” as the Field Type which will include the field upon submission but the customer will never see the field itself.
The reason you may want to do this is because this checkout form can be embedded (via shortcode) into a page that already gives important information about the product, including the price. If this is the case, displaying the Product field in the form can be redundant and even confusing to the customer.
Just remember that the field must be present.
At this point, you should save your form. The next step will require that you visit other pages to configure payment options. Once completed, we will revisit the form.
Adding payment fields
Now we are free to accept payments from customers. To do that, we have to set the form up to accept at least one payment method. As mentioned previously, we will use the PayPal Payments Standard add-on for Gravity Forms to process our payments.
Depending on which payment gateway you choose, you may or may not have to add a direct field to your form. For example, if you are using the Stripe add-on, it will add a Credit Card field to the form builder that you can select like you’ve done previously.
However, the PayPal Payments Standard add-on does not. Instead, you would need to follow instructions directly from Gravity Forms for setting up your forms to use PayPal for customer transactions.
In this article, we will not cover those details. They apply to Gravity Forms whether it is integrated with Easy Digital Downloads or not. So you’ll want to use the Gravity Forms documentation to find the docs that are relevant to your needs.
Complete all required steps for setting up your payment gateways. If a new field must be added to the form, do so following the same methods as described above.
Adding final payment amount (total)
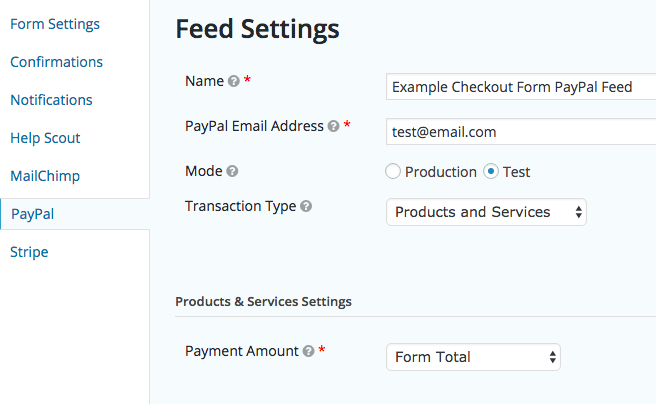
While configuring your payment option(s), you would have been instructed to create a Feed for each type of payment you would accept. PayPal Payments Standard users would have visited this documentation.
In the creation of that Feed, you would have had to set the Payment Amount for the Feed. What this means is every time your checkout form is submitted, the customer is to pay a certain amount and the Feed needs to know where you pull that amount from.
The Payment Amount setting must be set to pull data from one of your form fields that holds the form’s total value. However, we have not set that field up just yet. Save your Feed progress and go back to your saved form so we can add the field.
On the right side of the form builder screen, select to add a Total field to your form from the Pricing Fields section. Once added, expand the new field.
You will see that there aren’t very many settings. The field is designed to automatically calculate the form total based on information it gets from the other form fields and possible customer interaction.
With this field added to your form and your form updated, you may now set this field as the Payment Amount in your Feed.
Continue to follow the rest of the Gravity Forms documentation to finalize your Feed settings and save the new Feed.
Using your custom checkout form
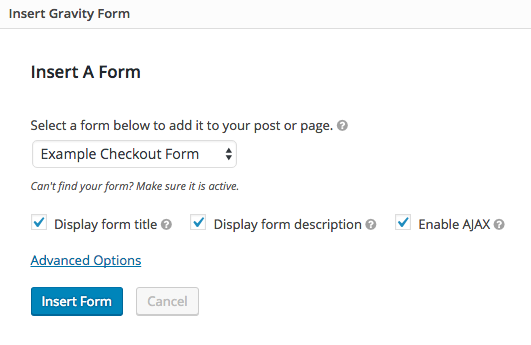
Now that you have created a custom checkout form that is prepared to accept payments, you need to display your form. Gravity Forms makes that extremely easy with the [[gravityform]] shortcode. On any page, post, or custom post type you’d like, click Add Form button to add a form to your content.
Once your page is saved, the form will output on the front end and be ready to accept payments for whatever product you have configured.
Please note that if PayPal Payments Standard is the only gateway you have configured, no PayPal related text will display on the form (unless you added custom text). Simply filling out the form and submitting will redirect the customer to PayPal to complete the payment.
Conditional logic examples
It would be impossible to cover every possible form configuration in this one article. However, we can share a few examples to help you get started with making your form smarter and more user friendly.
Let’s look at an example form that we use here on the Easy Digital Downloads site. To help new users choose the extensions they need to get their stores up and running, we’ve created the Starter Package. (Update: our Starter Package is no longer live, as we’ve made changes to our overall purchase options. You may continue reading as if it exists.)
This standalone form does not depend on the shopping cart functionality.
Separated into logical sections that include extension selections, all that a customer needs to do is select the extensions that fit his or her business needs, enter personal and payment information, agree to the terms, and complete the purchase.
Not only is the form fully custom, it can easily be one of many custom checkout forms on the site. With the information above, you can be well on your way to having just that.
Custom product packages
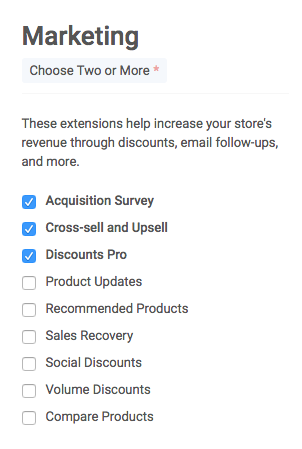
On our Starter Package form, you may have noticed the use of focused extension sections that allow the customer to pick and choose certain products. Let’s look specifically at the Marketing section.
Whenever a user checks a box for one of our marketing extensions, the extension is added to his or her custom starter package, thus changing the total of the form.
In order to achieve this, you must:
- Add a new Checkboxes field to your form. Once expanded, three default checkbox options will appear under the Choices section. If you intend to use this checkbox field to allow the selection of five products, for example, you must create five choices that represent the names of your five products. Make this a required field.
- Add a new Product field to your form. Configure the Product field to connect to one of the Easy Digital Downloads products that you referenced from your checkbox choices. On the General tab settings for the Product, set its Field Type to “Single Product” (it cannot be hidden) and give it a price. On the Advanced tab, check the Enable Conditional Logic setting and set the field to only show if the correct “Choice” from your checkbox field in step 1 is selected.
- Repeat step 2 for all Choices created in step 1.
What this does is only add Product fields to the form when their conditions are met. Those conditions are checked Choices from the checkbox field. As long as those Choices represent your products and are linked to to them through conditional field logic, customers can create their own custom packages.
Payment method selector
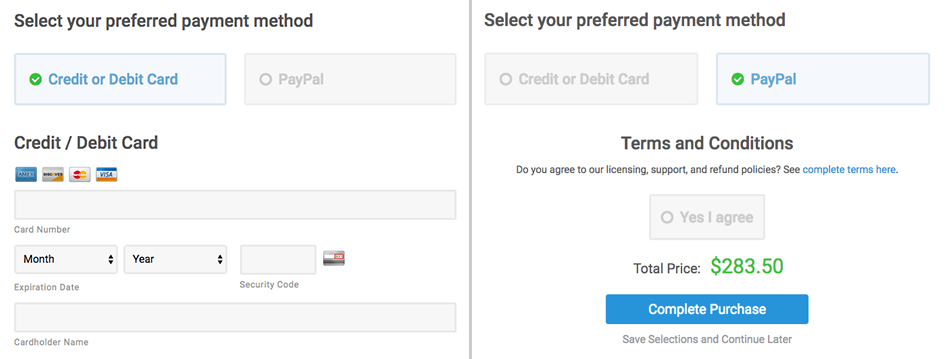
Towards the end of our Starter Package form, we instruct the customer to select a payment method. We accept payments through Stripe and PayPal.
As mentioned above, different methods are used to add fields to the form for payment information. PayPal Payments Standard does not require a field but Stripe requires several. Stripe’s Credit Card field and an additional Address field have to be added to the form to process credit card payments.
In order to create this, you must:
- Add a new Radio Buttons field to your form. Once expanded, three default radio options will appear under the Choices section. Since we are allowing customers to choose between two payment methods, you must have two choices that represent the names of the payment methods. In our case, we chose Credit / Debit Card and PayPal as choices. Make this a required field.
- Add all necessary fields for accepting credit card payments based on the instructions from Gravity Forms. Configure the fields to collect all of the required information. On the Advanced tab of all credit card related fields, check the Enable Conditional Logic setting and set the fields to only show if the correct “Choice” from your radio buttons field in step 1 is selected.
- Because PayPal does not require any fields in the form, all you need to do is go to your PayPal Feed for the form and in its settings, check the Enable Conditional Logic setting and set the Feed to only be used if the correct “Choice” from your radio buttons field in step 1 is selected (PayPal).
The choice is yours
This is a difficult thing to write about because once you grasp the concept of conditional field logic, you really have a blank canvas to play with every time you create a custom checkout form.
We can provide examples but the possibilities are endless. The key to it all is the conditional logic and the strategic use of Product fields.
It is up to you to decide if your products need a more specialized checkout form. Likewise, creating something similar to our Starter Package is a business choice that only you can make.
Play around with the features to see if it sparks a few lucrative ideas.
Frequently Asked Questions
Can I used Gravity Forms Checkout with the Recurring Payments extension?
No. Recurring Payments does not integrate with the above configuration.
What about email receipts and purchase confirmation?
The default Easy Digital Downloads Purchase Confirmation redirect no longer applies. However, Gravity Forms will allow you to set up custom confirmation behavior if you choose to do so. A standard page with static links are recommended.
The email receipt will still be sent to the user containing any product related information you have in your receipt template. This behavior does not change.
Tip: from a custom confirmation that you create in Gravity Forms, direct your customers to check their emails after purchase and link them to important information that could minimize confusion.
If I allow customers to create custom packages, are they processed as Bundles?
The Easy Digital Downloads core bundle functionality does not apply. If a customer purchases 10 products through one of your custom checkout forms, each product is considered a separate purchase.
How do I use discounts?
In order to give discounts to customers using the custom checkout form, you must simply set the Product fields to have a discounted price. Customers will not be able to enter a discount code like the default checkout form.
How do I style my custom checkout forms?
It is important to note that all we have discussed here is building the form and its functionality. These are generic form elements and must be styled by your theme or your own custom CSS just like any other HTML element.
When testing your form, be sure to test for proper functionality. Whether or not it looks pleasing to the eye is not an indication of how it works. As you would imagine, creating the Starter Package display took several hours of custom design work.
If you have about what was mentioned in this article, please feel free to leave a question below in the comments.
For support, please use our support form.
Using WordPress and want to get Easy Digital Downloads for free?
Enter the URL to your WordPress website to install.
Disclosure: Our content is reader-supported. This means if you click on some of our links, then we may earn a commission. We only recommend products that we believe will add value to our readers.
7 comments
Comments are closed.

Love it! Thanks for creating this free extension. Is it possible to have search for more than one sub-domain? We use HelpScout for multiple products hence multiple sub-domains, however the products are sold from the same website.
Hi Ben,
Were you perhaps meaning to comment on this post? https://pippinsplugins.com/gravity-forms-help-scout-docs-search-field/
Oops! Yes, guilty as charged. That’s what happens when you have 200 tabs open. On the bright side, I’m consuming content on your sites 😉
How can i use this to allow users to select their product via gravity forms dropdown, conditionally updating the price based on the users selection, and then giving them access to the download upon payment submission?
Is there a way to integrate the quaderno integration addon to automatically calculate local sales tax rates?
Not inside of the Gravity Forms Checkout extension.