Git Download Updater – Setup Documentation
The Git Download Updater extension supports both GitHub and BitBucket.
Connecting to BitBucket
To connect your Easy Digital Downloads website to your Bitbucket account, you will need to create an APP inside your Bitbucket account and then add the APP Password and your Bitbucket username in the extension’s settings.
To create an app password follow the steps below:
- From the top right cog wheel icon, select Personal Bitbucket Settings.
- Select App passwords under Access management.
- Select Create app password.
- Give the app password a name that will help you remember what it’s used for.
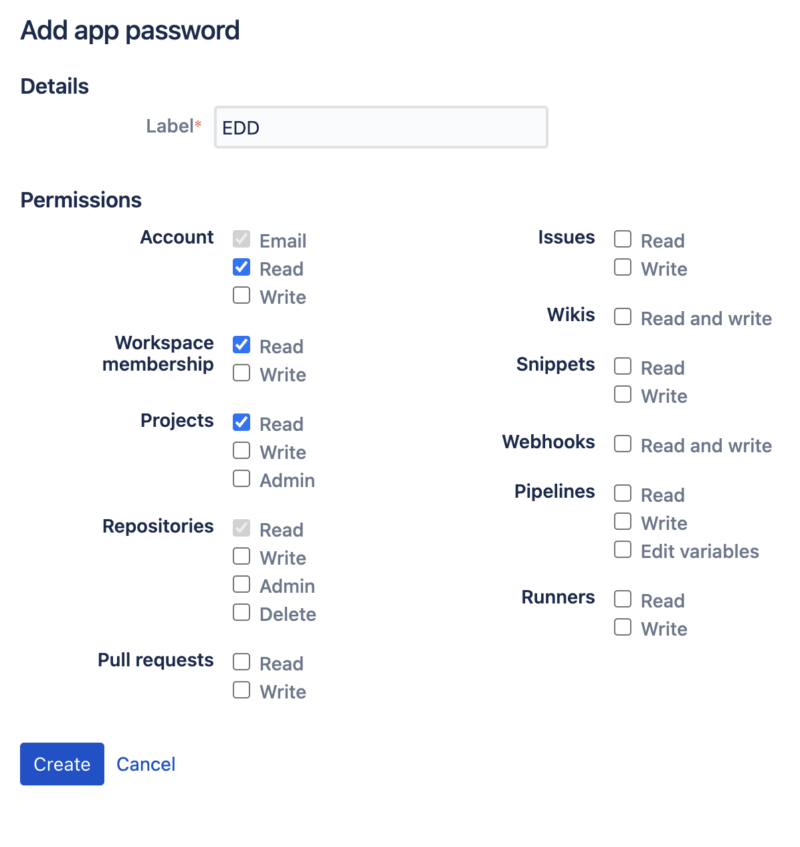
- In the Permissions section check the boxes for:
- Account > Email and Read
- Workspace Membership > Read
- Projects > Read
- Repositories > Read
- Copy the generated password in a safe place for now. The password is only displayed this one time.
Here is an image of all the required permissions described at step 5 above:

More details on app passwords (including usage and revocation) can be found in the Bitbucket documentation.
Once you have the new app password add it to the Downloads > Settings > Extensions > Git Updater page.
The Username field is your actual Bitbucket username (do not confuse this with the account email). You can easily find it on this page: https://bitbucket.org/account/settings/ under the “Bitbucket profile settings” section.
Connecting to GitHub
To use GitHub, navigate to Downloads > Settings > Extensions > Git Updater. Follow the instructions there to connect to GitHub.
Configuring a Download with the Git Updater
Setting Your Download Files
Once you have connected your website to either GitHub or Bitbucket, you can add files to your Download products.

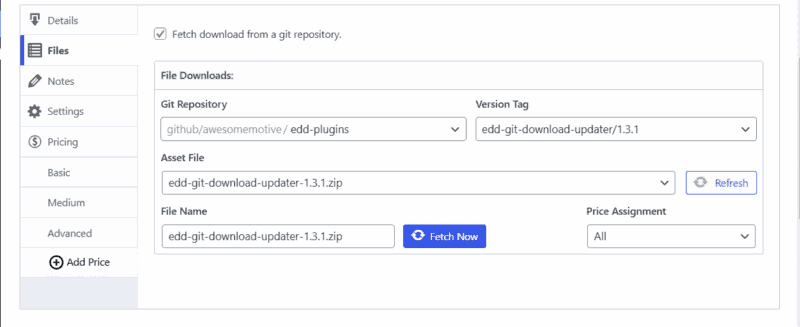
1. The “Download Files” metabox on the download edit screen will now have a checkbox labeled “Fetch download from a git repository.”
2. After a moment or two, a new set of fields will show up that will allow you to select a repository.
3. Search for the repository name, and then select the tag that you want to use.
Note: The Version Tag used in Git Updater is required to be a native git tag. It does not parse versions from your readme file. To learn more about using the tag feature in git, you can visit this guide.
4. Click “Fetch Now”. When your download has been successfully imported from the git repository, the button will say “Fetched”.
5. You can now edit the file and/or zip name if desired, or leave them as default. Your zip file is ready to go!
When you are ready to release a new version, simply select the tag you wish to use and click fetch. After fetching is complete, update your product.
FAQs & Troubleshooting
How do I exclude or remove files before the zip is generated?
The Git Download Updater uses the ‘export’ feature of Git to build out the file to deliver. You can use the `.gitattributes` file to determine what files you want to ignore during the export. Here is an example of how we use it for EDD Core.
For more details on using git attributes to exclude files, see this tutorial.
Update conflict between free and paid version
There are two different ways to resolve this issue:
- Change the name and/or slug of the pro version. Because of a nuance with the WordPress update API, WordPress cannot actually distinguish them as separate plugins.
- Add “wp_override” to the third parameter of the EDD_SL_PLugin_Updater class when it is instantiated, like this:
// set up the updater
$edd_updater = new EDD_SL_Plugin_Updater( EDD_SAMPLE_STORE_URL, __FILE__, array(
		'version'     => '1.0', 				// current version number
		'license'     => $license_key, 		// license key (used get_option above to retrieve from DB)
		'item_id'   => EDD_SAMPLE_ITEM_ID, 	// name of this plugin
		'author'      => 'Easy Digital Downloads',  // author of this plugin,
		'wp_override' => true
	)
);Note: this requires v1.6.4 of the plugin updater class.