Content Restriction Documentation
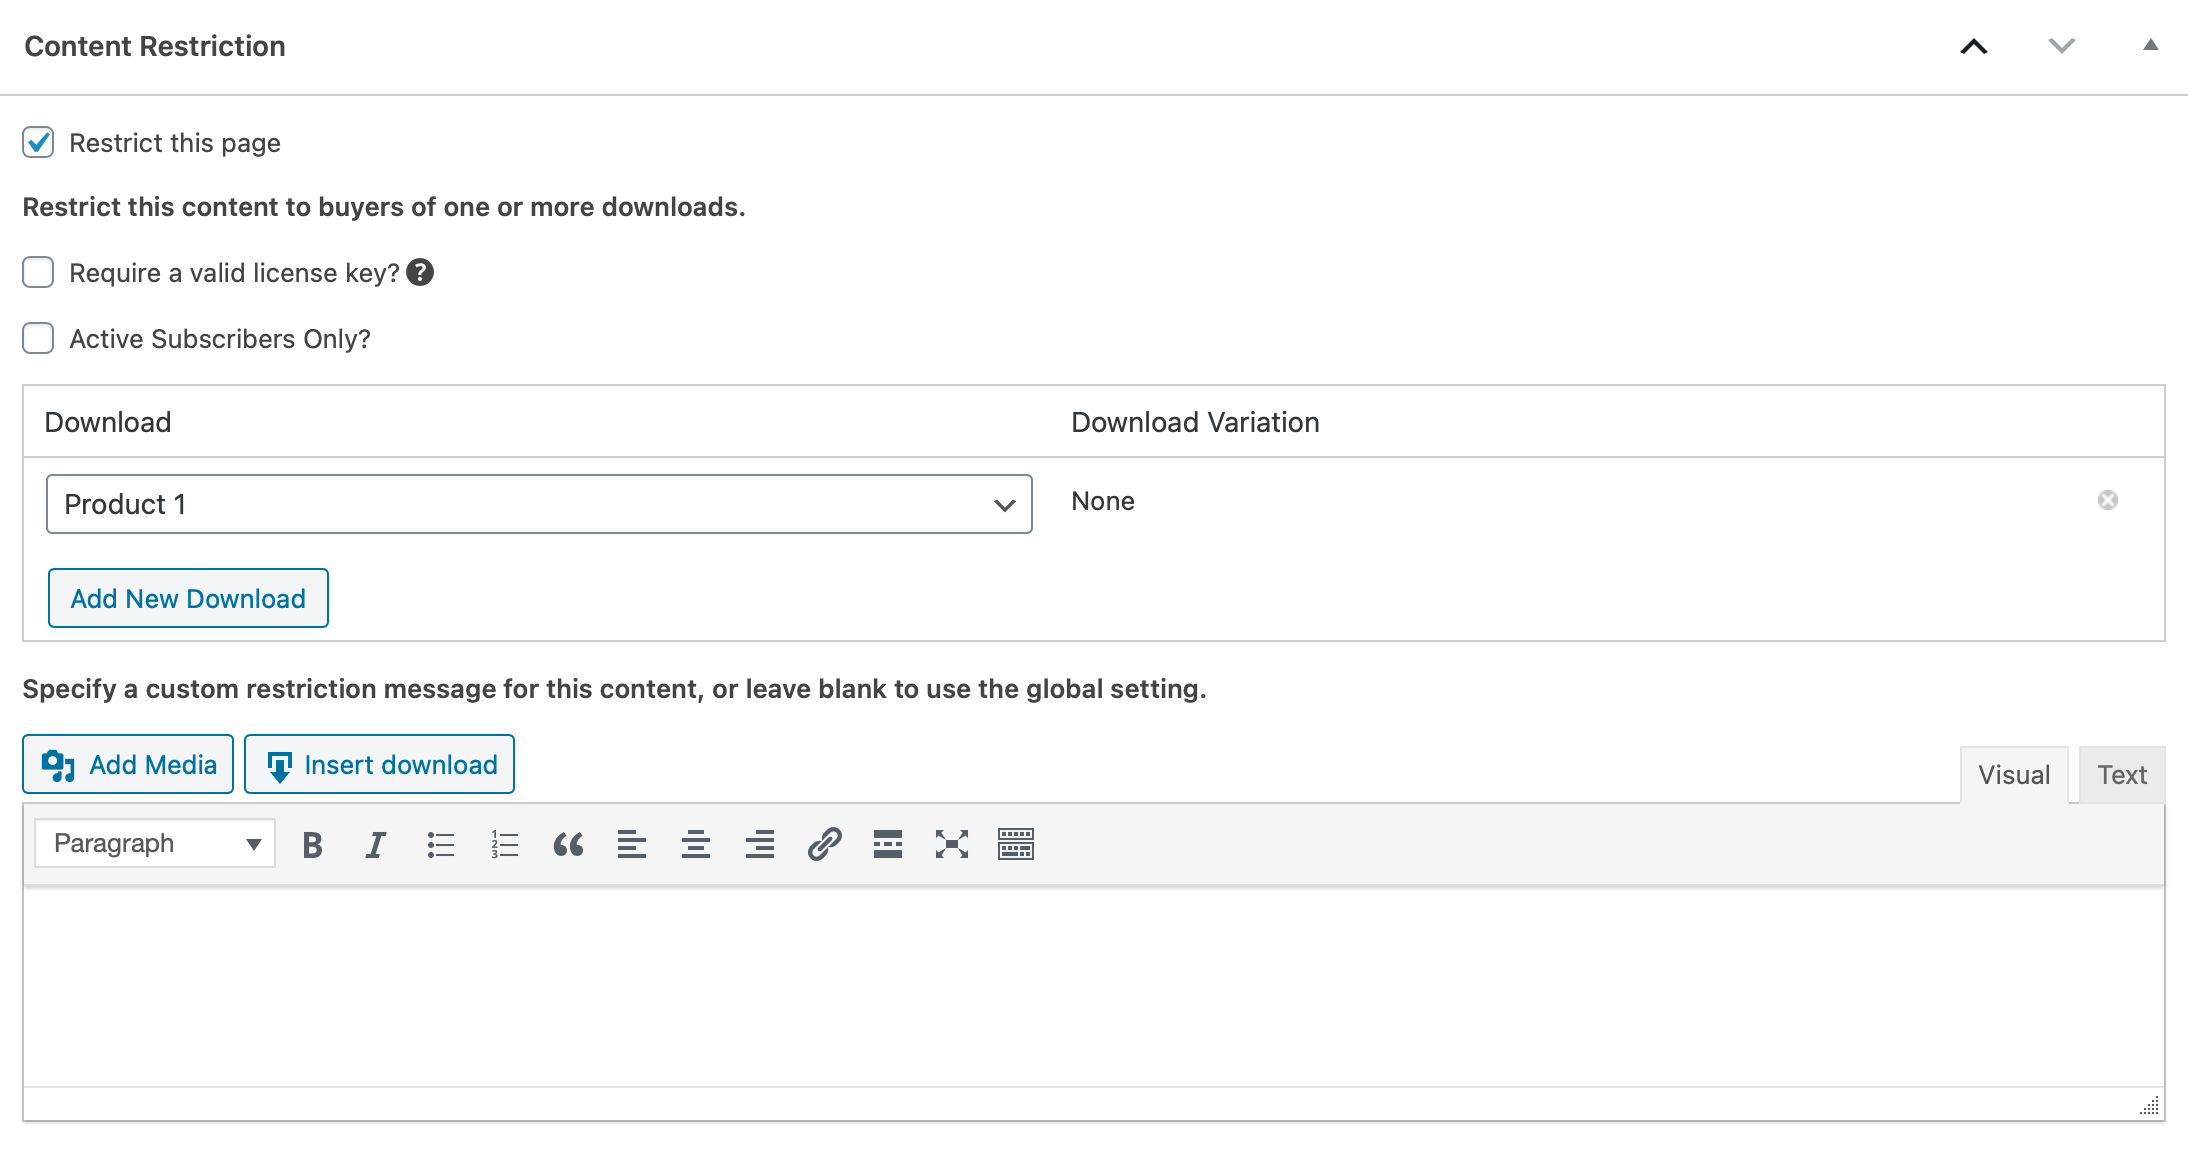
The Content Restriction extension for Easy Digital Downloads adds a section to the edit screen of your posts, pages, custom post types, and bbPress forums / topics called Content Restriction. This section allows you to specify the products that customers need to have purchased in order to access the content.
Restricting Content
Once activated, Content Restriction provides two ways to restrict access to content:
- By restricting the whole page or post using the “Content Restriction” settings within the post or page.
- Using the [edd_restrict] shortcode.
Content Restriction uses an OR condition for the products, so if you select Product X and Product Y, the content will be accessible to customers that have purchased Product X or whom have purchased Product Y.
You can also restrict content to verified customers of any product in your store by selecting the Any option. Note: This is specific to the shortcode restriction option.
Integrating with Recurring Payments:
You can restrict access to content if the Download is tied to a Subscription. See Recurring Payments – Content Restriction Integration for details.
Integrating with Software Licensing:
If the Download contains a license key, you can further restrict access to only active license keys. When enabled, this doesn’t affect access to selected downloads that don’t have Software Licensing enabled.
Restricting the full page / post
Restrict the full page or post using the Content Restriction settings below the content editor.

- Select “Restrict this page” to view options.
- In the Download dropdown, select a specific download or “Customers who have purchased any Download”.
- If the Download contains variations, you can select a specific variation or “All prices” in the “Download Variation” column.
- Additional Downloads can be added using the “Add New Download” button.
Shortcode
Also included in the plugin is a short code that will allow you to restrict portions of content. For example, to restrict a paragraph to only buyers of a specific download, you can do this:
[edd_restrict id="#"]This content is restricted.[/edd_restrict]
The # is replaced with the ID number of the Download product.
The short code accepts three parameters:
- id – This is a comma separated list of download ID numbers. Note that you can also put the word “any” to allow any purchase.
- price_id – This is the ID number of the price you want to restrict content to
- message – This is the text shown to non-buyers
If you want to restrict content to buyers of multiple downloads, you can use the shortcode like this, which will result in the content being restricted to download ID 23 or 254:
[edd_restrict id="23,254"]This content is restricted.[/edd_restrict]
If you would like to restrict a download to a particular price ID, then use:
[edd_restrict id="23" price_id="2"]This content is restricted.[/edd_restrict]
Note: To find the price ID, go to your download and count down from the top of your price options. The first price option is ID=1, the second is ID=2, and so on.
If you would like to restrict a download to any product purchased, do the following:
[edd_restrict id="any"]This content is restricted.[/edd_restrict]
There is also a shortcode you can use to show content to someone who has not purchased a specific product. You can use it the same way as the shortcode above. The shortcode is “edd_cr_no_access” and can be used like this:
[edd_cr_no_access id="#"]Preview of locked content here[/edd_cr_no_access]
Displaying Accessible Restricted Pages After Purchase
When you have posts, pages, or custom post types restricted to products, a list of these pages will be automatically displayed on the purchase confirmation page in order to make it nice and simple for your customers to find the content they have just purchased access to.
You can also add the {page_list} template tag to the email purchase receipt in order to show the list in the emailed receipt.
You can also place the [edd_restricted_pages] short code on any page in order to display a list of the posts and pages the logged in customer has access to.
Settings
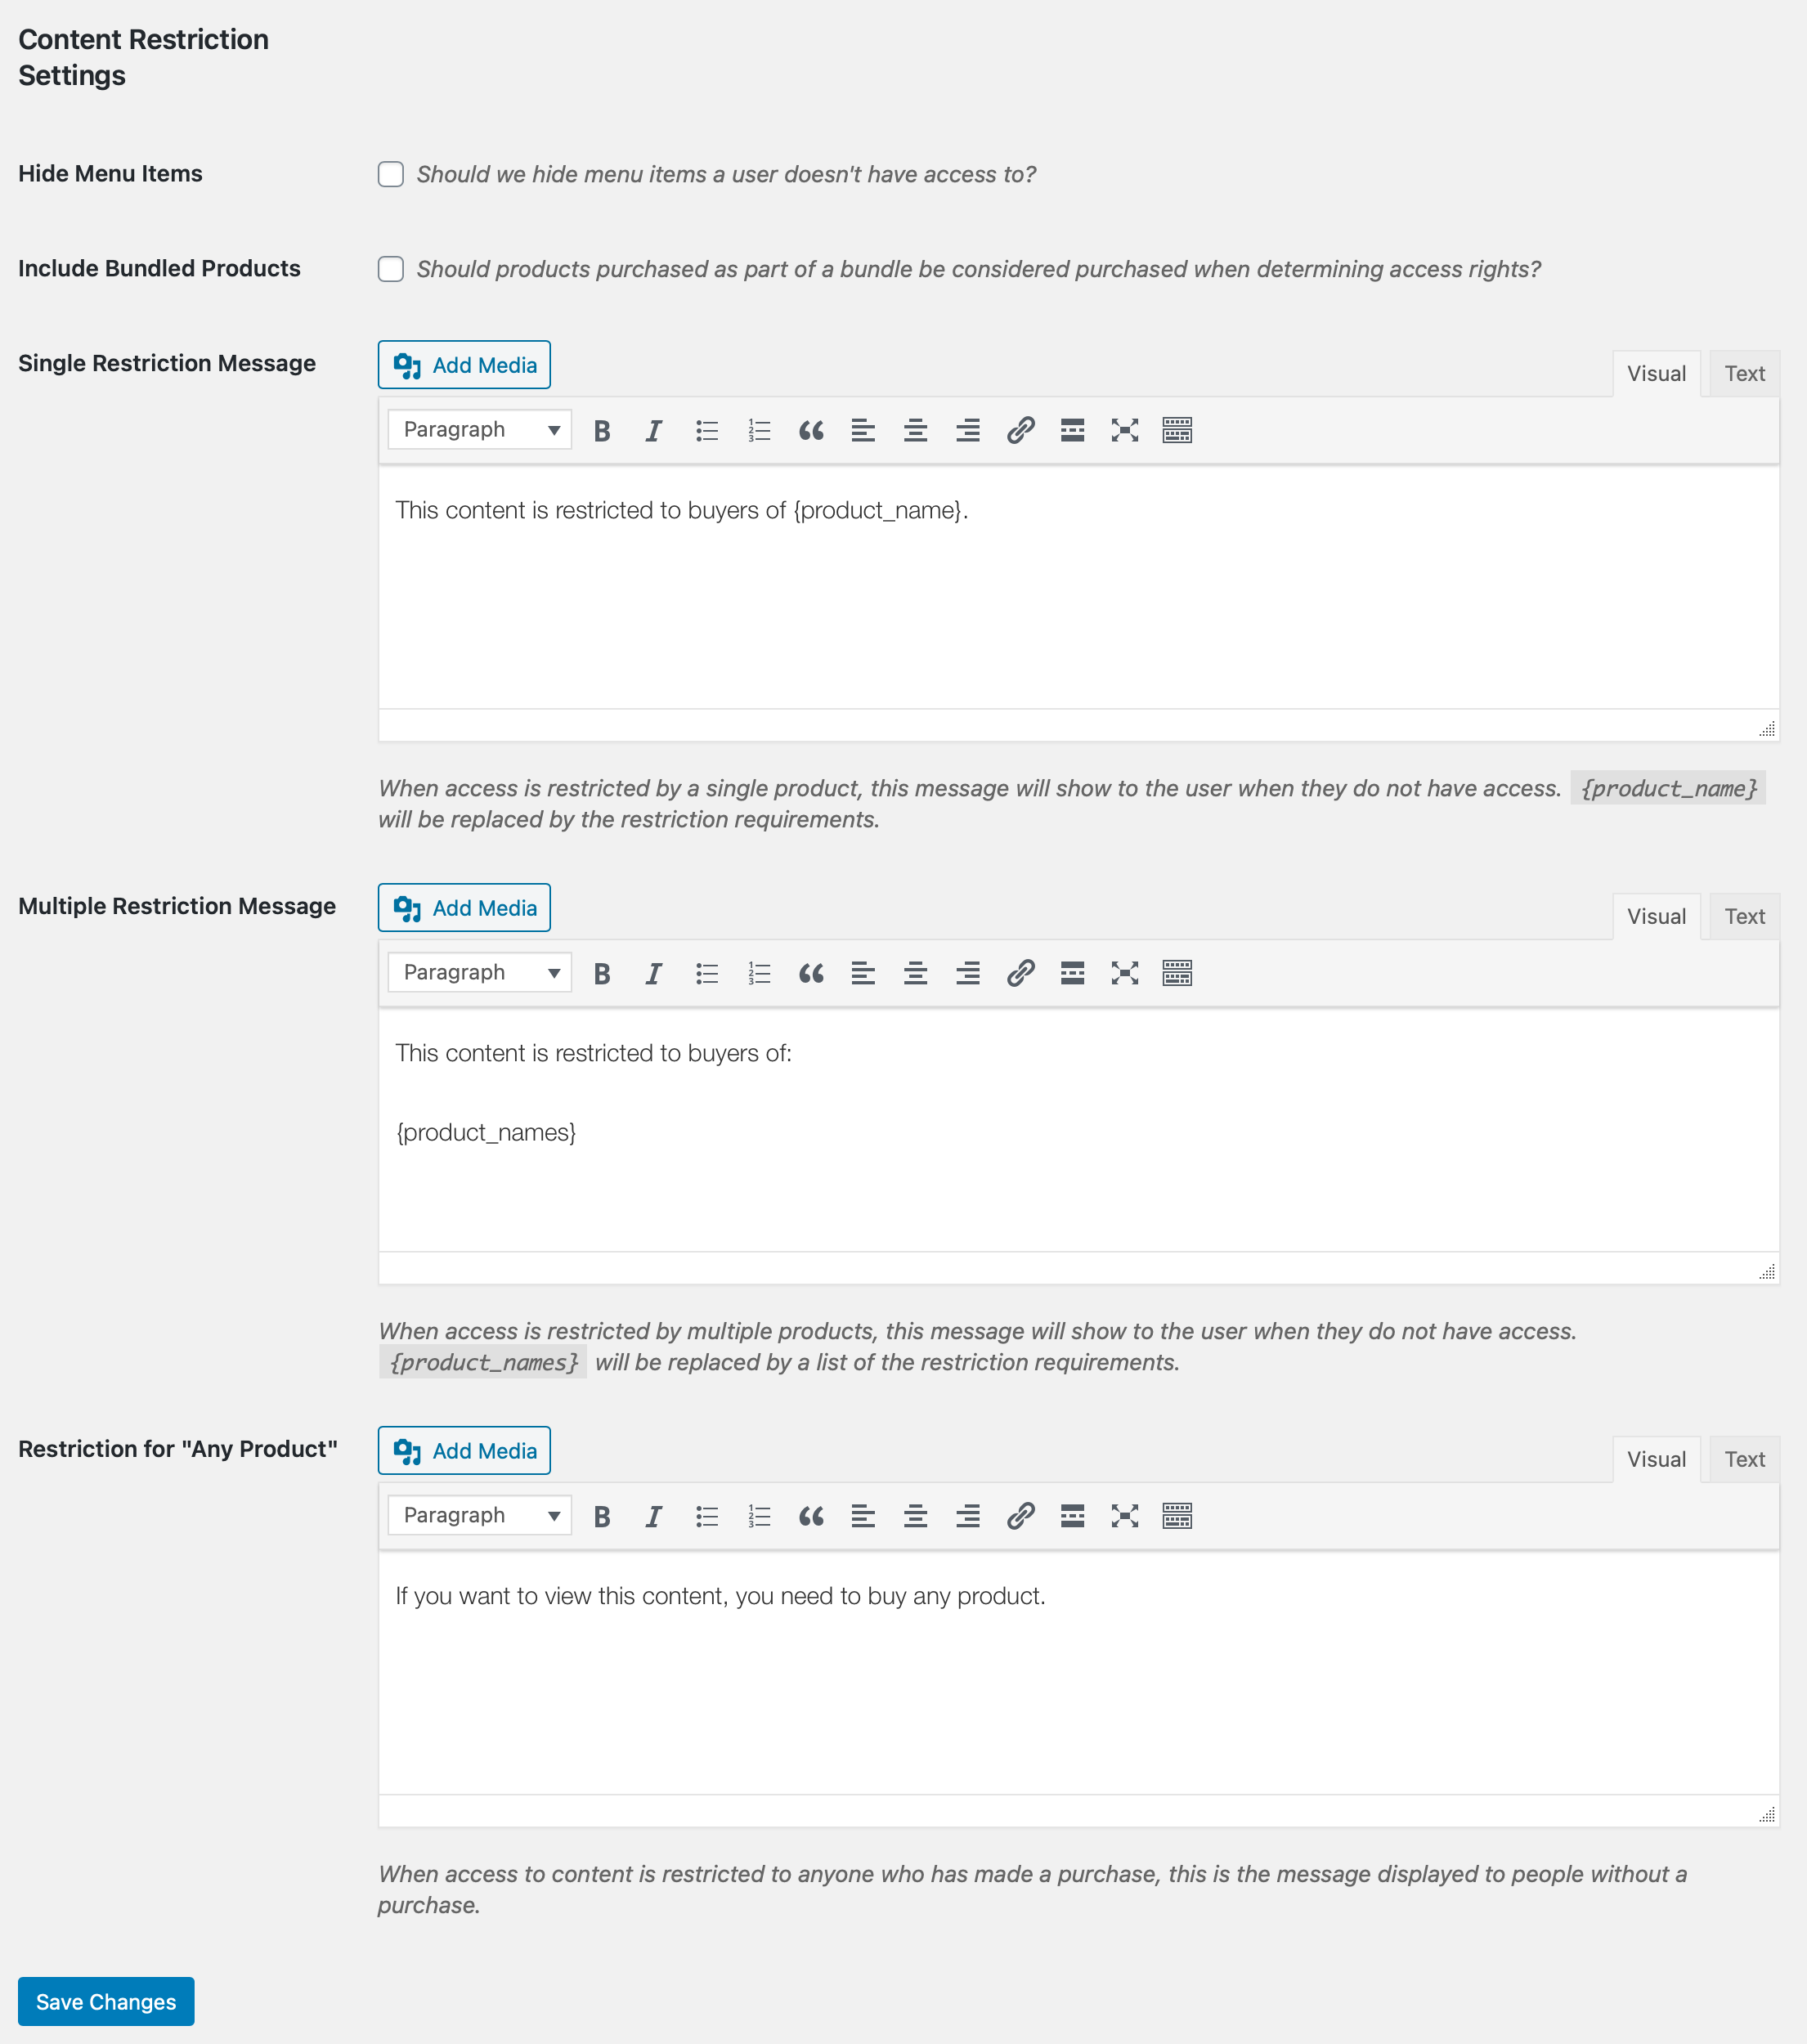
The global Content Restriction settings are located under Downloads → Settings → Extensions → Content Restriction.

Hiding Menu Items: Content Restriction allows you to hide navigation menu items from customers that have not purchased the necessary products in order to view the content. With this item checked, any navigation menu item that the customer does not have access to will be automatically removed from your site’s menus when that customer is logged in.
Include Bundled Products: In enabled, products included within a bundle will be considered purchased when determining Content Restriction access rights.
Single, Multiple & Any Product Messages: Use these fields to edit the messaging that appears to visitors that don’t have access to restricted content.
Frequently Asked Questions
How does the {page_list} email template tag order the unlocked pages?
The pages shown when using {page_list} are ordered based on the order that the items were added to the cart by the customer. If there are multiple pages that get unlocked because of a specific product being purchased, the order in which you’ve set up those restrictions is the order in which they are shown from there.
Here’s an example to help illustrate the order:
– You create “Page 1” and set it to be restricted to “Product A” on Jan 1, 2017.
– You create “Page 2” and set it to be restricted to “Product A” on Jan 2, 2017.
– You create “Page 3” and set it to be restricted to “Product B” on Jan 3, 2017.
If the customer puts “Product b” into their cart first, and then adds “Product a” after that, and then completes purchase, the order that {page_list} will show pages in will be:
– Page 3
– Page 1
– Page 2