
AWeber is a service that helps you manage email subscription lists. The Easy Digital Downloads AWeber feature helps you connect your AWeber account to your store. Customers can join your email list from a checkbox at checkout, and you can add buyers of a specific product to a list of its own.
Note: AWeber is a Pro feature included with all Easy Digital Downloads passes.
Getting Started
To use the AWeber feature, first ensure it’s enabled on your site. Go to Downloads » Extensions, find AWeber, and click Install. For help, see how to install an extension.
There are two separate ways customers get subscribed, and they work differently:
Global list (opt-in required): Customers only join your default AWeber list if they check the signup box at checkout.
Per-product lists (automatic): If you assign a list to a specific product, everyone who buys that product is subscribed to it when the purchase completes. The checkout signup box has no effect on this.
Keep this difference in mind before you set anything up, especially if you sell to customers in regions with email consent laws like the GDPR in Europe or CASL in Canada.
Connecting Your AWeber Account
To get started, go to Downloads » Settings » Marketing » AWeber.
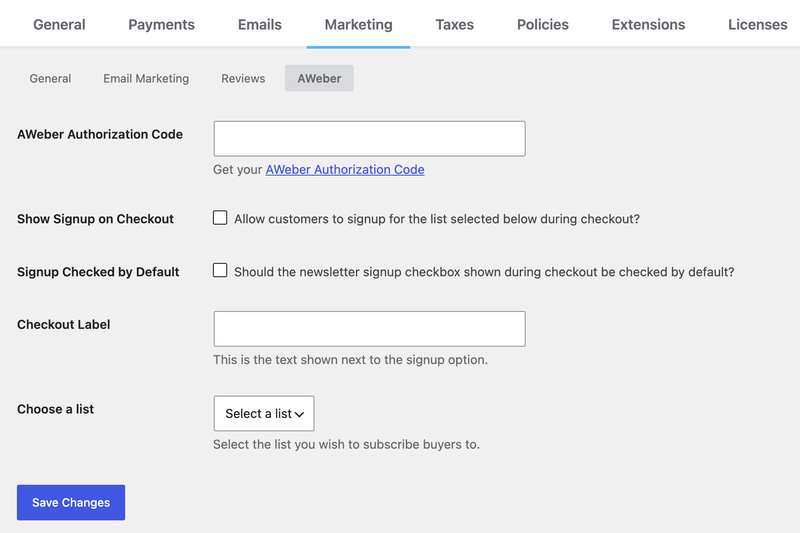
The first setting is the AWeber Authorization Code, which allows your site to communicate with your AWeber account. Click the link under the code field, which will open AWeber in a new tab.
Log in if you’re asked to, then approve the connection. AWeber shows you a long code made up of random letters and numbers.
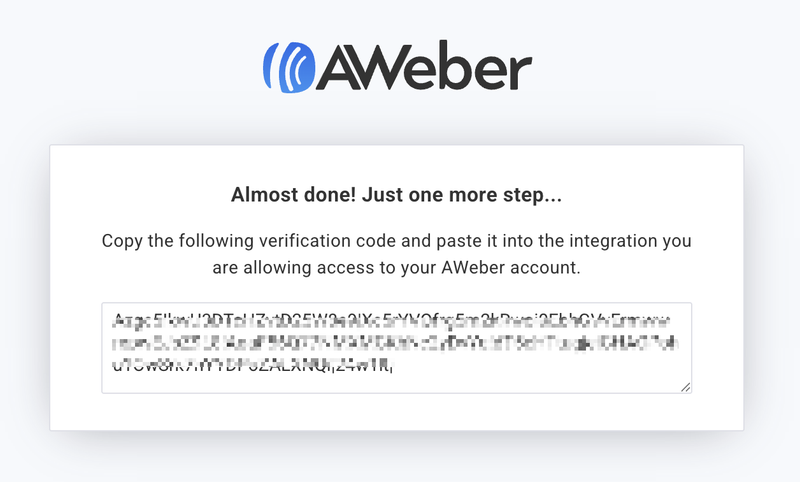
Copy the code, paste it into the AWeber Authorization Code field, then select Save Changes.
You’ll know the connection worked when the Choose a List dropdown fills in with the lists from your AWeber account. If the dropdown is empty after saving, the connection didn’t go through. See Troubleshooting below.
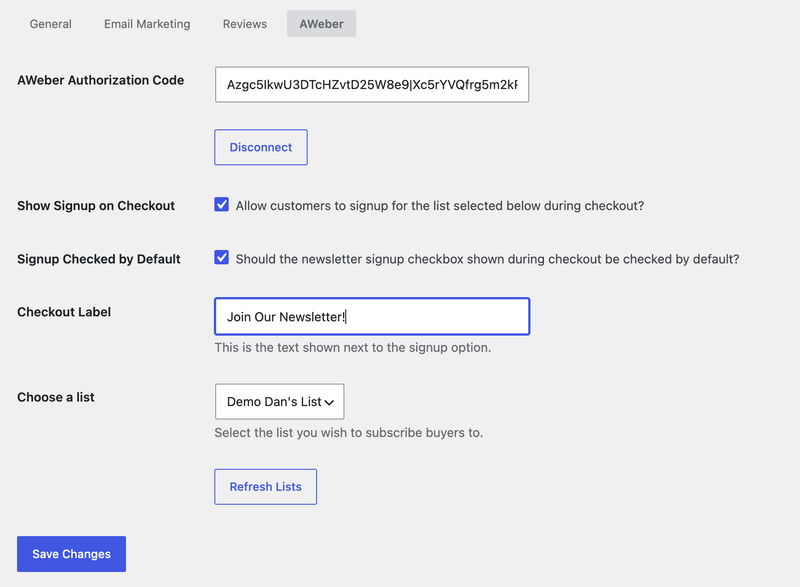
Once you’re connected, two buttons appear on the settings page:
- Disconnect: Removes the stored connection and clears your AWeber credentials from EDD. Use this if you need to connect a different AWeber account or start the setup over.
- Refresh Lists: Pulls a fresh copy of your lists from AWeber. EDD saves a copy of your lists for 2 hours so it doesn’t have to contact AWeber every time the page loads. If you create a new list in AWeber and it isn’t showing in EDD yet, click this button.
Checkout Signup Settings
These settings control the signup checkbox customers see at checkout. They only affect the global list. Lists assigned to individual products work differently, and that’s covered in the next section.
Show Signup on Checkout
Turn this on to add a signup checkbox to your checkout page. If a customer checks it, their name and email address are added to the list you pick in Choose a List.
If this setting is off, no checkbox appears at checkout, no matter what else you’ve set up.
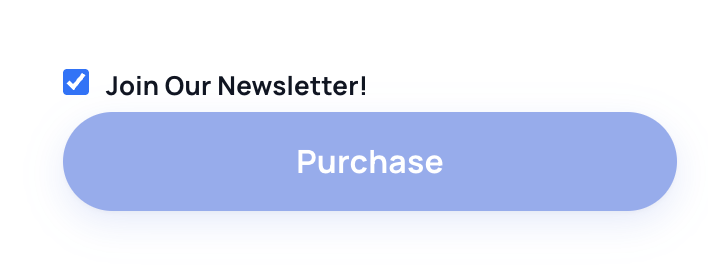
Signup Checked by Default
Turn this on if you want the checkbox pre-checked when the checkout page loads. Customers then have to uncheck it to skip your list.
Pre-checked signup boxes may not meet email consent requirements in some countries, including under the GDPR in Europe. Check your local requirements before enabling this setting.
Choose a List
Pick the AWeber list customers join when they check the signup box. Only lists that already exist in your AWeber account show here. If a list is missing, click Refresh Lists.
Checkout Label
Enter the text shown next to the signup checkbox. Something short and clear works best, like “Join our newsletter!”
Assigning Lists to Individual Products
Beyond the global list, you can attach one or more AWeber lists to any product from its edit screen. Open the product, look for the AWeber metabox in the right sidebar, and check the lists you want buyers added to.
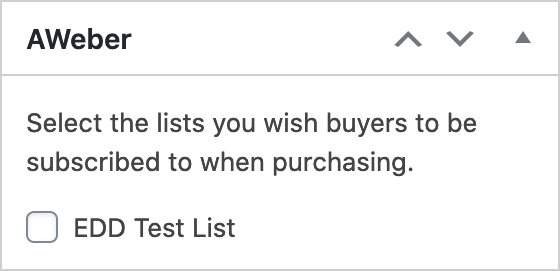
Important: Lists assigned to a product apply to every customer who buys that product, automatically, as soon as the purchase completes. The checkout signup checkbox only controls the global list from the section above. It doesn’t affect per-product lists.
This is a useful way to build a list of everyone who owns a specific product, so you can email them about updates, new versions, or security fixes. It also means customers land on those lists without having agreed to it at checkout. If your store sells to customers covered by GDPR, CASL, or similar laws, review your consent requirements before assigning lists to products.
What Gets Sent to AWeber
EDD sends two things to AWeber for each subscriber: the customer’s email address and their name. Nothing else.
No order details, product names, tags, or custom fields are sent. If you’ve used other email integrations that tag subscribers by what they bought, note that this one doesn’t. Per-product lists are the way to segment buyers by product.
Confirmation emails (double opt-in) are also not controlled here. Whether a new subscriber gets a confirmation email depends entirely on the settings for that list inside your AWeber account. If some subscribers get a confirmation email and others don’t, check each list’s settings in AWeber.
Troubleshooting
If the Choose a List dropdown is empty after saving your authorization code, the connection didn’t succeed. EDD doesn’t show an error message for this, so an empty dropdown is your signal.
The usual cause is a code that was pasted incorrectly, or an authorization that has expired. Click Disconnect, go back to AWeber for a fresh code, paste the new one in, and save again. Also make sure nothing on your server is blocking outgoing connections to AWeber.
EDD keeps a saved copy of your lists for 2 hours. Go to Downloads » Settings » Marketing » AWeber and click Refresh Lists to pull the latest ones from AWeber right away.
This is expected if the product they bought has an AWeber list assigned to it. Per-product lists apply to every buyer, regardless of the checkout checkbox. If you didn’t intend that, open the product and uncheck the lists in the AWeber metabox.
Go to Downloads » Settings » Marketing » AWeber and make sure Show Signup on Checkout is enabled. Save the page after turning it on.
Double opt-in is set per list inside AWeber, not in EDD. Open each list’s settings in your AWeber account to turn confirmation emails on or off.
Frequently Asked Questions
Does the checkout signup box control every list?
No. The checkbox only controls the global list you pick in Choose a List. Lists assigned to individual products are applied automatically to every buyer of that product, whether or not they check the box.
Can I make the signup box pre-checked?
Yes. Turn on Signup Checked by Default under Downloads » Settings » Marketing » AWeber. Pre-checked boxes may not meet consent requirements in some regions, including under the GDPR, so check your local rules first.
Where do I turn double opt-in on or off?
In AWeber, in the settings for each list. EDD doesn’t have a double opt-in setting for this feature.
How do I connect a different AWeber account?
Go to Downloads » Settings » Marketing » AWeber, click Disconnect, then follow the connection steps again with an authorization code from the other account.