
This document covers Legacy PayPal products which are no longer supported. We highly recommend updating your PayPal settings to the current version of PayPal.
See this document for details.
Table of Contents
PayPal Standard
Easy Digital Downloads comes with PayPal Standard built in. PayPal Standard is the most basic PayPal account you can get.
NOTE: A free PayPal Business account is required to connect to EDD. You can either upgrade an existing PayPal Personal to a Business account or create a new PayPal Standard Business account.
Settings
Settings are found under
Downloads → Settings → Payment Gateways → PayPal Standard.
1. PayPal Email Address
The first setting is your PayPal email address. This is the address associated with your PayPal account.

2. PayPal Image (Optional)
Next you have the option of uploading an image to display on the PayPal checkout page.

TIP: The image must be publicly accessible on the internet and stored on a secure (HTTPS) server for it to show on the PayPal checkout. Logos should be a maximum of 90 pixels wide by 60 pixels high and saved as a valid graphics format, such as .gif, .jpg, or .png.
NOTE: This was previously called PayPal Page Styles, but the page style options were deprecated by PayPal in favor of supplying an image.
3. PayPal Identity Token
Next, enter your PayPal Identity Token. This is required in order for payment records to be automatically marked as
Complete immediately after purchase.
 This token can be obtained from your PayPal account by following these steps:
- Log in to your PayPal account.
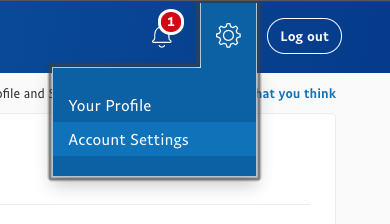
- Hover over the cog in the upper right corner of the screen and select Account Settings
- Under the Products & Services heading, click on Website payments on the left side of the screen
- Click the Update link next to Website Preferences
- Set Auto Return to On
- For the return URL, enter your website URL.
- In Payment Data Transfer, click the On option.
- Click Save.
- Your PDT identity token should now be visible in the Payment Data Transfer section on the page.
Copy the token to your clipboard and paste it into the
PayPal Identity Token field in Downloads → Settings → Payment Gateways → PayPal Standard.
4. IPN Settings
The PayPal Instant Payment Notification (IPN) service allows PayPal to communicate with your store, and mark transactions as complete, failed, refunded, etc.
The PayPal IPN will be configured automatically when using PayPal Standard but it is still important you can confirm it is enabled inside your PayPal account.
Log into your PayPal account and hover over the cog in the upper right corner of the screen, then select
Account Settings.
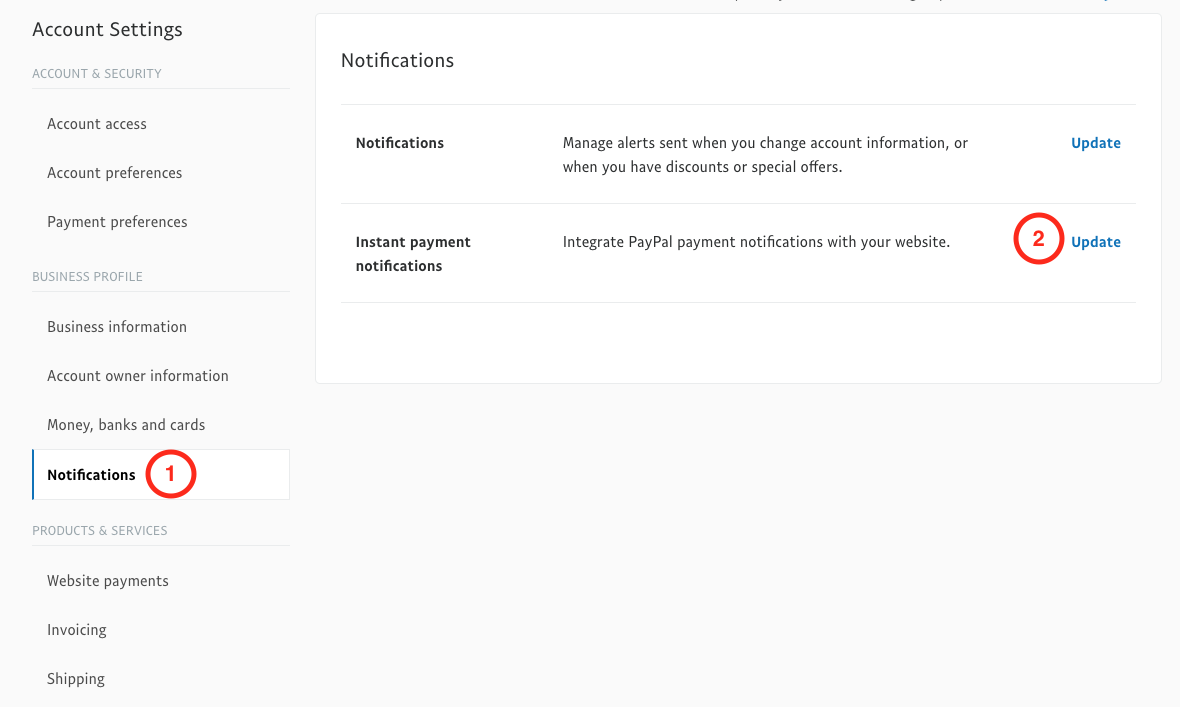
Click
Notifications on the left side of the screen, then click Update next to Instant Payment Notifications.
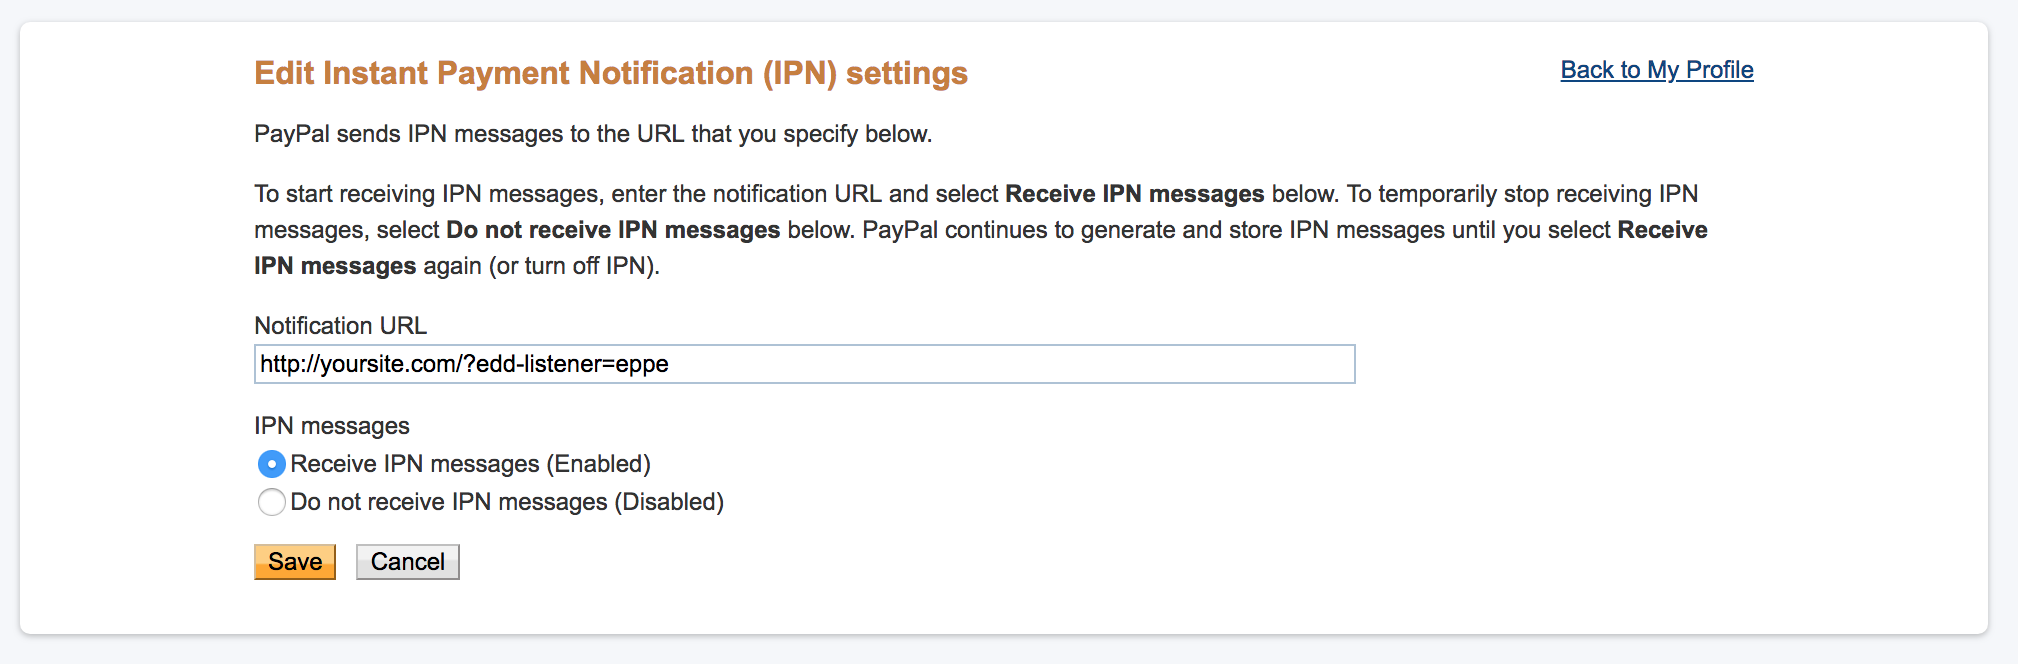
 Click the Edit Settings button, then enter your domain (including http or https) followed by ?edd-listener=IPN
Choose the radio button for Receive IPN messages (Enabled).

If the PayPal IPN is not working, you can disable IPN verification, which simply disables an extra verification step that is performed when IPN messages are processed.

NOTE: PayPal IPN verification requires an SSL certificate.
If you need to access your PayPal IPN history, see
this guide.
5. API Keys
PayPal API keys allow your store and PayPal to communicate more fully, allowing for more reliable communication as well as some additional features like
in-store refunds. This section needs API keys for Live and Test for:
- Username
- Password
- Signature
Full documentation on getting PayPal API keys is found below.
FAQ
What is the difference between PDT and IPN, and do I need both?
PDT (Paypal Identity Token) and IPN (Instant Payment Notification) are both ways that Paypal uses to tell your store that a Payment was successful, so that the status can be set to “complete”, releasing the files to the customer.
PDT is an alternative to IPN. You should use both to get the most accuracy from Paypal. You especially need to make sure that IPN is set up if you are using Recurring Payments.
Note: If you are using Commissions, it’s recommended to only use IPN. If both are enabled, there are instances where commissions can be recorded twice, if PDT and IPN are updated at different times.
My store’s Paypal payments remain as “Pending” and are not being set to “Complete”. What should I do?
This can happen for a number of different reasons. We have a list of possible solutions to help get this working properly here:
https://docs.easydigitaldownloads.com/article/190-payments-not-marked-as-complete
PayPal Express / Pro
About PayPal Pro and Express Gateway Extension
Easy Digital Downloads comes with PayPal Standard built-in.
PayPal Website Payments Pro and PayPal Express Gateway provides you with two additional PayPal options, PayPal Pro and PayPal Express:
PayPal Pro
PayPal Pro allows users to enter their credit card details during the checkout process and never leave your site, resulting in a better experience for the user, and more successful conversions for you.
Note: if using PayPal Pro to process credit cards, you must have an SSL certificate.
PayPal Express
When checking out with PayPal Express, the user experience is very similar to PayPal standard, except it is more secure. It also gives you the option to checkout via In-Context Checkout.
Supported Countries
PayPal Express and Website Payments Pro are not available in all countries. Please use the following links to determine if your country is supported.
If you receive an error saying “Merchant country not supported”, that means your country is not supported.
Setup:
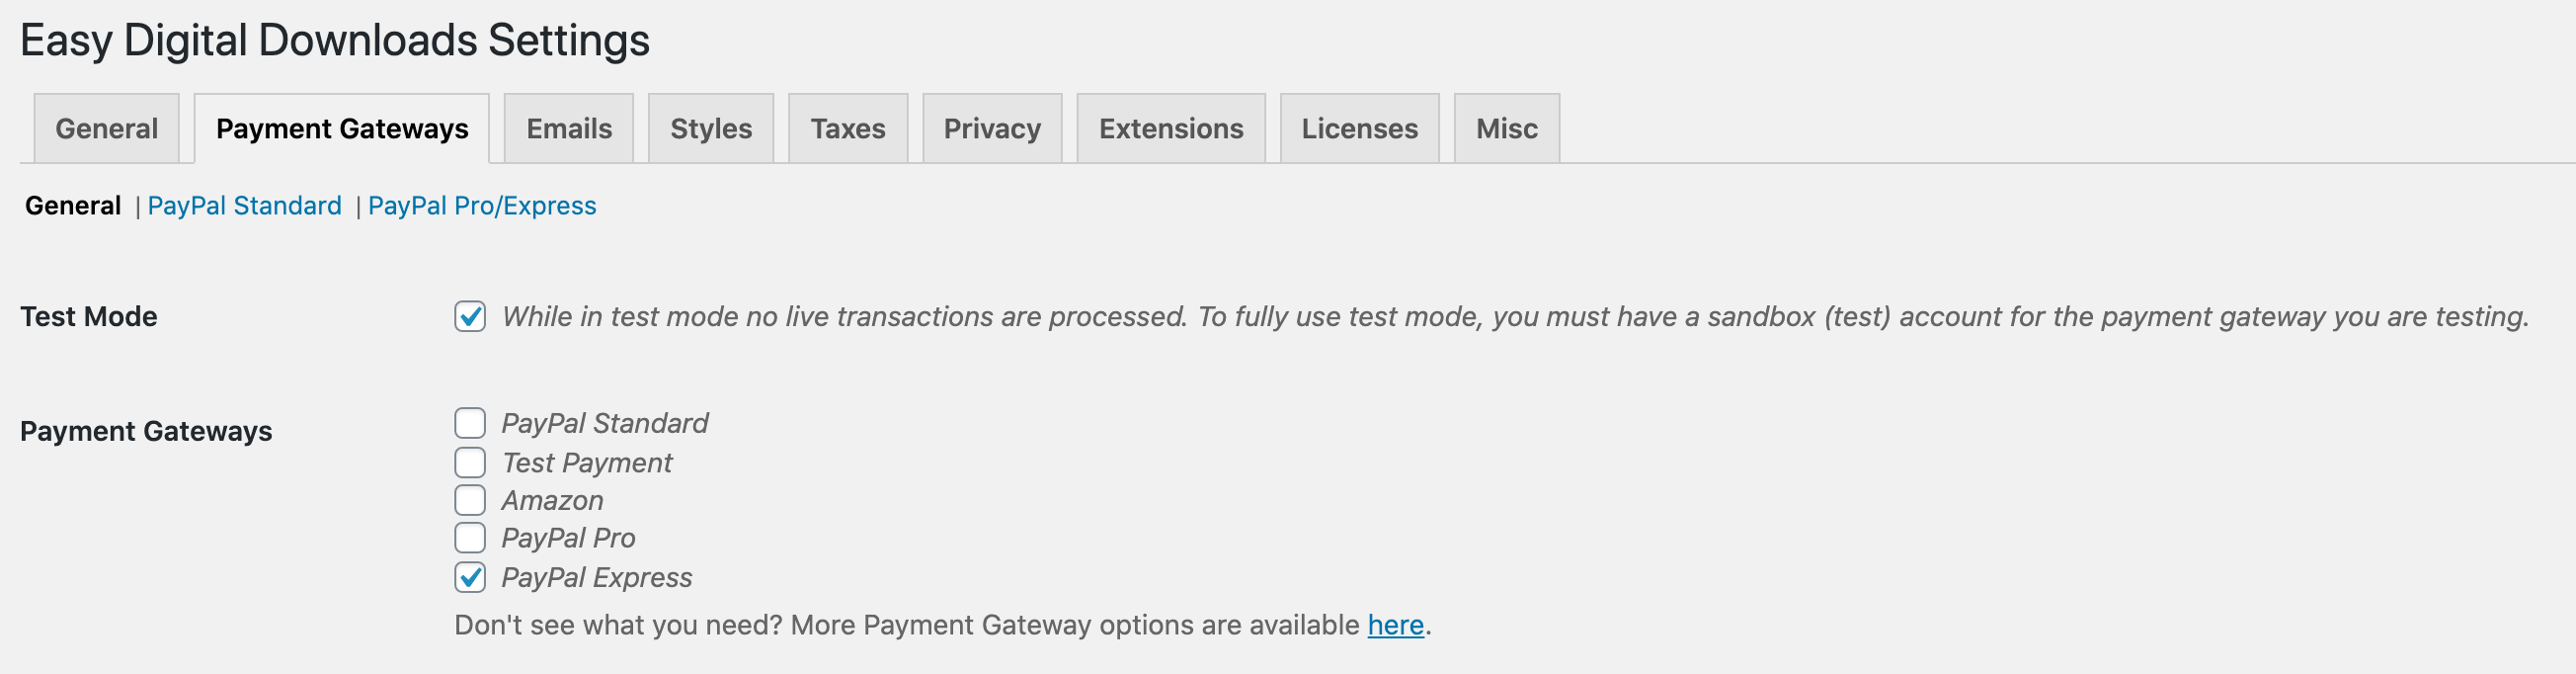
1. Enable Payment Gateway(s)
Navigate to Downloads → Settings → Payment Gateways. Enable the PayPal Payment Gateway(s) you want to use. It’s not required you enable both Pro and Express. If you enable PayPal Express, you should disable PayPal Standard if it’s currently enabled on your site.
2. Enter API Keys
Before either Website Payments Pro or the Express Gateway will work you must enter API keys on the Gateways settings page (Downloads → Settings → Payment Gateways → PayPal Pro/Express). PayPal API keys allow your store and PayPal to communicate more fully, allowing for more reliable communication as well as some additional features like
in-store refunds. This section needs API keys for Live and Test for:
- Username
- Password
- Signature
Full documentation on getting PayPal API keys is found below.
If you’d like a testing account on PayPal you can follow the instructions in
our PayPal Sandbox document.
3. IPN Settings
PayPal’s Instant Payment Notifications (IPN) are how PayPal communicates with your site to do things like confirm completed sales, failed sales, etc.
When using the Recurring Payments extension:
For recurring billing to work properly with PayPal Website Payments Pro and Express, it’s very important that your IPN settings are working properly.
Log into your PayPal account and hover over the cog in the upper right corner of the screen, then select
Account Settings.
Click
Notifications on the left side of the screen, then click Update next to Instant Payment Notifications.
You need to enable IPN messages and then set the Notification URL to: https://yoursite.com/?edd-listener=eppe
* Note: Replace “yoursite.com” with the appropriate name of your website.
Choose the radio button for Receive IPN messages (Enabled).
If you need to access your PayPal IPN history, see this guide.
4. In-Context Checkout (Optional)
In-Context Checkout works only with PayPal Express. To use
In-Context Checkout you must complete two settings. On the Downloads → Settings → Payment Gateways page you’ll find both of them.
You must check the box labeled “PayPal Express In-Context Checkout”:

and you must also provide your Live PayPal Merchant ID:

A merchant ID is required for In-Context Checkout. You can look up your merchant ID by logging into
https://www.paypal.com. Click the profile icon on the top right side of the page and then select Profile and settings in the Business Profile menu. (If you do not see the profile icon at the top of the page, click Profile, which appears in the top menu when the My Account tab is selected.) Click My business info on the left, and the Merchant account ID is displayed in the list of profile items on the right.
You may
read more about In-Context Checkout at PayPal.com.
5. Test PayPal
Setup PayPal Sandbox and enable Test Mode (Downloads → Settings → Payment Gateways) to test the the gateway.
FAQ and Troubleshooting
Is this extension PCI compliant?
Being PCI compliant is a requirement of Paypal if you are using their PayPal Payments Pro system. This extension is coded to be PCI compliant. It does not store any credit card information. Instead, it simply transmits the user-entered information to Paypal. However, in order to be fully PCI compliant, your website needs to send and receive all data in a secure and encrypted way. You can do this by setting up an SSL certificate and forcing all pages to use it. If you need assistance with setting up an SSL certificate and forcing all data to be sent/received through HTTPS, we recommend contacting your webhost as they will be the ones equipped to set that up for you. Thus, it is important to note that you need to confirm with your webhost that you are PCI compliant as well
What is the difference between PayPal Express and PayPal Standard?
PayPal Standard (which is included with Easy Digital Downloads for free), sends the user to PayPal to complete their purchase. Whereas with PayPal Express, while the user is sent to PayPal to agree to the purchase, it is not actually completed until they are back on your site. This is less prone to have communication issues with PayPal and results in payments being more reliably set to “Complete” in your Easy Digital Downloads store. It’s common to have difficulty with Pending or incomplete payments when PayPal Standard is used, as PayPal relies on its own IPN (Instant Payment Notification) service. This service can fail for various reasons, and since it’s owned by PayPal, our support team has a limited ability to troubleshoot IPN-related issues.
Error: Security error Security header is not valid
If this error appears on checkout, it’s likely due to incorrect API credentials. Verify your API credentials are correct.
PayPal Advanced
Accept Credit Cards and PayPal directly on your WordPress site and offer a seamless checkout experience
This PayPal gateway add-on allows you to accept credit cards and PayPal payments directly on your site through your
PayPal Payments Advanced account. When purchasing downloads through the PayPal Payments Advanced gateway, users enter their credit card details during the checkout process and never leave your site, resulting in a better experience for the user, and more successful conversions for you.
What is PayPal Payments Advanced?
Keep customers on your site for the entire checkout process without the full burden of protecting their financial data. In addition to a merchant account and gateway in one, PayPal provides you with a secure checkout template to integrate within your website for only $5 a month. Your customers won’t know that PayPal is processing their payment, making your business look more secure and professional.
Installation and Setup
Installation
Once this extension is
installed and activated, go to WordPress admin → Downloads → Settings → Payment Gateways, then enable the PayPal Payments Advanced.
Licensing
Enter your EDD PayPal Payments Advanced license key by clicking on”Settings” under the Downloads menu, and navigating to the Licenses tab. You can find this license key in your email receipt that you received while making your purchase on
https://easydigitaldownloads.com
Setting up your PayPal Manager Account
If you haven’t already applied for your PayPal Payments Advanced account, you’ll need to do that first. This application will walk you through setting up a PayPal Manager account, which allows you to tie in to the PayPal Payments Advanced service. Note that your new PayPal Manager login information will be separate from your normal PayPal Account login information.
Apply for a PayPal Payments Advanced account
In step 2 of your application for PayPal Payments Advanced, you are asked to create a PayPal Manager Account and enter your business information.
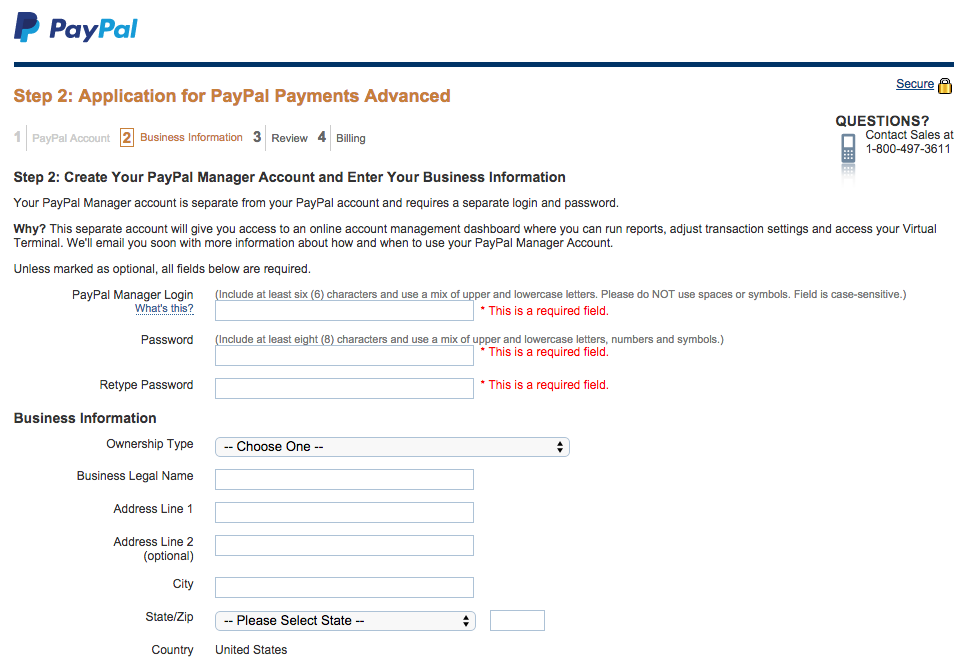
This separate account will give you access to an online account management dashboard where you can run reports, adjust transaction settings and access your Virtual Terminal. We’ll be using this PayPal Manager Login and Password to finish setting up the EDD PayPal Payments Advanced plugin.
NOTE: Your PayPal Manager login information is separate from your PayPal Account login information.
Login to your PayPal Manager account at
https://manager.paypal.com using your Partner ID, Merchant Login, and Password:
- Partner ID: PayPal
- Merchant Login: [Your PayPal Manager Login]
- User: [Leave this blank]
- Merchant Password: [Your PayPal Manager Password]
Configure PayPal’s Manager Settings
Now that you’re logged in, you need to modify your settings to ensure that your PayPal transactions are completed successfully and securely. To do this, click on the “Service Settings” tab. Under the “Hosted Checkout Pages” section, click “Set Up”.
There are quite a few settings on this page, but most are actually taken care of by the EDD PayPal Payments Advanced plugin behind the scenes. Configure this settings page to match the settings in the following screenshot:
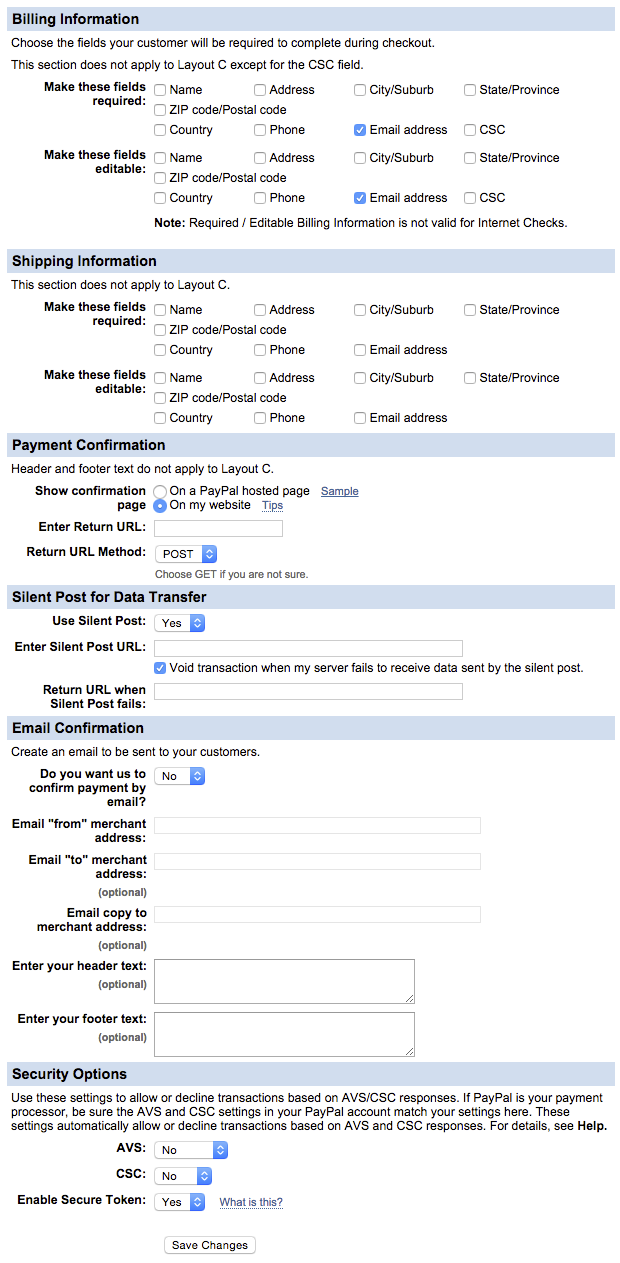
Summary of Changes
Billing Information / Shipping Information
You can optionally require your PayPal checkout to capture your customers’ name, billing address, email address etc. by choosing the corresponding”Required” and “Editable” checkboxes under the “Billing Information” section on the same page. The minimum suggested options to mark as checked here are the two “Email address” checkboxes.
Payment Confirmation
- Select the radio button for the option that reads ;”On my website” next to the “Show confirmation page” setting.
- Choose “POST” in the dropdown box next to the “Return URL Method”setting.
Silent Post for Data Transfer
- Choose “Yes” in the dropdown box next to the “Use Silent Post” setting.
- Enable the checkbox next to the setting which reads “Void transaction when my server fails to receive data sent by the silent post.”
Security Options
- Find the “Enable Secure Token” option, and choose “Yes” from the dropdown next to it.
After you’ve configured your settings, remember to click the “Save Changes”button at the bottom of the page.
Enabling PayPal’s Secure Token
Now that you’re logged in, you need to tweak your settings to ensure that your PayPal transactions are completed securely. To do this, click on the “Service Settings” tab. Under the “Hosted Checkout Pages” section, click “Set Up”.
Scroll to the bottom of this page to find the “Enable Secure Token” option, and choose “Yes” from the dropdown next to it. Then, click “Save Changes”
You can also optionally require your PayPal checkout to capture your customers’ name, billing address, email address etc. by choosing the corresponding”Required” and “Editable” checkboxes under the “Billing Information” section on the same page. The minimum suggested options to mark as checked here are the two “Email address” checkboxes.
Creating a PayPal EDD User
We’re now going to create a new user that connects your EDD site to your PayPal Manager account. Once you are logged in, click on the “Account Administration” tab. Under the “Manage Users” section, click “Add User”.
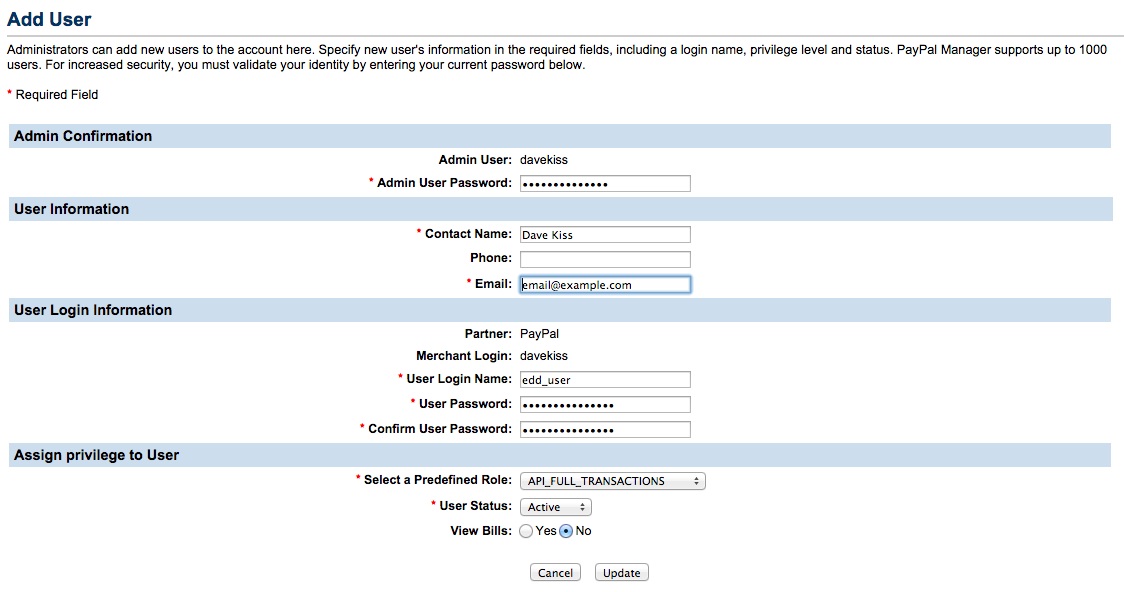
Fill out the form as it applies to you. Once you reach the “Assign privilege to user” section at the bottom, use the following settings:
- Select a Predefined Role: API_FULL_TRANSACTIONS
- User Status: Active
- View Bills: No
Connecting PayPal to your EDD Site
Now that you have an EDD user in our PayPal Manager account, you need to tell your site to process transactions with those user credentials.
You can enter your user credentials on your EDD site by clicking on “Settings”under the Downloads menu, and navigating to the Payment Gateways tab.
Here, under the PayPal Payments Advanced – Manager Settings section, we’ll enter all the info we need to establish this connection:
- Live PayPal Manager Partner: “PayPal”
- Live PayPal Manager Vendor: [Your PayPal Manager Login, e.g. “davekiss”]
- Live PayPal Manager Username: [Your PayPal EDD User, e.g. “edd_user”]
- Live PayPal Manager Password: [Your PayPal EDD User Password]
Don’t forget to click the “Save Changes” button at the bottom. You’re now all set up and ready to accept live transactions with PayPal Payments Advanced!
You can activate the payment gateway on your store by clicking the PayPal Payments Advanced checkbox at the top of the Payment Gateways tab.
Optional: Customizing a PayPal template
PayPal Payments Advanced allows you to customize your payment page. You can customize the header, background, title, button, and the order summary column of your payment page.
PayPal offers three design templates for you to choose. Template A is the default template but you can choose from any of the three templates offered, including Template C, which allows you to embed the payment fields directly on your site.
To customize a template, login to your PayPal Manager account at
https://manager.paypal.com using your Partner ID, Merchant Login, and Password.
Then, click the Service Settings tab, and under the Hosted Checkout Pagessection, click the Customize link. You can
see the PayPal documentation for more info..
Once you have a PayPal template designed and configured, you need to tell your EDD site which template you’d like to use during checkout.
You can do this on your EDD site by clicking on “Settings” under the Downloads menu, and navigating to the Payment Gateways tab.
Here, under the PayPal Payments Advanced – Manager Settings section, select the appropriate template option in the PayPal Template dropdown box.
Optional: Using in Test/Sandbox Mode
If you’d like to use EDD PayPal Payments Advanced while your EDD site is in test mode, you’ll need to set up a separate PayPal Manager Testing Account that only handles test transactions.
To start, visit the PayPal Registration Page and click Continue. This will take you to the test account signup page.
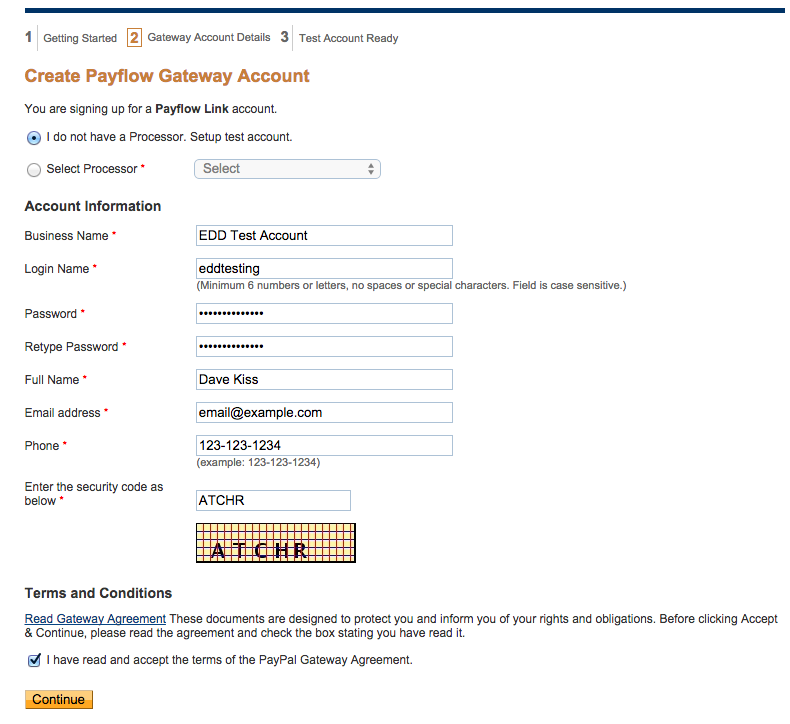
On this page, make sure to select the option that reads “I do not have a Processor. Setup test account.” Fill out the account information as it pertains to you, choosing a new username and password for this test account.
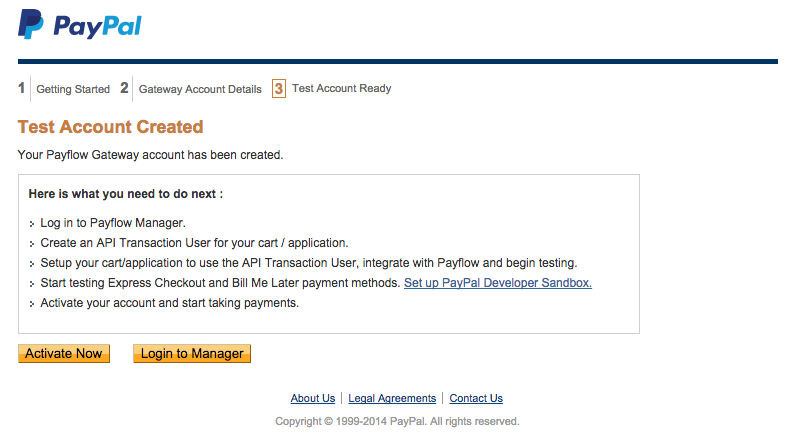
Under Terms and Conditions, you’ll need to click the “Read Gateway Agreement” link, which will enable the checkbox to agree and accept to the PayPal Gateway Agreement. Click Continue, and if all goes well, you should see this screen.
Now that you have a PayPal Manager testing account, you need to tell your site to process test transactions with those user credentials.
You can enter your testing user credentials on your EDD site by clicking on”Settings” under the Downloads menu, and navigating to the Payment Gateways tab.
Here, under the PayPal Payments Advanced – Manager Settings section, we’ll enter all the info we need to establish this connection:
- Test PayPal Manager Username: [Your PayPal Manager testing account username, e.g. “edd_test_user”]
- Test PayPal Manager Password: [Your PayPal Manager testing account Password]
Don’t forget to click the “Save Changes” button at the bottom. You’re now all set up and ready to accept test transactions with PayPal Payments Advanced!
How to get PayPal API keys
A variety of extensions for Easy Digital Downloads use PayPal API keys. This document will show how to get Live API keys. The process for getting Test API keys is
documented in our PayPal Sandbox doc.
Creating Keys
First go to https://www.paypal.com/us/cgi-bin/webscr?cmd=_profile-api-access. Log in with your normal PayPal account. Once you’re logged in, find the box labelled NVP/SOAP API Integration. In that box click Request API credentials.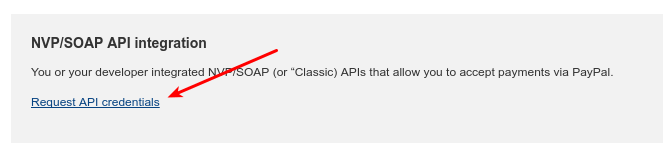
On the next page look for the box labelled
Request API signature. Make sure the radio button in there is checked, and then click Agree and Submit.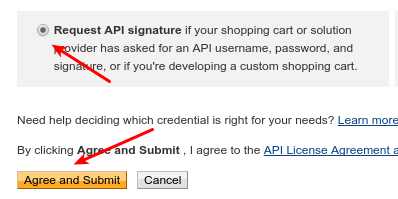
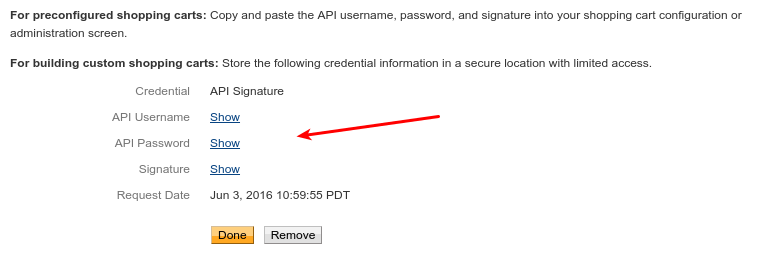
On the next page you’ll have a list of the
- API Username
- API Password
- Signature
each with a Show link next to it. Clicking Show will will reveal the proper string for each item.
Entering Keys in EDD Settings
Once you have those three items, in the WordPress admin go to Downloads → Settings → Payment Gateways → PayPal Standard and you’ll find fields to enter them in.

Getting Test API Keys
Getting Test API keys is documented in our PayPal Sandbox document. Take the Seller keys created there and enter them into the Test API fields you find under the Live API fields on the settings page mentioned above.


