Easy Digital Downloads Documentation
Documentation, Reference Materials, and Tutorials for Easy Digital Downloads

2Checkout Gateway Configuration

At this time the 2Checkout extension is no longer available for purchase. Customers who have previously purchased the extension are welcome to continue using it on their site(s).

To configure 2Checkout payment gateway follow these steps:

1. Set up 2Checkout in EDD

Sandbox Mode

Sandbox mode no longer works with our extension, so 2Checkout payments will have to be tested with real payments.

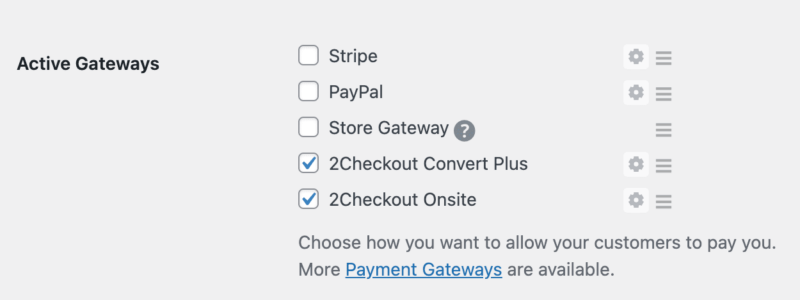
Once installed and activated , go to Downloads → Settings → Payment Gateways.

You will have the option to enable one or both of the 2Checkout gateways:
2Checkout Gateway Option:

Purchases made with 2Checkout will send customers to the 2Checkout website where they will complete the purchase.

2Checkout Onsite Gateway Option:

Purchases made with 2Checkout Onsite will keep customers on your website and allow them to enter their credit / debit card details on the checkout screen. Note: this option requires that you have an SSL certificate installed on your website.

After you have chosen which gateway options you want to use, enter your 2Checkout account information:

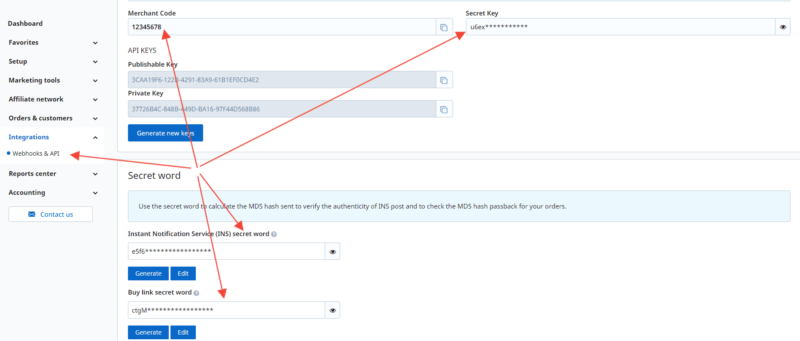
Note: The 2Checkout Account Number is labeled as the Merchant Code in 2Checkout’s settings and the Secret Word is the Secret Key in the API 2Checkout settings. This wording will be fixed in the next 2Checkout release.

From your 2Checkout account, account information is located under Integrations / Webhooks & API. The Publishable and Private API are only needed for onsite purchases with credit / debit cards.

2. Setup Instant Notification Service (INS) in 2Checkout

Important!

If INS is not properly configured, purchase processing will not work.

2Checkout’s Instant Notification Service allows 2Checkout to communicate with your store, keeping transaction data in sync. INS must be set up properly for purchase processing and recurring billing to work.

From your 2Checkout account, navigate to the Integrations / Webhooks & API screen and enable all notifications (INS & Global INS). The URL should be set to:http://example.com/index.php?edd-listener=2COINS

Replace “example.com” with the appropriate name of your website.

Canceling Subscriptions

When using 2Checkout, a cancellation may be initiated either from within EDD or from the 2Checkout Dashboard.

EDD Subscription Cancellation Setup

Due to limitations of the 2Checkout API, cancellation options inside the EDD admin interface will only be available if you place a special username and password inside of your wp-config.php file.

1. Create an API user role

  1. From the 2Checkout Dashboard, click your username at the top right, then go to SettingsManage user accessView rolesAdd role
  2. Enter a role and description. This is only for your information, any name and description will do.

  3. Under Privileges, only Api read/write should be selected. Deselect all other privileges.
  4. Save role.

2. Create a new user in your 2Checkout account and give them API access.

Click the View users → Add user after creating the role
OR
From the 2Checkout Dashboard, click your username at to top right then go to SettingsManage user access → Add User.

Fill out the required information for the API User. Make sure the following items are properly configured:

  • Set Password lifetime to Never expires.
    If the password expires, it will prevent subscriptions from working on your site. If you want this feature, we recommend manually updating the password so the new password can be added to your WordPress site at the same time to prevent problems.
  • Deselect “Require user to change the password on the first login”
  • Select the API user role

3. Add the username and password of the newly created user to your wp-config.php file:

define( 'TWOCHECKOUT_ADMIN_USER', 'USER NAME HERE' );
define( 'TWOCHECKOUT_ADMIN_PASSWORD', 'PASSWORD HERE' );

To cancel a subscription from the EDD admin

Go to Downloads → Subscriptions and click View on the item you want to cancel.

Then in the bottom of the next screen click on Cancel Subscription.

When you set a subscription to canceled, it’s canceled immediately, but the customer will still have access to their purchased material for as much time as they’ve paid for.

Example: Your customer paid $10/mo, and you cancel halfway through the month. They still have access to their material for the rest of the month, but they won’t be re-billed, and access will stop at the end of the month.

To cancel a subscription from the 2Checkout Admin

  1. Go to Subscriptions management.
  2. Search for the subscription and edit its settings.
  3. Click Stop automatic billing.
  4. Enter the number of billing cycles to cancel the subscription after.
  5. Enable the Cancel subscription when automatic billing ends option.
  6. Click Apply.
  7. Once disabled, you can switch it back on, provided that payment data is available.

Note: EDD will always stop “After a specified number of billing cycles”, therefore it doesn’t matter if choose to stop automatic billing Now or After a specified number of billing cycles.

Click to see the 2Checkout documentation for details

Canceling Summary

It doesn’t matter if you cancel a subscription in EDD or in 2Checkout, the effect is exactly the same and the customer won’t notice a difference.

Refunds

When using the 2Checkout payment gateway, refunds are processed the same way as any other transaction. Read our full documentation on refunds here.

Additionally, refunds may be processed from within the 2Checkout admin also.

  1. Go to Orders & customers → Order search.
  2. Select the eStore orders tab.
  3. Use the filters to search for the order that you want to reimburse.
  4. Click the order reference number.
  5. Click Request refund.
  6. Choose the Total refund type.
  7. Fill in the details of the reimbursement, including whether or not to re-use keys or disable subscriptions.
  8. Fill in the cancellation reason box.
  9. Click Request refund.

Click to see the 2Checkout documentation for details

Troubleshooting

INS Failures

If you find that your INS requests are failing, make sure you’re using the same protocol for all requests. For example, if you make your request via HTTP, but then require HTTPS for incoming requests (from 2Checkout for example) then they’ll fail, since they don’t match.

Error: Unauthorized

This notice can happen when the billing address is not filled out. The billing address is required, so hiding or removing it will cause the transaction to fail.

Bad request – parameter error

If you receive this error, it means one of two things:

1. Your 2Checkout account has not been fully approved. Contact 2Checkout’s support team to confirm and to fully activate your account.

2. Not all required fields are being sent to 2Checkout. This could happen if you have removed the billing address or other required fields on the checkout form. To resolve the problem, restore the fields that were removed.

Can customers update their credit card information?

No. If you have a customer setup on a subscription, 2Checkout does not currently allow them to update their credit card information. Additional information is available on the 2Checkout website.

Note: In 2018 2Checkout updated its user interface, so it’s possible some settings were changed/moved when the update occurred. If anything is not working as expected, review all settings in this document and

500 Internal Error Page On Purchase

Example of PHP error: PHP Fatal error: Uncaught Twocheckout_Error: [0]: Invalid Username/Password thrown in /var/www/html/wp-content/plugins/edd-2checkout/sdk/lib/Twocheckout/Api/TwocheckoutUtil.php

If you are seeing a PHP error related to an Invalid Username/Password, it’s related to the API User. Confirm the API User’s Password lifetime setting is set to “Never expire”, then update the password. Update your wp-config.php file with the new password.

Canceling EDD Subscription Does Not Cancel 2Checkout Subscription

To fix, confirm the API’s user role is properly set to “API read/write” and confirm “API read-only” is deselected, as detailed in the documentation above.

Subscription Cancel Button Missing and/or Renewals Are Not Recorded In EDD
First, review the subscription details in EDD, the Profile ID should not start with 2Checkout and it should match the 2Checkout subscription ID. If they do not match, update the Profile ID with the correct Subscription ID. Otherwise, review all documentation to confirm 2Checkout is properly configured.
If the Profile ID is incorrect for a couple of transitions, there may have been a temporary communication issue. If most or all subscriptions have the wrong Profile ID, first confirm that 2Checkout is properly configured per the instructions above, specifically INS. If everything is properly configured, reach out to support so we can further investigate.