Are you looking to set up credit card payments for your WordPress website?
With the right WordPress plugin, configuring your eCommerce store for accepting online payments is pretty easy.
🔎 In this article, I’ll cover:
Choosing the Right Payment Plugin
The best WordPress payment plugin to use depends on a handful of factors. For example, what type of item(s) are you selling? Are you offering a service?
Use the chart below to learn about some of the most popular eCommerce plugins and decide which option is best for your specific needs.
| Use Type | Suggested Solution |
|---|---|
| 💻 🎮 📱 🧑🏽🔧 Selling Digital Products or Services | Easy Digital Downloads (EDD) • Great for selling downloads like eBooks, graphics, document templates, software, themes, or plugins. • Also good for selling service ‘packages’ like logo design or other creative/digital services delivered over the internet. • Has flexible checkout options (shopping cart or buy-now buttons), test mode ➡️ Get Started with EDD |
| 🧾 ⛪️ 💒 🕌 Accepting Payments or Donations | WP Simple Pay or WPForms • These plugins are good for simple payment forms when you don’t need a full online store or shopping cart. Great for donations or professional services with online billing. ➡️ Learn More about WP Simple Pay or WPForms |
| 👕 ☕️ 💄 🛍 Selling Physical Products | WooCommerce • The WooCommerce plugin is great if you are selling physical products like apparel, food, health, or beauty products. • Offers flexible checkout options (shopping cart or buy-now buttons, may require extensions) ➡️ Learn More |
Set Up Credit Card Payments With EDD
If you’re selling digital files/products or services, the best way to accept credit cards is with Easy Digital Downloads (EDD):

EDD turns your WordPress site into a full-featured eCommerce website store with just a few clicks. You don’t need to know how to code or hire a developer to use our advanced payment processing functionality.
Unlike other eCommerce platforms, EDD is laser-focused on being the best way to sell digital products. You can sell an unlimited number of items, manage customers, and use payment processors like Stripe or PayPal (along with many others).
I’ll show you how to easily set up credit card payments with Stripe, our recommended payment gateway.
With EDD, Stripe isn’t an after-thought addon, it’s fully integrated.
Step 1: Install Easy Digital Downloads
First, install and activate Easy Digital Downloads. This will get you access to all of our payment gateways as well as features like email integration and subscription payments.
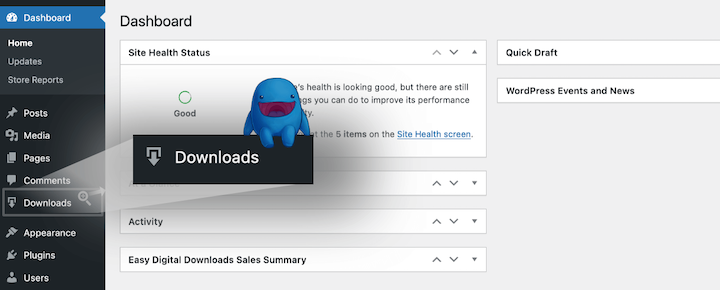
When EDD is installed on your site, you’ll have a new menu item called Downloads. Look for it on the left side of your WordPress dashboard:
Sep 2: Connect Easy Digital Downloads & Stripe
Before we start, be sure to make sure Stripe is available in your country. If it’s not, I suggest PayPal payments as another great option. Click here to learn about PayPal setup.
Next, integrating EDD with Stripe is easy, especially if you already have a Stripe account. You won’t have to manage or copy/paste API keys.
Setup with a Pre-Existing Stripe Account
If you have a Stripe account, you basically only have to hit one button.
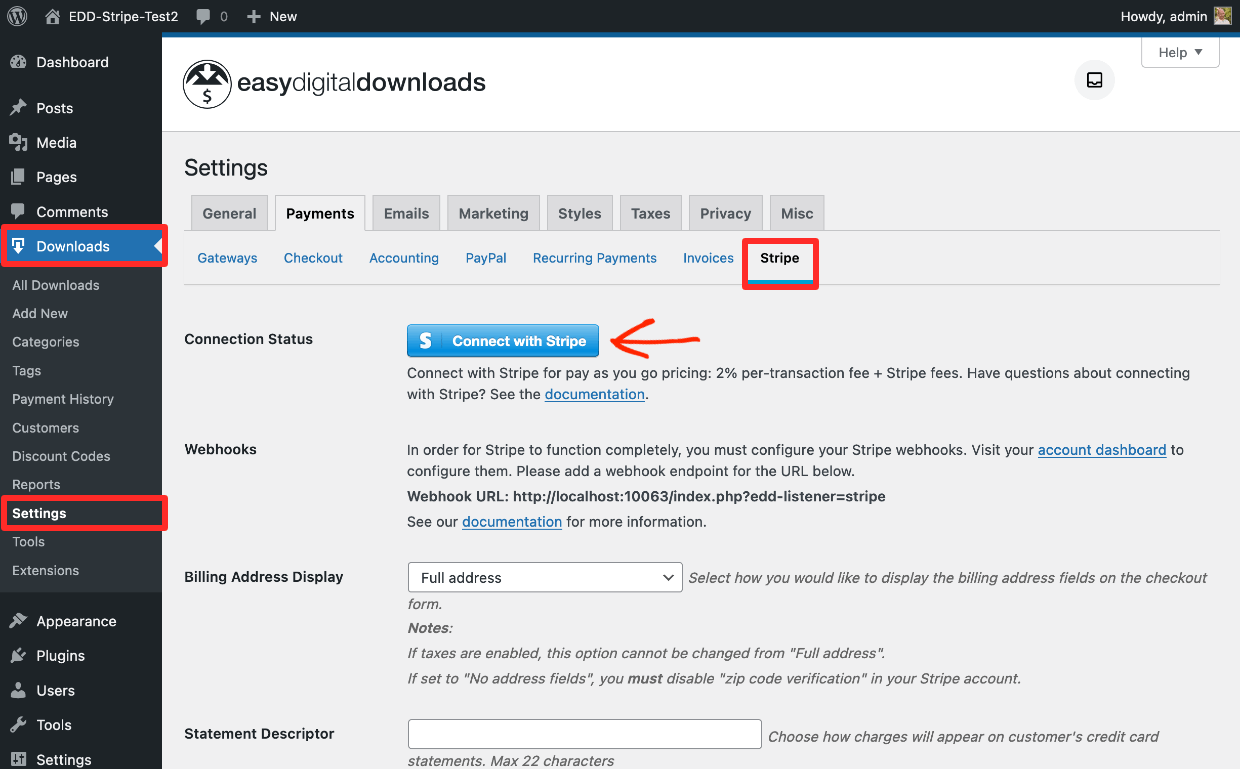
From your WordPress dashboard go to Downloads » Settings » Payments » Stripe.
Click on the blue Connect with Stripe button:
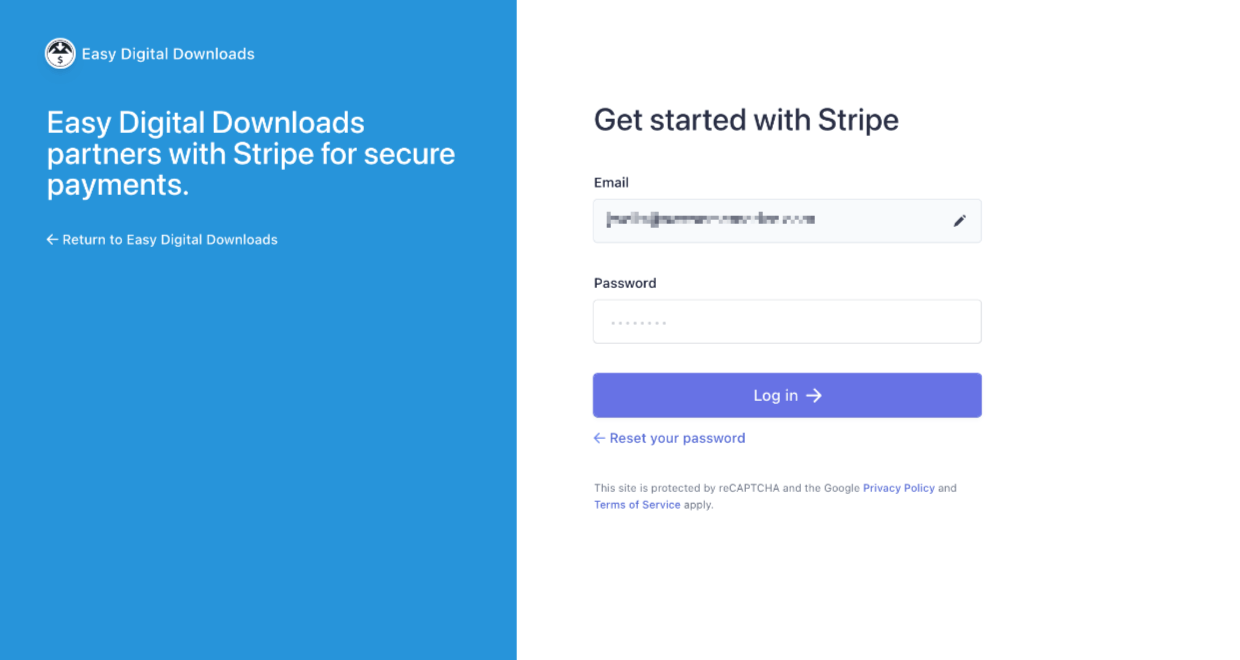
Next, log in with your Stripe email address and password (and enter a code if you have a two-factor authentication enabled).
Then you’ll be able to choose your account and click on Connect → to link it to EDD:
You’ll see a green notification box that confirms your connection status:
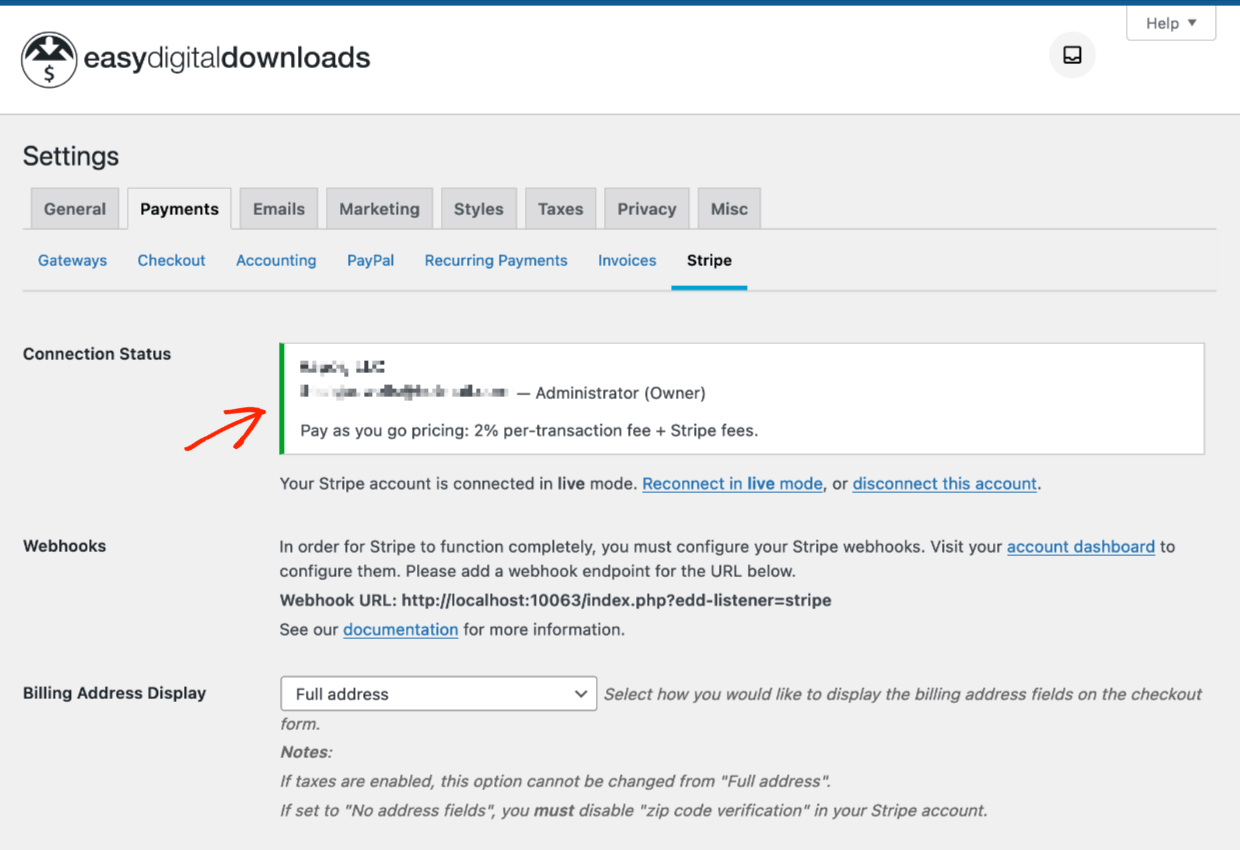
Setup Without Pre-Existing Stripe Account
Don’t have a Stripe account? No problem. Stripe makes it easy to create a new one (for free) and connect it to EDD.
The process looks different depending on which country you’re in. I’ll walk through a setup from the United States. Note that these screenshots may change slightly over time, as Stripe tweaks their interface.
From your WordPress dashboard, go to Downloads » Settings » Payments » Stripe. Click on the blue button that says Connect with Stripe.
You’ll be taken to the Stripe Connect screen. It will take you through a multi-page form. Stripe will ask for your contact information and business information. The questions will vary depending on your region.
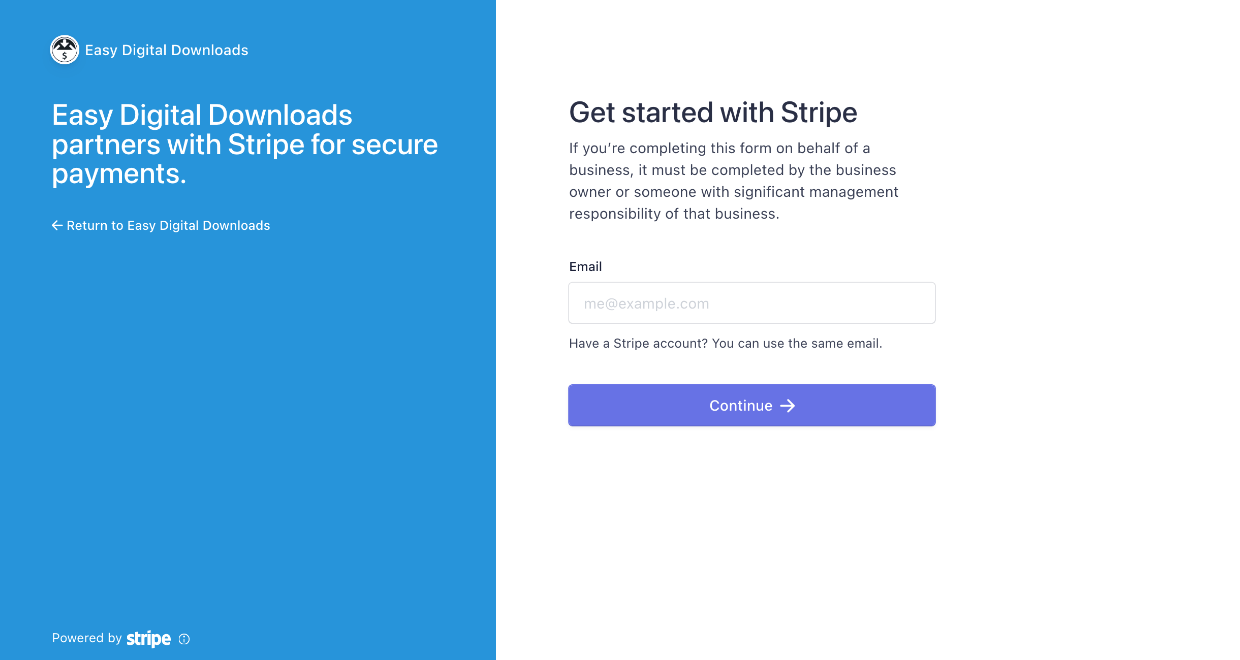
Be sure you see our logo and ‘Easy Digital Downloads’ on the left side.
You’ll be taken through a multi-page form. Stripe will ask for your contact information and business information. The questions will vary depending on your region.
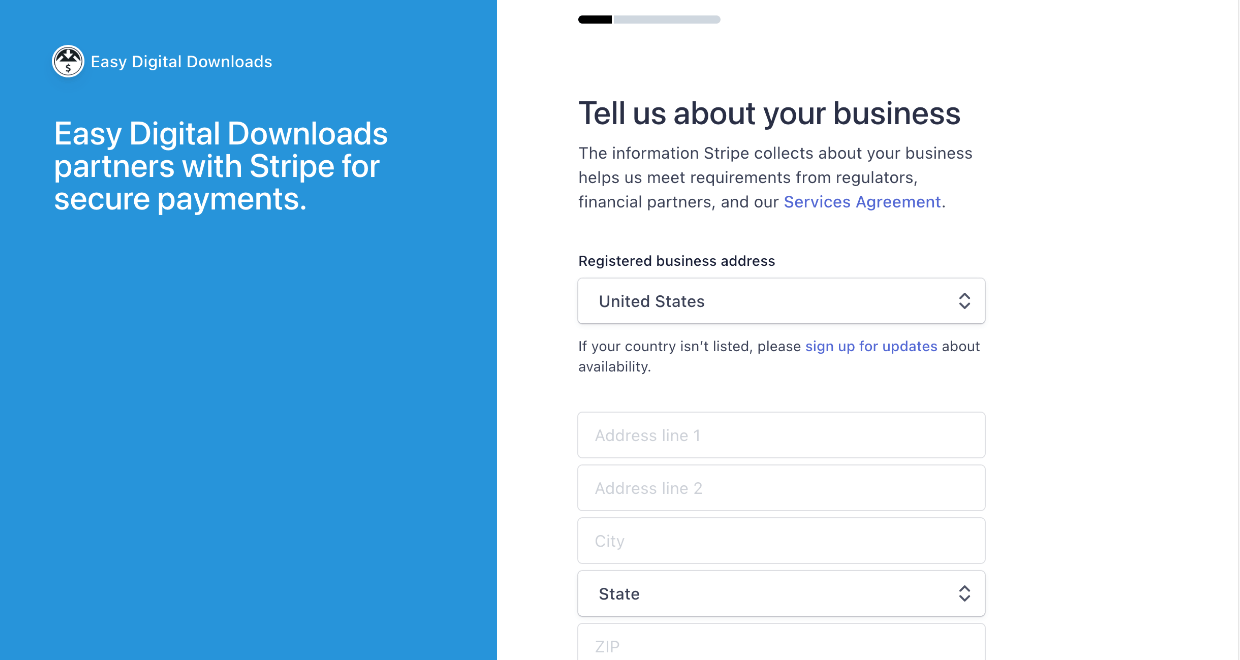
Questions will likely include:
- Name, address, phone number
- Personal information, like government ID numbers
- Business information (type of business, business address)
- The last step in most regions will be connecting a bank account for Stripe to deposit your money into when you make sales!
Some banks have guided presets. If yours doesn’t, don’t worry you can enter account numbers manually.
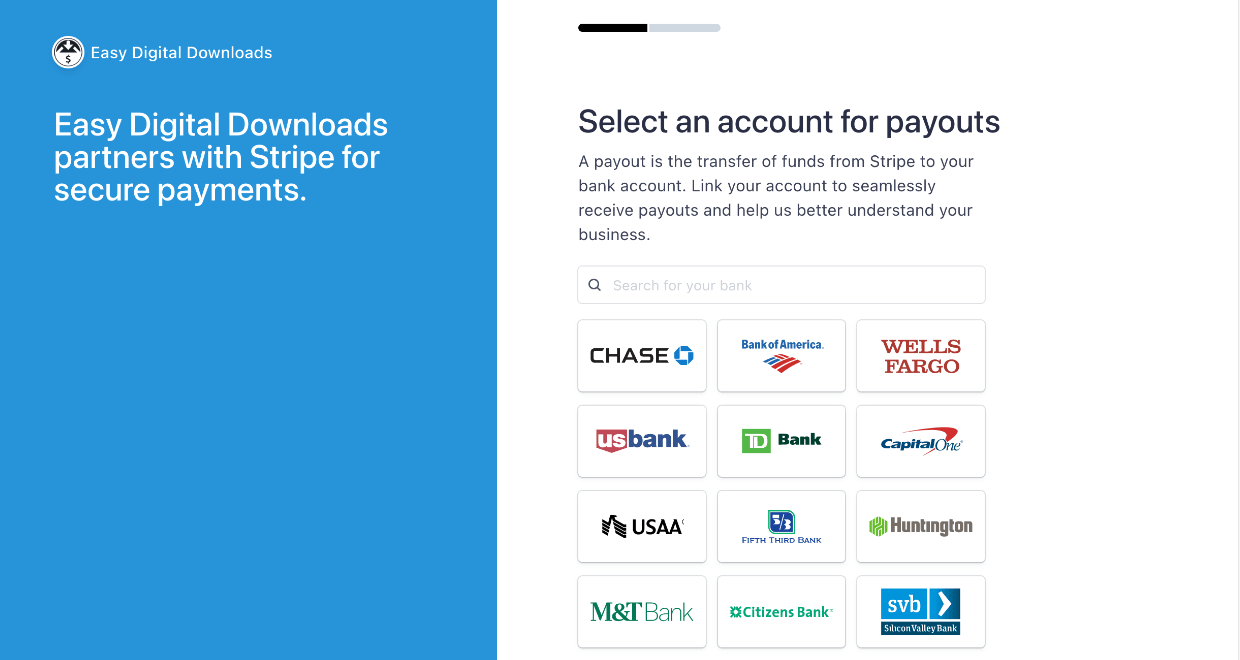
After completing this multi-page form, you’ll have a new Stripe account.
Configure Webhooks
Next, you need to configure a webhook. This makes sure refunds are communicated between your EDD store and Stripe.
From your new Stripe dashboard, go to Developers » Webhooks. Alternatively, you can use the direct link below (you must be logged in):
https://dashboard.stripe.com/webhooks
Click on the Add Endpoint button:
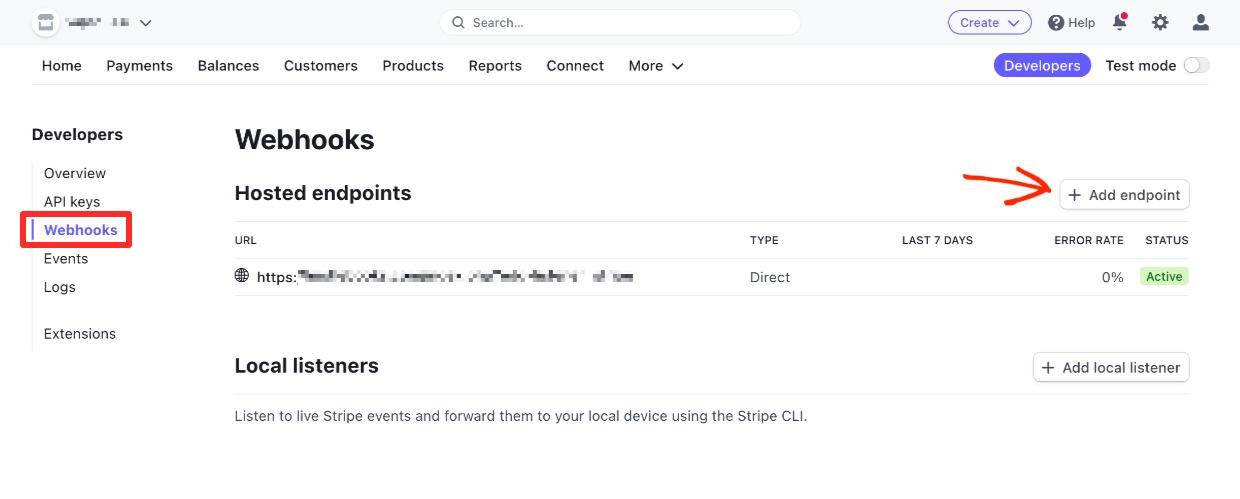
Add your domain name with ‘/?edd-listener=stripe’ at the end of it. It should look like this:
https://yourwebsite.com/?edd-listener=stripe
Replace ‘yourwebsite.com’ with your own website’s domain name. Another option is to copy and paste it from the screen located at Downloads » Settings » Payments » Stripe in the Webhooks section:
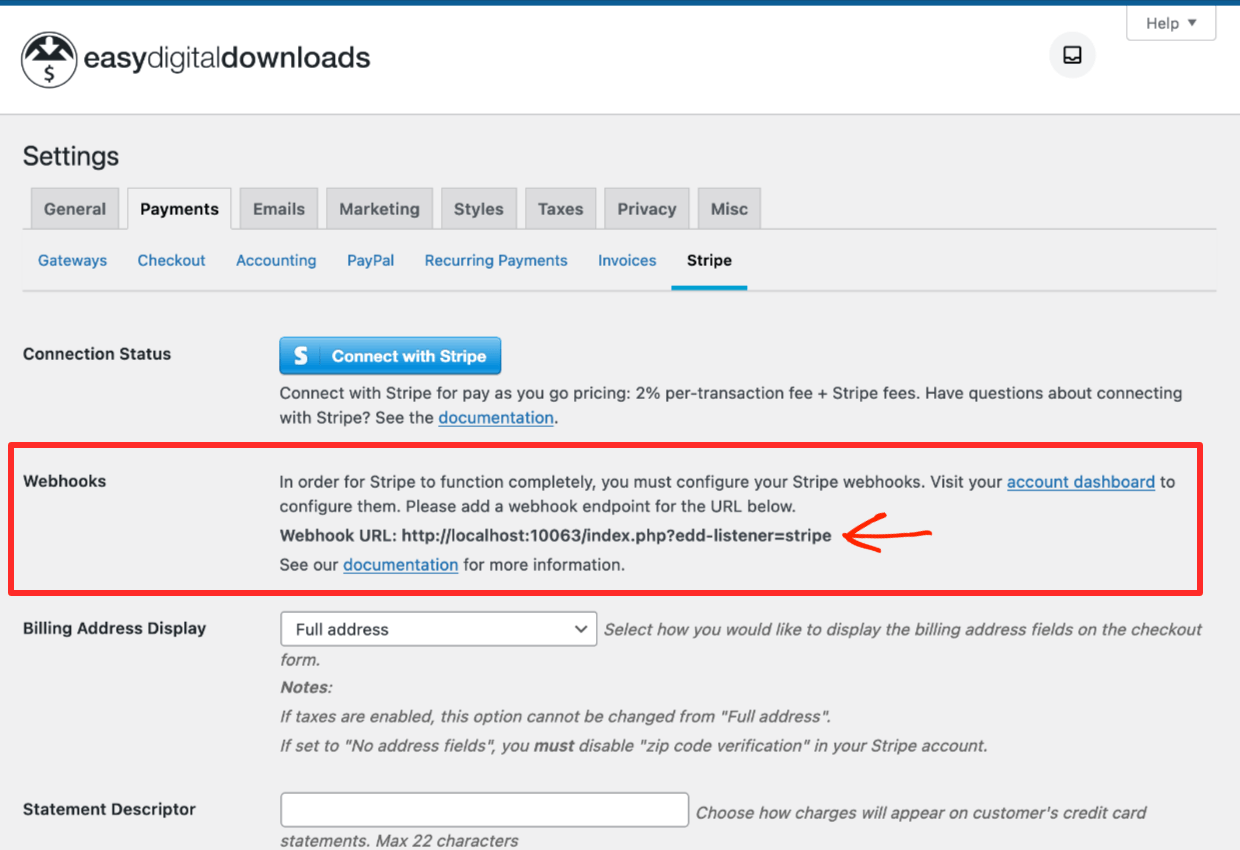
On the Stripe Dashboard select these settings:
- Make sure the Listen to events on Connected accounts box is unchecked
- The API version should be Latest version
- Select the following events:
- charge.succeeded
- charge.refunded
- customer.subscription.deleted
- customer.subscription.updated
- customer.subscription.created
- invoice.payment_failed
- invoice.payment_succeeded
- review.opened
- review.closed
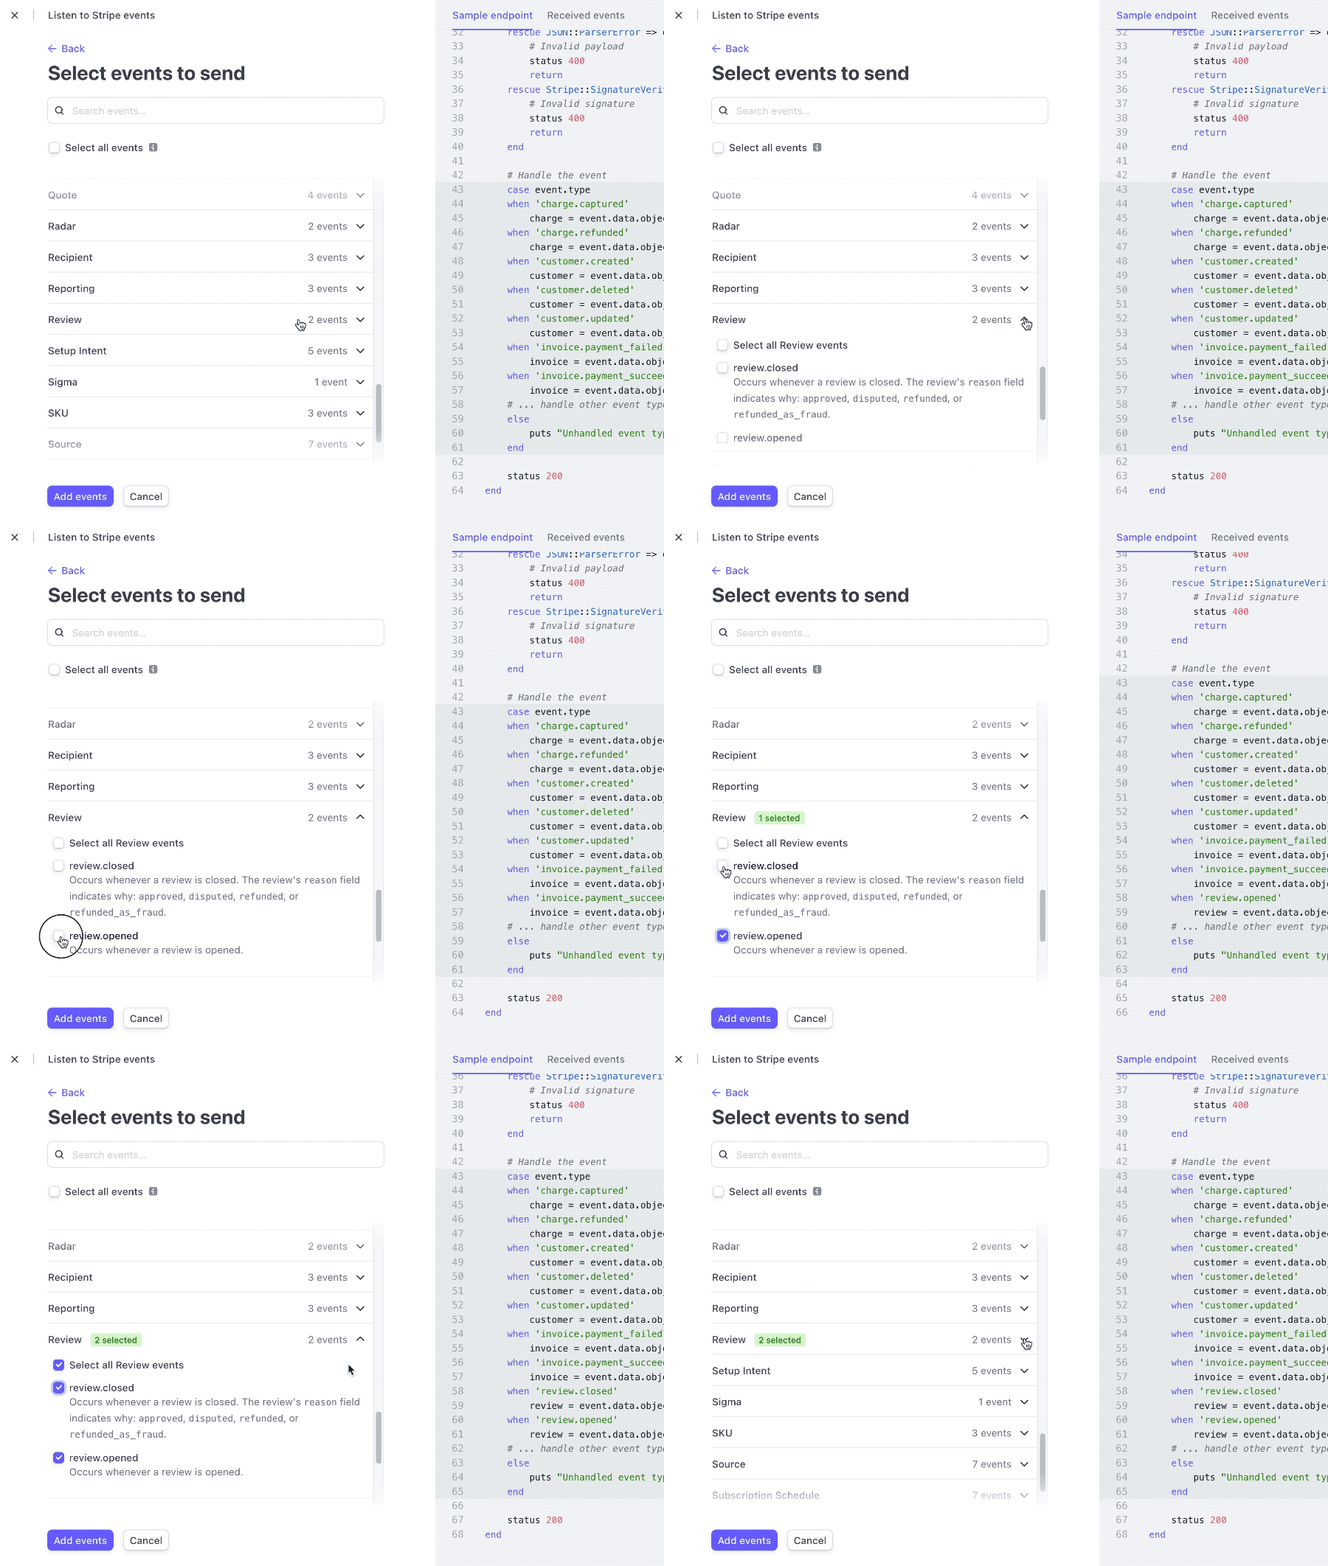
In the animation below, you see the Review events being selected:
Once completed, your webhooks page should look like this:
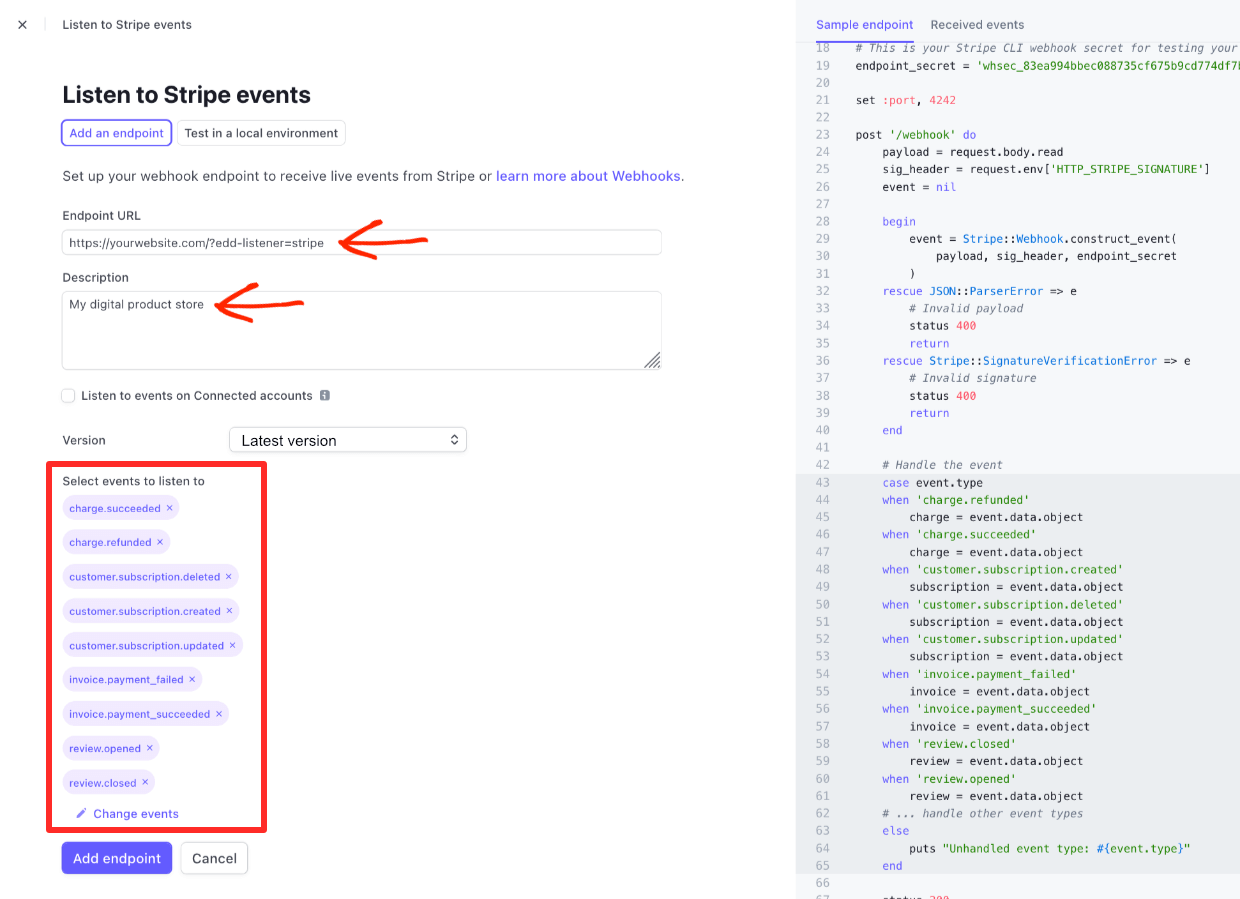
Hit the Add Endpoint button to save these settings. Your integration with EDD will be complete.
🔍 Click here for more details on Stripe setup
Set Stripe as Default Payment Gateway
Last, go to Downloads » Settings, then click on the Payments tab.
Under the Active Gateways and Default Gateway sections, select the Stripe options. In the Payment Methods Icon section, choose which credit card brands to accept:
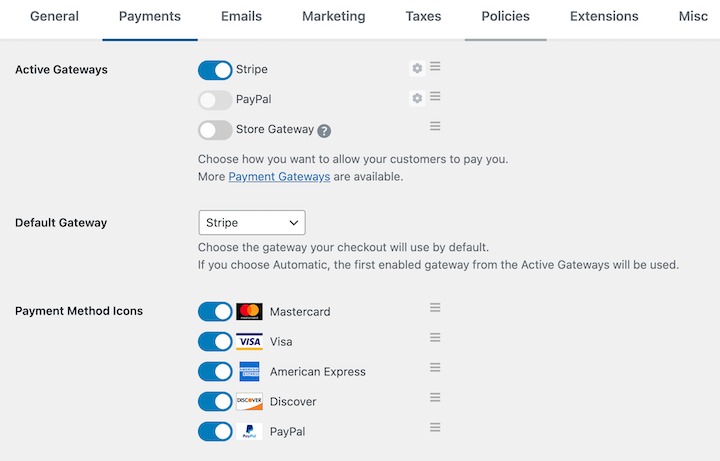
Not sure which ones to choose? Go with Mastercard, Visa, American Express, and Discover unless you have a reason not to use these popular brands. Availability may vary by country/region.
Be sure to hit the Save Changes button when you’re done.
🥳 Stripe and EDD are ready to go. You can now accept credit card payments! Now
Step 3: Add Your Download
Good work so far. Next, you need to set up your digital product or service. These are called ‘Downloads’ in EDD.
From your WordPress dashboard, click on Downloads followed by the Add New button:

Give your download a:
- Name & description
- Price
- Download image (which is what the potential customer sees while shopping or browsing your site)
- Specify the file that the customer gets upon purchase (it could be instructions or a link for services)
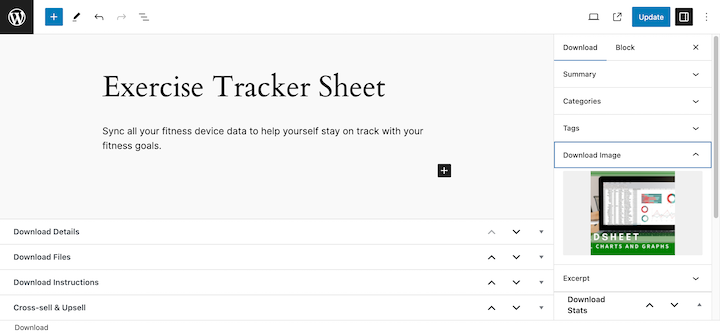
➡️ Click here for a detailed step-by-step guide for creating a download.
Once your download is published, website visitors can see it on the front end of your website.
When a visitor clicks the Purchase button and completes the checkout process, they’ll be taken to the purchase confirmation (thank you) page where your customers can click to download their file(s).
New customers will also get a purchase receipt with their information and download link.
We have many other payment options than just Stripe.
Don’t have a WordPress site yet? You just need WordPress hosting. Get EDD and WordPress preinstalled and perfectly configured with SiteGround EDD Managed Web Hosting.
Credit Card Payment Alternatives
Here are our top suggestions for Easy Digital Downloads alternatives if you are not primarily selling digital products or services.
WP Simple Pay
If you want to accept donations or sell a small number of products or services, WP Simple Pay is a great option. It’s the best WordPress Stripe payments plugin.
- Add payment buttons or payment forms with a drag-and-drop interface
- Insert buttons or form templates as shortcodes or blocks in the block editor
- Offer subscriptions, installment plans, or free trials
- Add other payment options like Apple Pay, Google Pay, ACH debit and Buy Now, Pay Later with Klarna and Afterpay/Clearpay
- The plugin works with 135+ currencies, as well as payment methods including iDeal, SEPA, Alipay, giropay, Bancontact, Przelewy24, and FPX
Get started for free or learn more about the pro plans. Some of the features require a Pro or Elite license.
WPForms
WPForms is the best WordPress form builder plugin. You can use it to collect payments/payment information or donations with payment forms. WPForms is trusted by more than 5 million websites (small businesses and large ones too).
There are three main reasons you might want to use WPForms instead of WP Simple Pay:
- If you also need a form builder for other uses like contact forms, email registration forms, or surveys. You may be able to do everything with one form plugin!
- If you have a unique customization needed, WPForms allows more custom fields and other options.
- WP Simple Pay uses Stripe. If you need more credit card payment options, you can use the PayPal or Square add-ons with a Pro license. You can use the Authorize.net add-on with an Elite license.
WPForms has a free/lite version, but for payments you’ll need to get a Pro or Elite License.
WooCommerce

WooCommerce is a great solution if you’re selling physical products. If you’re selling digital goods, I suggest EDD.
WooCommerce is trusted by more than a million websites, and it’s free. There are thousands of extensions that allow you to customize Woo to your exact needs.
I recommend having WooCommerce pre-installed on a managed server. This way you’ll be ready for spikes in traffic and won’t have to worry about any of the behind-the-scenes techie stuff. Everything will be taken care of for you.
FAQs on Setting Up Credit Card Payments
Let’s wrap up with some frequently asked questions.
What do I need to set up credit card payments?
To set up credit card payments in WordPress, you’ll need:
- A web host
- WordPress site
- SSL certificate
- A plugin like Easy Digital Downloads that processes the credit card payment
- An account with the payment gateway, linked to your credit card or debit card so you can get revenue sent to you
How do I choose a good web host?
Read this guide on choosing a web host (it has discount codes!). Or you can select our top pick based on what you are doing with your website:
- For Easy Digital Downloads check out SiteGround Managed EDD WordPress Hosting
- For WPForms or WP Simple Pay consider Bluehost.
- For WooCommerce we suggest Bluehost Premium Managed Hosting
Accept Credit Card Payments With EDD
Nicely done. You’ve learned how to set up credit card payments with WordPress. You’re set up to build a profitable online business or side hustle.
If you haven’t yet, get started with EDD today!
📣 P.S. Be sure to subscribe to our newsletter and follow us on Facebook or Twitter for more WordPress resources!
