

Would you like to know which Checkout Fields Manager field types collect the data you actually need? CFM offers 22 field types, and this guide covers what each one does along with the options every field shares.
Before you get started, make sure Easy Digital Downloads and the Checkout Fields Manager feature are installed and activated on your WordPress site.
⚠️ Requirements: Checkout Fields Manager is an Easy Digital Downloads Pro feature and requires an Professional Pass license or higher.
To build the form itself, see the Checkout Fields Manager setup doc.
Options Every Field Shares
To get started, we’ll look at the options that appear on almost every field type, whichever one you pick.
Four of them sit in the main part of the field panel. Required decides whether a customer can complete their order without answering. Field Label is the text they see. Help text appears underneath the field. Size sets the width of the input, and results vary with your theme.
Finding the Advanced Settings
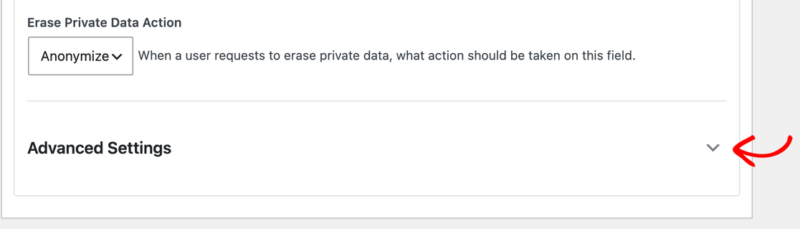
The rest of the shared options live behind a disclosure inside each field. To reach them, scroll to Advanced Settings within the field and click it to expand.
Expanding it reveals five options in one place.
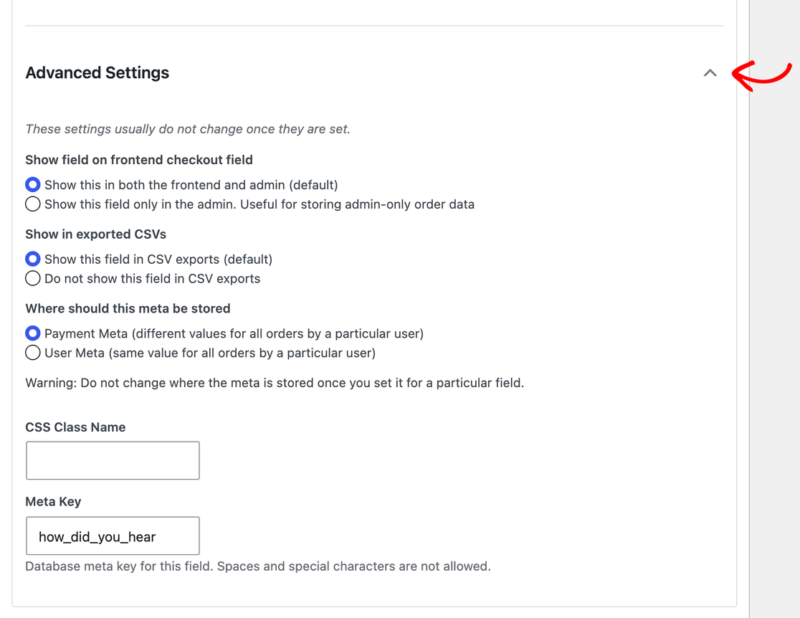
The first, Show field on frontend checkout field, decides who sees the field. The default shows it to customers and to you. The alternative shows it only in your admin, which is how you store order data a customer never needs to see.
The remaining four each get their own section below.
Choosing Where the Data Is Stored
Where should this meta be stored decides how long an answer lives and who it belongs to.
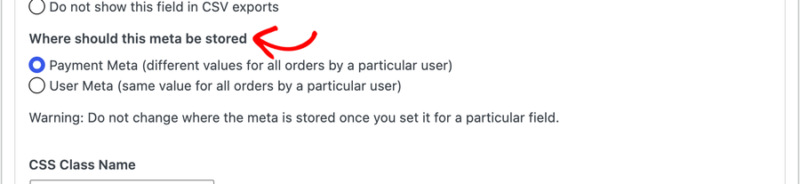
Payment Meta attaches the answer to a single order. This is the default, and it suits anything that can differ between purchases.
User Meta attaches the answer to the customer’s account, so the same value applies to every order they place. It is prefilled on their next purchase, and customers can update it themselves through the profile editor shortcode.
⚠️ Requirements: Avoid changing this setting once customers have started answering the field. Answers already saved under the previous choice will not be found.
Making the User Meta Option Available
If User Meta does not appear as a choice, it is because customers on your store can check out without an account. With no account, there is nothing for the answer to attach to.
To change that, go to Downloads » Settings » Payments » Checkout. Switch Customer Registration to Customers must log in or create an account to purchase.
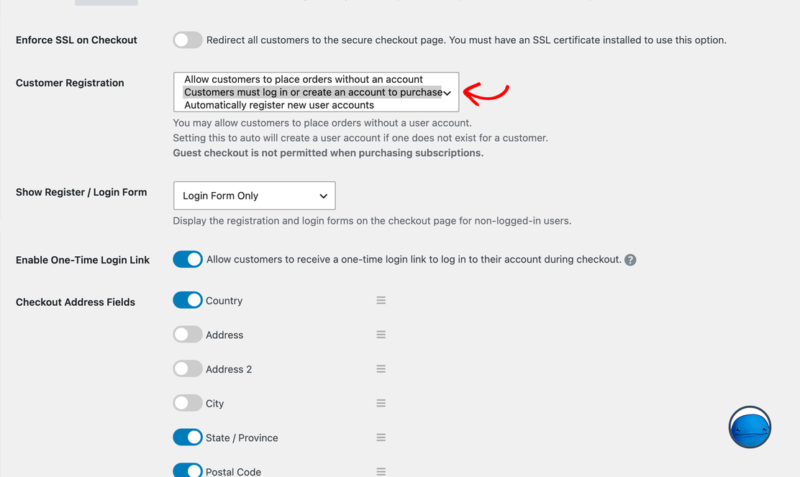
⚠️ Requirements: Only Customers must log in or create an account to purchase unlocks User Meta storage. Automatically register new user accounts creates accounts but does not make the option available.
Keeping a Field Out of Your Exports
Show in exported CSVs decides whether the field’s answers appear when you export your orders. It is on by default.
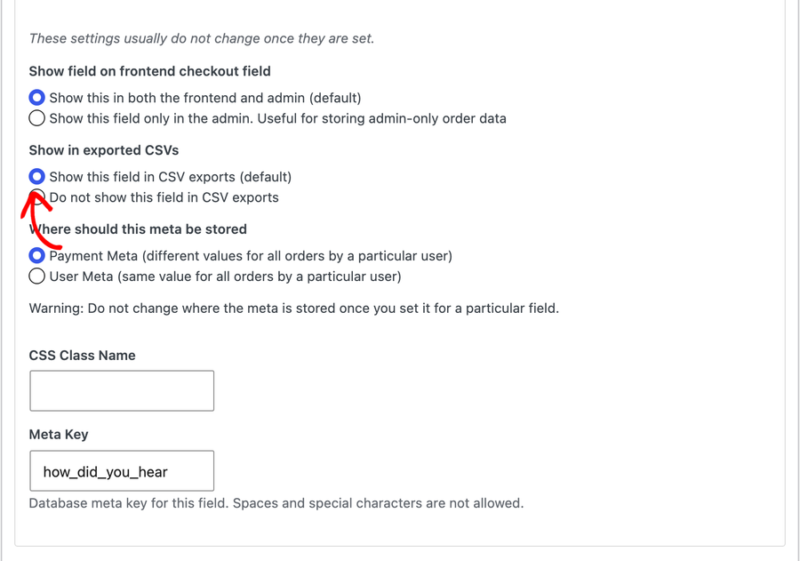
Switching it off is useful for fields whose answers are noise in a spreadsheet, such as a honeypot or an internal note. The answer is still stored on the order either way.
Setting the Meta Key
The Meta Key is the name the answer is stored under in your database. It is also the template tag you use to put the answer into an email, so a meta key of company_name becomes {company_name} .
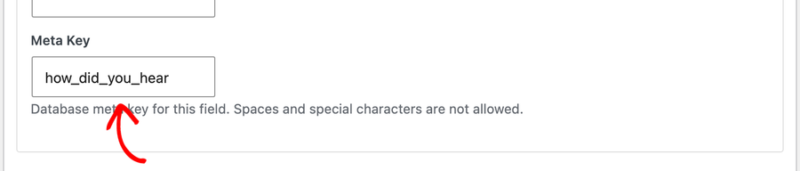
Leave it blank and Checkout Fields Manager generates one from your field label. Meta keys cannot contain spaces, so use an underscore or a hyphen instead.
⚠️ Requirements: Avoid changing a meta key after customers have started answering the field. Answers saved under the old key will no longer be found.
Setting Privacy Options
Each field also carries its own Privacy Settings. They control how that answer is handled when a customer exercises their privacy rights through WordPress’s built-in tools.
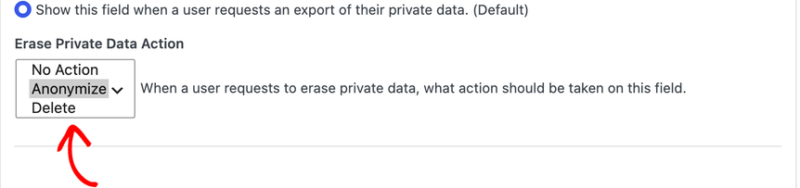
Show field in Privacy Export decides whether the answer is included when a customer requests a copy of their data. It is on by default.
Erase Private Data Action decides what happens when a customer requests deletion. Anonymize is the default and scrambles the value, which keeps your reporting intact. Delete removes it outright, and No Action leaves it alone.
Some fields hold personal information, such as First Name or Email Address. On those, the controls are set for you and appear as a short explanation rather than an editable setting.
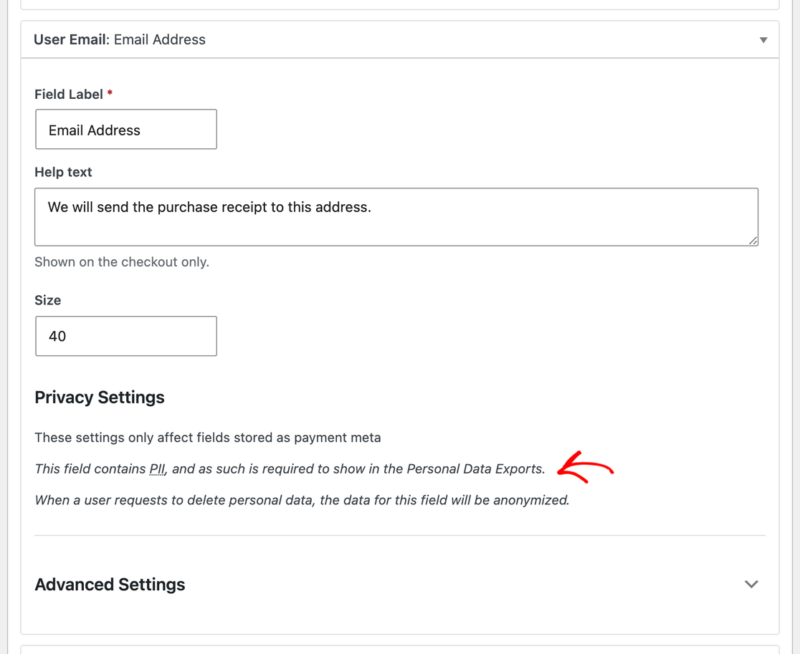
ℹ️ Note: Privacy Settings apply to fields stored as Payment Meta. Fields stored as User Meta are covered by WordPress’s own handling of user data.
The 22 Checkout Field Types
Each type below collects data in a different shape. Where a type has options beyond the shared ones, those are noted with it.
Text and Number Fields
- Text: a standard single-line text input. The most common choice for a short free-form answer.
- Textarea: a multi-line box. You can set the rows, columns, placeholder text, and a default value. It also offers three modes: a plain box, a full rich editor, or a smaller rich editor.
- Email: looks like a text field but only accepts a valid email address.
- URL: looks like a text field but only accepts a valid web address.
- Date: a date picker, with an option to collect a time as well. You can set whether the picker opens on day, month, or year.
- Repeat: a text field the customer can duplicate as many times as they need, for collecting a list of answers.
Choice Fields
- Select: a dropdown where the customer picks one option. You set the options and the placeholder text.
- Multiselect: the same control, but the customer can pick more than one.
- Radio: a set of radio buttons, one choice only. Better than a dropdown when you want every option visible.
- Checkbox: a set of checkboxes, any number of which can be ticked.
- Country: a dropdown of every country. You can add to or remove from the list to build a custom one.
Customer Name and Email Fields
These three exist so you can restore a field that was removed by accident. Each form already has one, and you cannot add a second.
- First Name: a text field for a first name, 40 characters wide by default. It has no meta key option.
- Last Name: a text field for a last name.
- User Email: a text field validated as an email address, intended for a WordPress user’s address. This is a different thing from the standalone Email type above, which you can add as many times as you like.
File Upload
File Upload lets a customer attach files to their order. Alongside the shared options you can set a maximum file size and a maximum number of files. You also choose which file types are allowed, from these groups:
- Images: jpg, jpeg, gif, png, bmp
- Audio: mp3, wav, ogg, wma, mka, m4a, ra, mid, midi
- Videos: avi, divx, flv, mov, ogv, mkv, mp4, m4v, mpg, mpeg, mpe
- PDF: pdf
- Office documents: doc, ppt, pps, xls, mdb, docx, xlsx, pptx, odt, odp, ods, odg, odc, odb, odf, rtf, txt
- Zip archives: zip, gz, gzip, rar, 7z
- Executable files: exe
- CSV: csv
ℹ️ Note: With the Amazon S3 feature active, uploaded files go to a folder named cfm in your S3 bucket instead.
Layout and Content Fields
These add structure or text to the form rather than collecting an answer, so none of them appear on the purchase confirmation.
- Section Break: a divider with a title and description, for grouping a long form into readable sections.
- HTML: a title plus any HTML you want to place in the form.
- Terms and Conditions: a block of text plus a checkbox the customer ticks to agree.
Anti-Spam Fields
Neither of these appears on the purchase confirmation.
- Honeypot: an invisible field that real customers never see and never fill in. Bots do fill it in, and a submission that includes it is rejected.
- reCAPTCHA: adds Google reCAPTCHA v3 to your checkout. It needs a key pair before it works, covered in the next section.
Developer Fields
Neither of these appears on the purchase confirmation.
- Hidden: a standard hidden input. Its only options are a meta key, a value, and whether it applies on the front end, in the admin, or both.
- Action Hook: fires a WordPress action at a chosen point in the form, so a developer can render anything they want there. You give it a hook name and then hook onto it.
The action passes four arguments: the form object, the order ID, the user ID, and the field object. Both IDs arrive as -2 when they do not apply.
add_action( 'hookname', 'my_function_name', 10, 4 );

function my_function_name( $form, $payment_id, $user_id, $field ) {
    // Your code here.
}
ℹ️ Note: Easy Digital Downloads does not provide support for custom development. If you need help, we recommend hiring a developer through Codeable.
Setting Up reCAPTCHA
The reCAPTCHA field needs a key pair before it does anything. To add yours, go to Downloads » Settings » Extensions » Checkout Fields Manager. On that screen, fill in reCAPTCHA v3 Site Key and reCAPTCHA v3 Secret Key, then save.
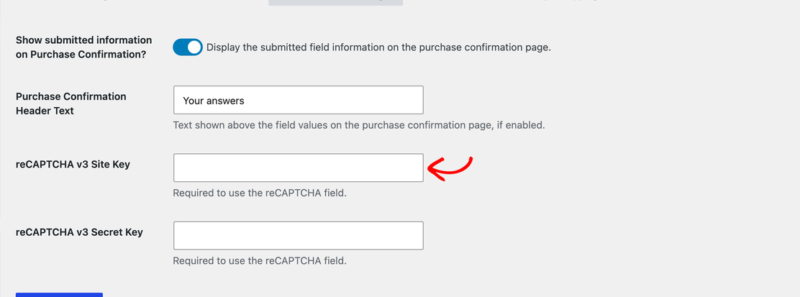
Checkout Fields Manager uses reCAPTCHA v3, so select v3 when you create your keys with Google.
Version 3 scores traffic silently in the background, which means the reCAPTCHA field never appears on your checkout for real customers. It is also skipped for gateways that take payment on their own site, such as PayPal.
ℹ️ Note: If your store still has an older v2 key pair saved, those fields stay visible until you add both v3 keys. Once you save a v3 pair, the older keys are removed for you.
Checkout Fields You Cannot Change
Two parts of the checkout are outside Checkout Fields Manager’s reach, and both are deliberate.
Billing address fields are required by card gateways and by the Easy Digital Downloads tax system, so they stay as they are. The credit card form itself is also fixed, because gateways depend on those inputs appearing exactly as expected.
Retrieving Field Values in Code
Most stores never need this section. If your goal is to show a customer their own answers, switch on Show submitted information on Purchase Confirmation? in the Checkout Fields Manager settings and you are done.
This section is for developers placing a value somewhere that setting does not reach, such as an invoice, a custom template, or a third-party integration.
Reading a Value
Checkout field answers are stored as order meta, keyed on the field’s Meta Key. To read one, pass the order ID, the meta key, and true :
$channel = edd_get_order_meta( $order_id, 'how_did_you_hear', true );⚠️ Requirements: The third argument defaults to false , which returns an array of every stored value. Set it to true for the single value a checkout field holds.
Fields that accept more than one answer, such as Checkbox and Multiselect, store an array. Checkout Fields Manager can flatten one for you, and it also resolves the built-in name and email fields to the values on the order:
$field = EDD_CFM()->fields->get_field( 'how_did_you_hear' );
$value = $field->export_data( $order_id, get_current_user_id() );
This is the same call the purchase confirmation uses internally, so a value read this way matches what a customer sees.
ℹ️ Note: Easy Digital Downloads moved orders into their own database tables in version 3.0, so get_post_meta() no longer reads order data. Any older snippet built on it returns an empty value.
Placing a Value on the Receipt
To add a value to the purchase confirmation yourself, hook one of the receipt actions rather than copying a template into your theme. Each one passes the order object, so the order ID is available as $order->id :
add_action( 'edd_order_receipt_after_table', 'my_channel_row', 10, 2 );

function my_channel_row( $order, $receipt_args ) {
    $channel = edd_get_order_meta( $order->id, 'how_did_you_hear', true );

    if ( empty( $channel ) ) {
        return;
    }

    echo '<p>' . esc_html__( 'Referral channel:', 'my-plugin' ) . ' ';
    echo esc_html( $channel ) . '</p>';
}
The current actions are edd_order_receipt_before , edd_order_receipt_before_table , edd_order_receipt_order_details , and edd_order_receipt_after_table . The older edd_payment_receipt_* equivalents are deprecated, so new code should use the order actions above.
ℹ️ Note: Easy Digital Downloads does not provide support for custom development. If you need help, we recommend hiring a developer through Codeable.
That’s it! You can now pick the right field type for the data you need and set up the options every field shares. You can also show or hide a field based on the cart or the customer. For that, see the Checkout Fields Manager conditional logic doc next.
FAQs on Checkout Fields Manager Field Types
Where did the Meta Key option go?
It moved inside each field’s Advanced Settings, along with the CSS class name, the export option, and the storage choice. To reveal them, click Advanced Settings within the field.
What is the difference between the Email field and User Email?
Email is a general-purpose field you can add as often as you need, for a secondary address or a billing contact. User Email is the address Easy Digital Downloads uses for the order itself. Every form has one already, and you cannot add a second.
Should I use Radio or Select for a short list of choices?
The Radio type suits three or four choices, because every option stays visible without a click. The Select type suits longer lists, where a dropdown keeps the form compact. Both collect one answer.
Why is there no User Meta option on my field?
Your store lets customers check out without an account, so there is no account to store the answer against. Switch Customer Registration to Customers must log in or create an account to purchase under Downloads » Settings » Payments » Checkout.
Which field types do not appear on the purchase confirmation?
7 of them: hidden, HTML, section break, reCAPTCHA, action hook, honeypot, and Terms and Conditions. None of them hold an answer that is meaningful to show a customer.
Can I add a second First Name or Last Name field?
No. Each form has one of each already, and Easy Digital Downloads needs them to process an order. Those types exist in the panel so you can restore one that was removed by accident.
How do I get a field’s value in my own code?
Read it as order meta with edd_get_order_meta() , using the field’s Meta Key. See the Retrieving Field Values in Code section above for working examples and the receipt hooks.
Do I need reCAPTCHA v2 keys as well as v3?
No. Checkout Fields Manager uses v3, so a single v3 key pair is all you need. If your store has older v2 keys saved, they are removed once you save a v3 pair.