

Easy Digital Downloads (EDD) just released more than ten Elementor checkout templates, each one designed to move your buyer from cart to confirmation without second thoughts.
These modern, distraction-free designs feature conversion-focused touches like trust badges and guarantees already in place. Import one onto your existing checkout page, replace the placeholder wording, and you’re live in minutes without hiring a designer or touching a line of code.
The layouts aren’t locked, either. Each checkout element is its own Elementor widget now, with over 100 native Elementor controls between them, so the look of each section is yours to set, from colors and typography to icons and background shapes. Rearrange them however you like: put the cart above the payment form, remove one you don’t need, or slot your own content between them.
This is one of the biggest updates we’ve shipped, and it’s available now. 🎉 Below, I’ll cover the template library, how importing works, how to undo it, and everything the new Elementor controls let you change.
- 10+ Pre-Built Elementor Checkout Templates for EDD
- How to Import an Elementor Checkout Template
- Changed Your Mind? Restore Your Original Checkout
- Your Checkout Page Is Now Made of Movable Parts
- FAQs About Checkout Templates in WordPress
- Can I move the checkout sections into any order I want?
- Do I need Elementor Pro to use checkout templates?
- Can I use checkout templates on the free version of Easy Digital Downloads?
- Will importing a template delete my current checkout page?
- Will rearranging my checkout break my payment gateway?
- Can I remove parts I don't want, like the discount field?
- What if I don't use Elementor at all?
- Build the Checkout Page You Actually Wanted
10+ Pre-Built Elementor Checkout Templates for EDD
The EDD Checkout Templates library gives you more than ten complete checkout page designs, each one ready to import onto the checkout page you already have.
Every template arranges the full checkout for you, with supporting copy, trust elements, and movable checkout pieces already placed around the payment form.
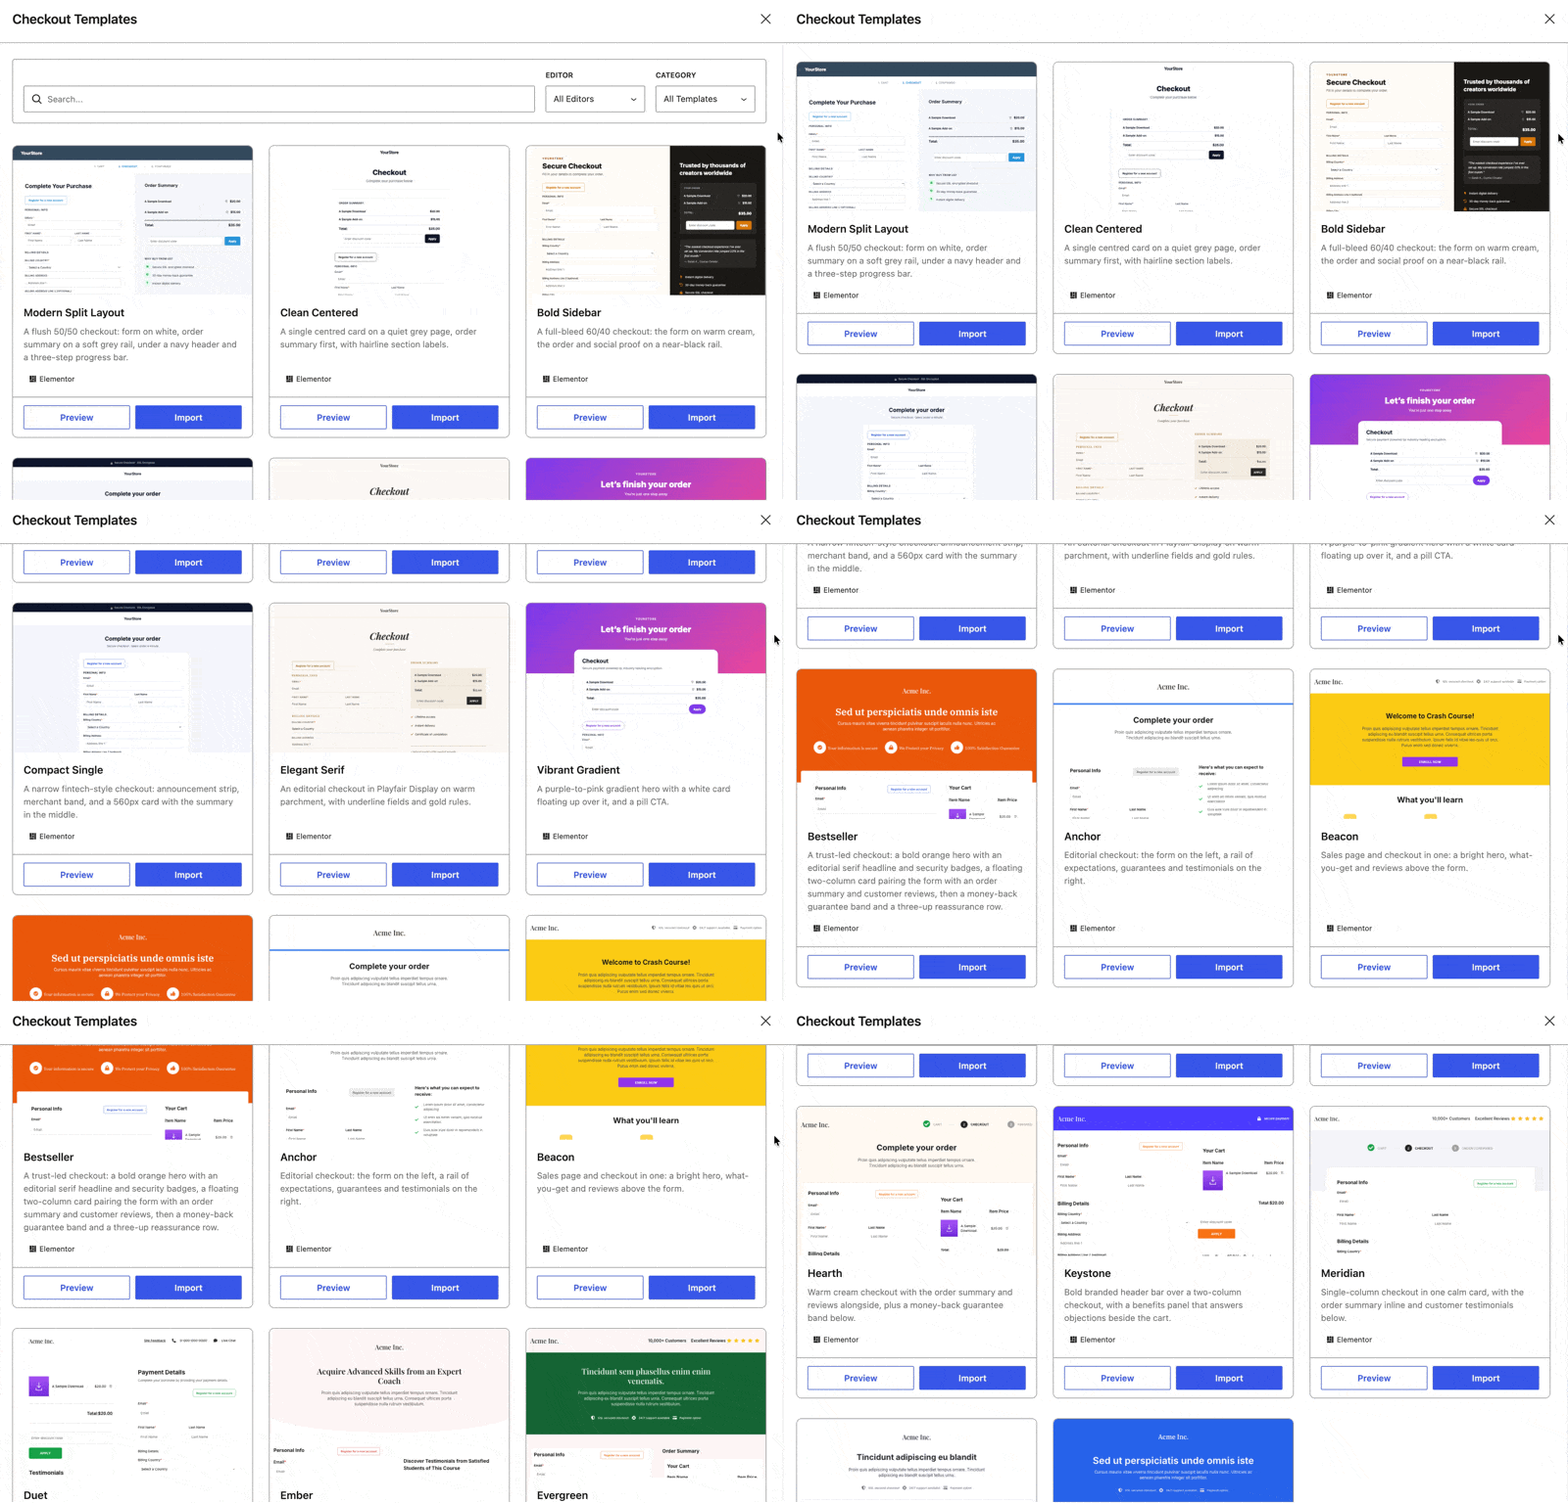
The styles range from single column and minimal to two column layouts that keep the cart summary beside the payment form, so you can pick the look that fits your store.
Designed for Digital Products and Services
These aren’t general ecommerce templates with the shipping fields hidden. Each was built for a store selling digital services and products, so the page isn’t built around shipping-related info or physical inventory.
Every design leads with distraction-free trust building: a clean, modern layout that keeps your buyer focused on finishing the purchase.
Find the Right One Fast
Two controls narrow the grid. The Search field looks at template descriptions. For example, searching for “guarantee” returns every template that includes guarantee copy.
The Category menu filters by what a template leads with, such as Trust, Progress Steps, Two Column, etc.
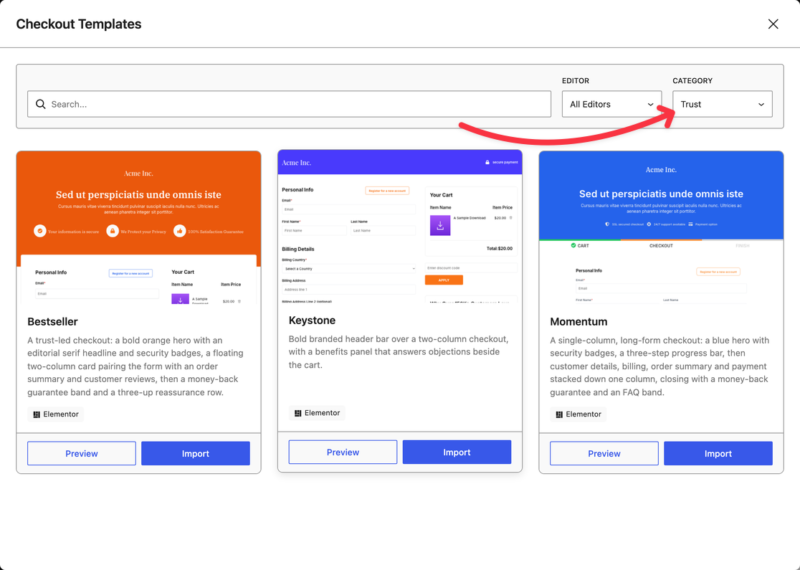
Preview the Whole Page First
Every card has a Preview button that opens the complete design in a new tab. You see the full page end to end, not a thumbnail.
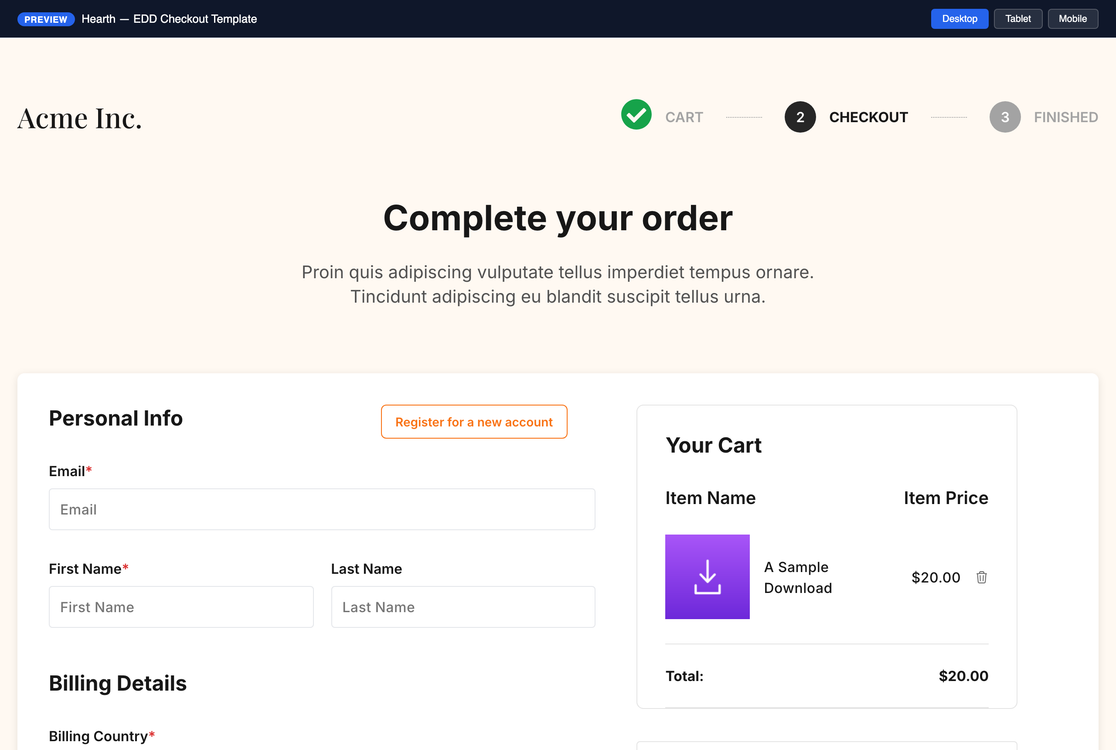
Once it’s open, switch between Desktop, Tablet, and Mobile at the top to check how the layout handles a phone. Previews use sample products and placeholder wording, so they show you the arrangement rather than your own store’s content.
Every Elementor Checkout Template Is a Starting Point
Import a template, replace the placeholder wording, and you have a finished checkout page. Plenty of stores will stop there.
But because everything on that page is a movable widget, a template is also just a head start. Import the one closest to what you want, then rearrange it until it’s yours. Every section on it moves, and I cover exactly how further down.
How to Import an Elementor Checkout Template
Importing takes a few clicks and a few seconds. There are two ways to access the Checkout Templates library.
Checkout Templates is an Easy Digital Downloads Pro feature.
Before you start, note that every EDD user can open the templates library and preview any template.
However, importing one requires an Easy Digital Downloads Pro pass with an active license, the free Elementor plugin at version 3.35.0 or higher, and Elementor’s Flexbox Container experiment feature turned on.
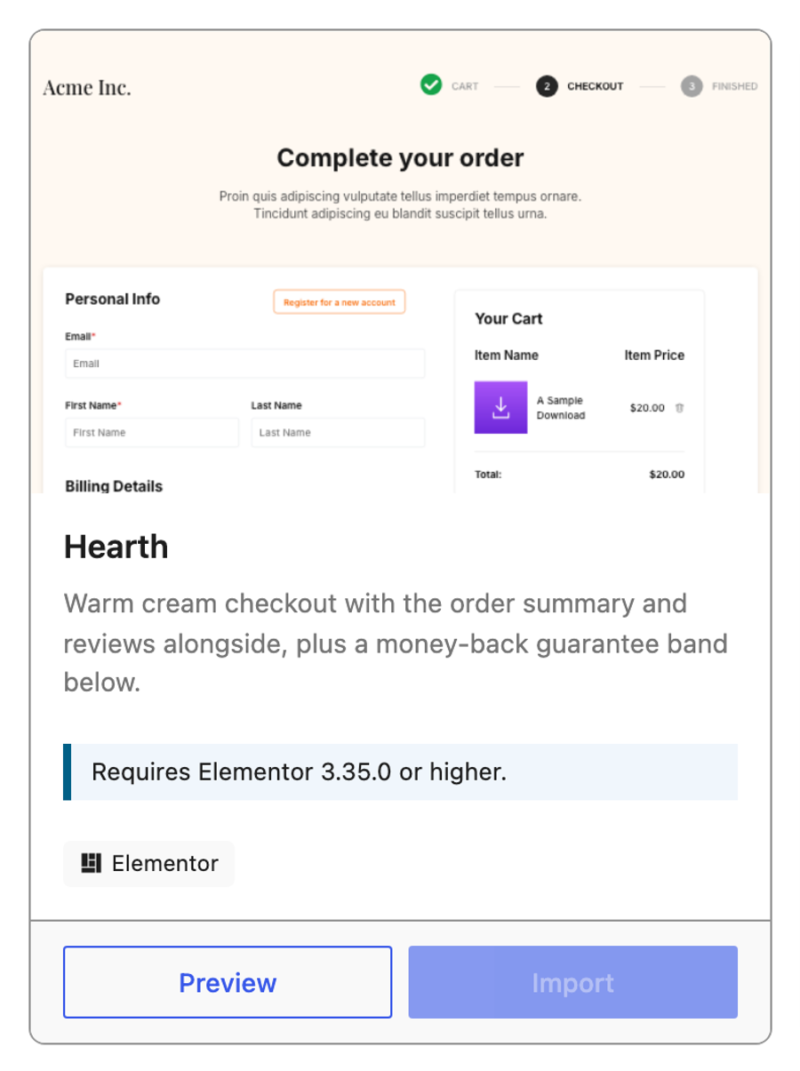
Step 1: Open the Checkout Templates Library
From your WordPress admin sidebar, go to Downloads » Settings » General » Pages.
Find the Primary Checkout Page row, then click Browse Templates below it.

If you’re already editing your checkout page in Elementor, you don’t need to leave. Click EDD Checkout Templates in the top left corner of the Elementor editor instead.
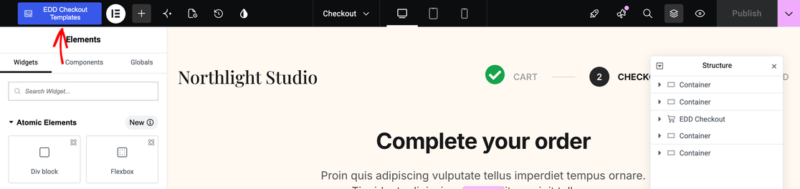
Either of the above methods opens the EDD Checkout Templates library where you can browse, preview, and import a checkout page template.
Step 2: Choose and Preview a Template
Browse the grid and use the search field or the Category menu to narrow it down.
Click Preview on any template you’re considering, and check it on Desktop, Tablet, and Mobile before you decide.
Step 3: Import Your Template
On the card you’ve chosen, select Import.
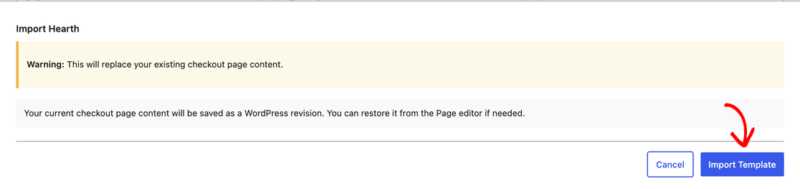
EDD asks you to confirm first, because importing replaces whatever is currently on your checkout page. Your existing content is saved as a WordPress revision before anything changes, so it isn’t lost. Click Import Template to continue.
Step 4: Edit or Undo
The import finishes in a few seconds, and you’ll see a confirmation with three options.
- Edit Page opens your new design in Elementor so you can start editing right away.
- Restore Original Checkout puts your previous checkout page back exactly as it was.
- Close keeps the template and returns you to your settings.

Step 5: Make It Yours
Templates arrive with sample headings and placeholder wording in the sections around the payment form. Open the checkout page in Elementor (select Edit with Elementor on the WordPress Checkout Page editor), click any text element, and type your own.
While you’re in there, put the sections in the order you want. Your guarantee, your support hours, your product name, your arrangement.
Changed Your Mind? Restore Your Original Checkout
Redesigning a live checkout page can feel risky. This release gives you a one-click way back.
Easy Digital Downloads saves your previous checkout content as a WordPress revision before it imports anything. The confirmation panel also includes a Restore Original Checkout button.

Click it, then click Yes, Restore to confirm. Your checkout page comes back exactly as it was immediately before the import.

That’s an undo, not a factory reset. It reverses your most recent import rather than wiping the page to a blank default, so you can try a template on a real store and walk it back in seconds.
If you’ve already closed the library, you can still restore your previous version from the revisions list in the WordPress page editor.
Your Checkout Page Is Now Made of Movable Parts
Templates give you a finished page. If you want to go further, this is what’s underneath one.
In Elementor, the Easy Digital Downloads checkout is built from four separate widgets. Each piece is its own element on the canvas, so where it sits on the page is yours to decide:
- Personal Info: the customer’s name and email fields
- Payment Info: the gateway’s payment form
- Cart: the items being purchased and the totals
- Discount Form: the discount code field
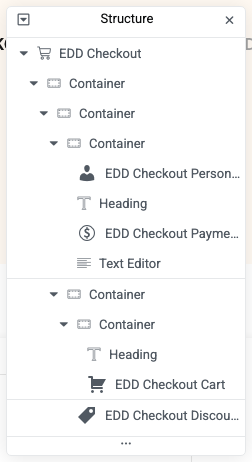
You select each one on the page and style it on its own, and each carries its own position setting.
What That Actually Lets You Do
Put the cart above the payment form so buyers confirm what they’re getting before they reach for a card.
Move the discount field to the bottom, or remove it entirely if codes are training your customers to hunt for one before they buy. Slot a guarantee, a support note, customer reviews, or any other Elementor widget between any two sections, because stock Elementor widgets sit on this canvas too.
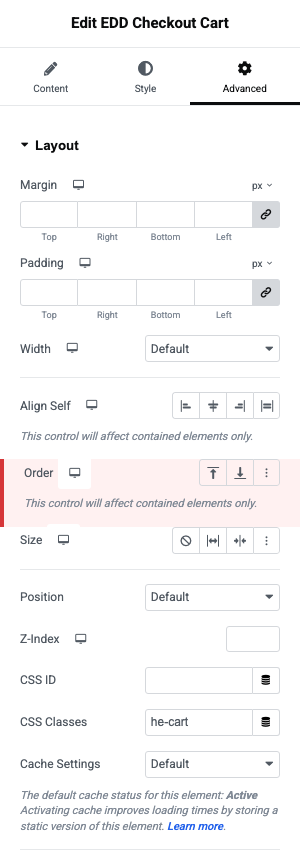
To change a section’s position, select it on the page, open the Advanced tab, and use the Order control under Layout. No custom code, and no template files to edit.
Over 100 Controls for Custom Checkout Design
Each widget carries its own control set, and across them that adds up to over 100 native Elementor controls. Some of the most useful:
- Cart contents: show or hide the product thumbnail, show or hide the section header
- Discount field: show it, hide it, or restyle it
- Icon lists: pull from full icon sets and libraries instead of one fixed icon
- Background shapes: add or remove the decorative shapes behind sections
Colors, spacing, typography, and sizing all behave the way you already expect from Elementor.
FAQs About Checkout Templates in WordPress
Can I move the checkout sections into any order I want?
Yes. Personal info, payment info, cart, and the discount form are each their own Elementor widget, so each one’s position is yours to set. Select the section you want to move, then use the Order control on the Advanced tab under Layout. You can also add headings, icons, text, or any other Elementor widget between them.
Do I need Elementor Pro to use checkout templates?
No. The free Elementor plugin is enough, as long as it’s version 3.35.0 or higher. You don’t need an Elementor subscription to import or edit a checkout template. However, you do need to ensure the Flexbox Container experiment feature is turned on under the plugin settings.
Can I use checkout templates on the free version of Easy Digital Downloads?
Every EDD user can open the library, browse every template, and preview any of them in full. Importing a template requires an EDD Pro pass with an active license. Any paid pass works, so you don’t need a specific tier.
Will importing a template delete my current checkout page?
No. Importing replaces the content on your checkout page, but your previous version is saved as a WordPress revision first. The confirmation panel also gives you a Restore Original Checkout button if you change your mind right away. Also, if revisions are disabled for the checkout page, the import doesn’t run at all rather than proceeding without a backup.
Will rearranging my checkout break my payment gateway?
No. The payment form stays fully functional wherever you put it on the page. Move it or place content around it, and it keeps working the same way.
Can I remove parts I don’t want, like the discount field?
Yes. Aside from what your payment gateway needs to collect, any element on the page can be changed or removed. That includes the discount code field, cart thumbnails, section headers, trust badges, and background shapes.
What if I don’t use Elementor at all?
You can still browse and preview every template in the library from your WordPress dashboard. Importing one onto your checkout page needs Elementor installed, and the free version is enough.
If you build with blocks instead, the EDD Checkout block has its own new Layout options in the WordPress editor, so your checkout keeps working exactly as it does today either way. Note: Switching layouts replaces all inner blocks.
Build the Checkout Page You Actually Wanted
The short version: every part of your checkout page is yours to position.
If you want to design it yourself, the pieces are all there and they all move. If you’d rather not start from an empty canvas, import one of the ready-made templates and change the wording. Either way, the structure of your checkout is a decision you get to make.
Ready to get started? Our Using Checkout Templates documentation walks you through importing your first template step by step, and our Changelog covers everything else in this release.
Not on an Easy Digital Downloads Pro pass yet? Grab one today to unlock the template library and start building a checkout page that converts.
📣 P.S. Be sure to subscribe to our newsletter and follow us on Facebook, Twitter/X, or LinkedIn for more WordPress resources!