

Want to sell more ebooks, courses, or templates without dropping your prices for good? A well-timed discount code can do exactly that.
Discount codes give your customers a reason to buy now instead of later. They’re one of the simplest sales levers you have as a digital product seller, and you don’t need to touch a line of code to use them.
In this guide, you’ll learn how to create discount codes for digital products in WordPress with Easy Digital Downloads (EDD). We’ll also cover automatic discounts, how to promote your codes, and how to track which ones are actually working.
- Key Takeaways
- Why Use Discount Codes for Digital Products
- What You Need Before You Start
- Step 1. Create Your Discount Code
- Step 2. Set Up Automatic Discounts With Discounts Pro
- Step 3. See How Customers Redeem the Code
- Step 4. Promote Your Discount Code
- Step 5. Track How Your Discount Codes Are Performing
- More Ways to Get Creative With Discount Codes
- FAQs: WordPress Discount Codes for Digital Products
- How do I create a discount code in WordPress?
- Can I limit a discount code to specific digital products or categories?
- How do I make a discount apply automatically, without a code?
- How many times can customers use the same discount code?
- Where do customers enter their discount code at checkout?
- How do I track which discount codes are actually working?
- Use Discount Codes to Turn Browsers Into Buyers
Key Takeaways
- Create a code in minutes. Give it a name, a code, and an amount, and it’s live.
- Control exactly who can use it. Limit codes by product, category, date, or minimum order.
- Skip the code entirely. Discounts Pro applies discounts automatically based on cart conditions.
- Get the word out. Promote codes with a shortcode, a dedicated page, or a widget.
- Know what’s working. EDD’s built-in reports show you which codes are earning their keep.
Why Use Discount Codes for Digital Products
A discount code is a word or set of characters a customer enters at checkout to get a percentage or dollar amount off their order.
For digital product sellers, discount codes are a low-risk way to move the needle on sales. You’re not managing inventory or eating into your margin with shipping costs. You’re simply adjusting a price for a limited time or a specific audience.
Use them to clear out an older course before you launch a new one, reward email subscribers, or give first-time buyers a reason to try your product. Because EDD’s discount codes live inside your own store, you keep full control over the terms, without a marketplace approval process or extra fees cutting into the deal.
What You Need Before You Start
This guide assumes you already have Easy Digital Downloads installed and active on your self-hosted WordPress site, and that you’re using it to sell at least one digital product.
If you haven’t added a product yet, head to Downloads » Add Download first. Once you have something to sell, you’re ready to create your first discount code.
Step 1. Create Your Discount Code
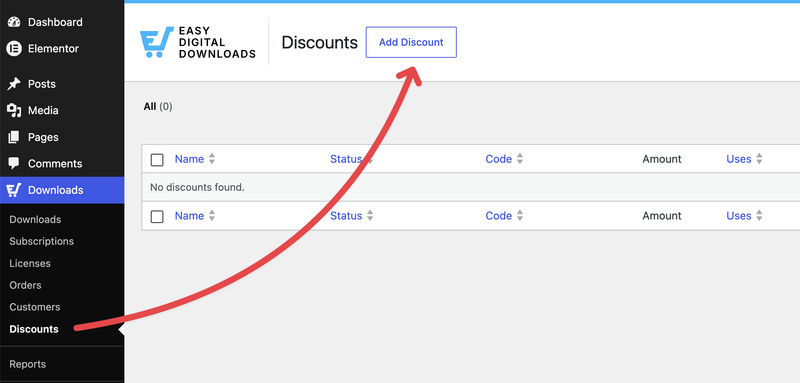
Go to Downloads » Discounts and click Add Discount.
You’ll land on the discount form. Three fields are required to get a working code:
- Name: what you’ll call this discount internally. Customers see it at checkout.
- Code: the alphanumeric code your customer types in. Click Generate Code if you’d rather not come up with one yourself; you can set a prefix, length, and whether it includes letters, numbers, or both.
- Amount: a flat dollar amount or a percentage off.
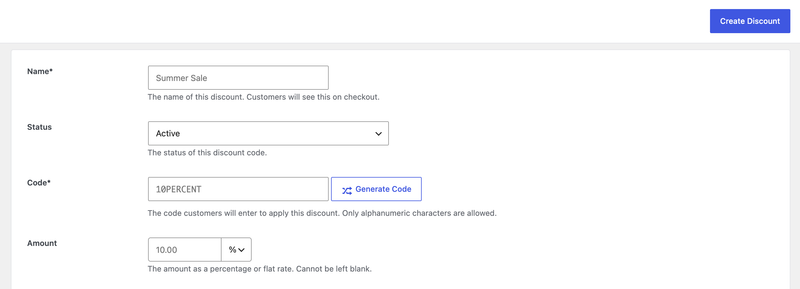
Click Create Discount, and that’s it. Your code is live and ready to use on any product, with no limits, unless you add some.
Customize Your Discount Code’s Rules and Restrictions
Most sellers want at least a few guardrails on a discount. EDD gives you several:
- Download Requirements: Restrict the code to specific products. Leave this blank and it applies to everything.
- Downloads Excluded: Block specific products from ever using this code.
- Categories: Include or exclude products by category instead of picking them one by one.
- Start Date and Expiration Date: Run the discount for a set window, like a weekend sale.
- Minimum Amount: Require a minimum cart total before the code works.
- Max Uses: Cap how many times the code can be used, site-wide.
- Use Once Per Customer: Limit each customer to a single redemption. Most sellers turn this on to protect their margin.
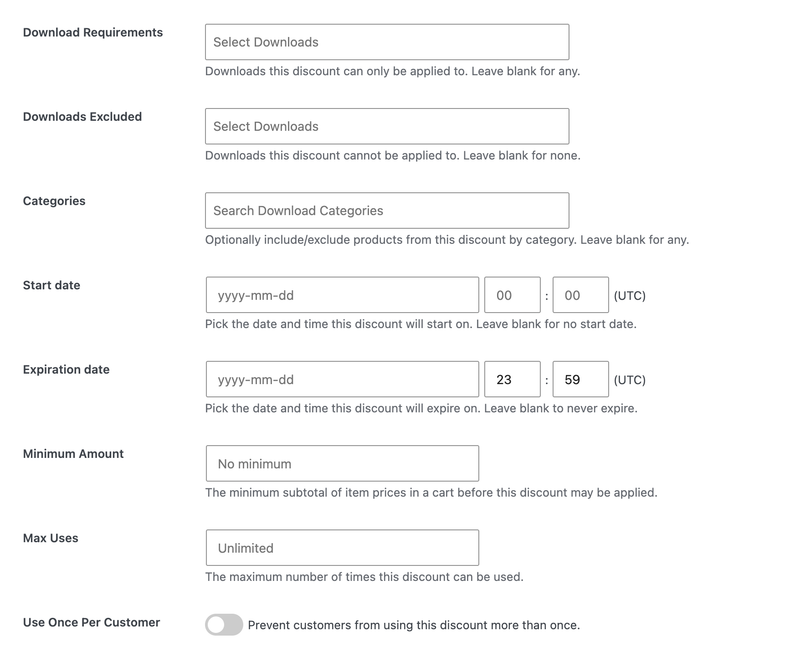
You can also set the discount’s Status to Active, Inactive, or Archived at any time from the Discounts list, so you don’t have to delete a code you might reuse later.
For the full list of fields and what each one does, check EDD’s Creating and Using Discount Codes documentation.
Step 2. Set Up Automatic Discounts With Discounts Pro
A code works great when you’re promoting a specific sale. But sometimes you want a discount to apply without the customer doing anything at all.
That’s where Discounts Pro comes in. It’s a feature available on an Extended Pass or higher, and it lets you build discounts that trigger automatically based on cart conditions instead of a code.
Once enabled on your site, go to Downloads » Discounts Pro » Add New Discount.
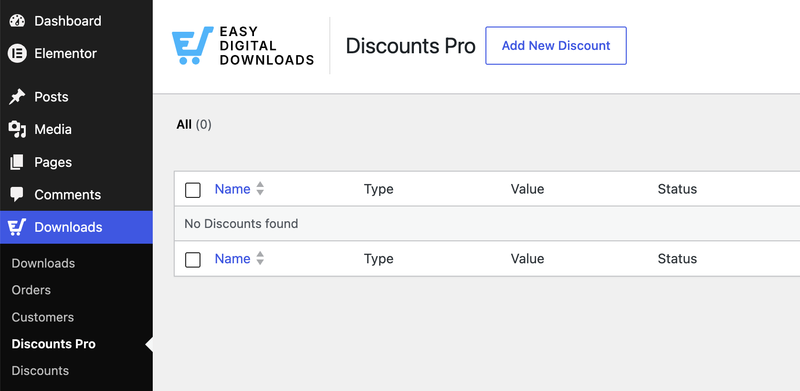
Next, choose a Discount Type:
- Fixed Price: Flat amount off.
- Percentage Price: Percentage off.
- Product Quantity: Discount based on how many items are in the cart.
- Each X pProducts: Discount that repeats for every set number of items.
- From X Products: Discount that kicks in once a cart hits a certain item count.
- Products in cart: Discount tied to specific product combinations.
- Cart threshold: Discount that unlocks once the cart total crosses a set amount.
For example, you could set a Cart threshold discount that knocks 10% off any order over $50, with no code required.
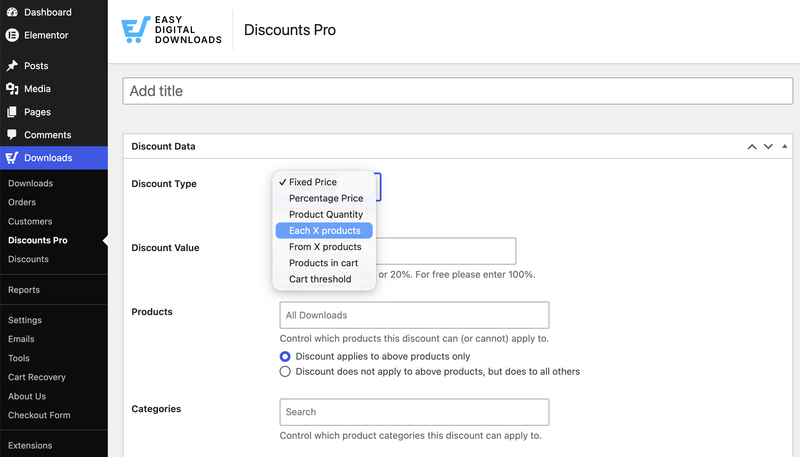
Set your conditions, click Publish, and the discount will apply itself the moment a customer’s cart qualifies.
Step 3. See How Customers Redeem the Code
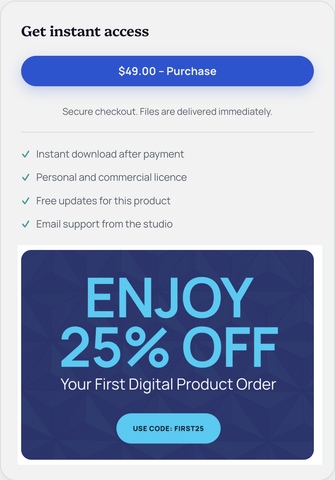
Once a code is active, customers see an option to enter it on your checkout page. They type it in, hit Apply, and the cart total updates right away.
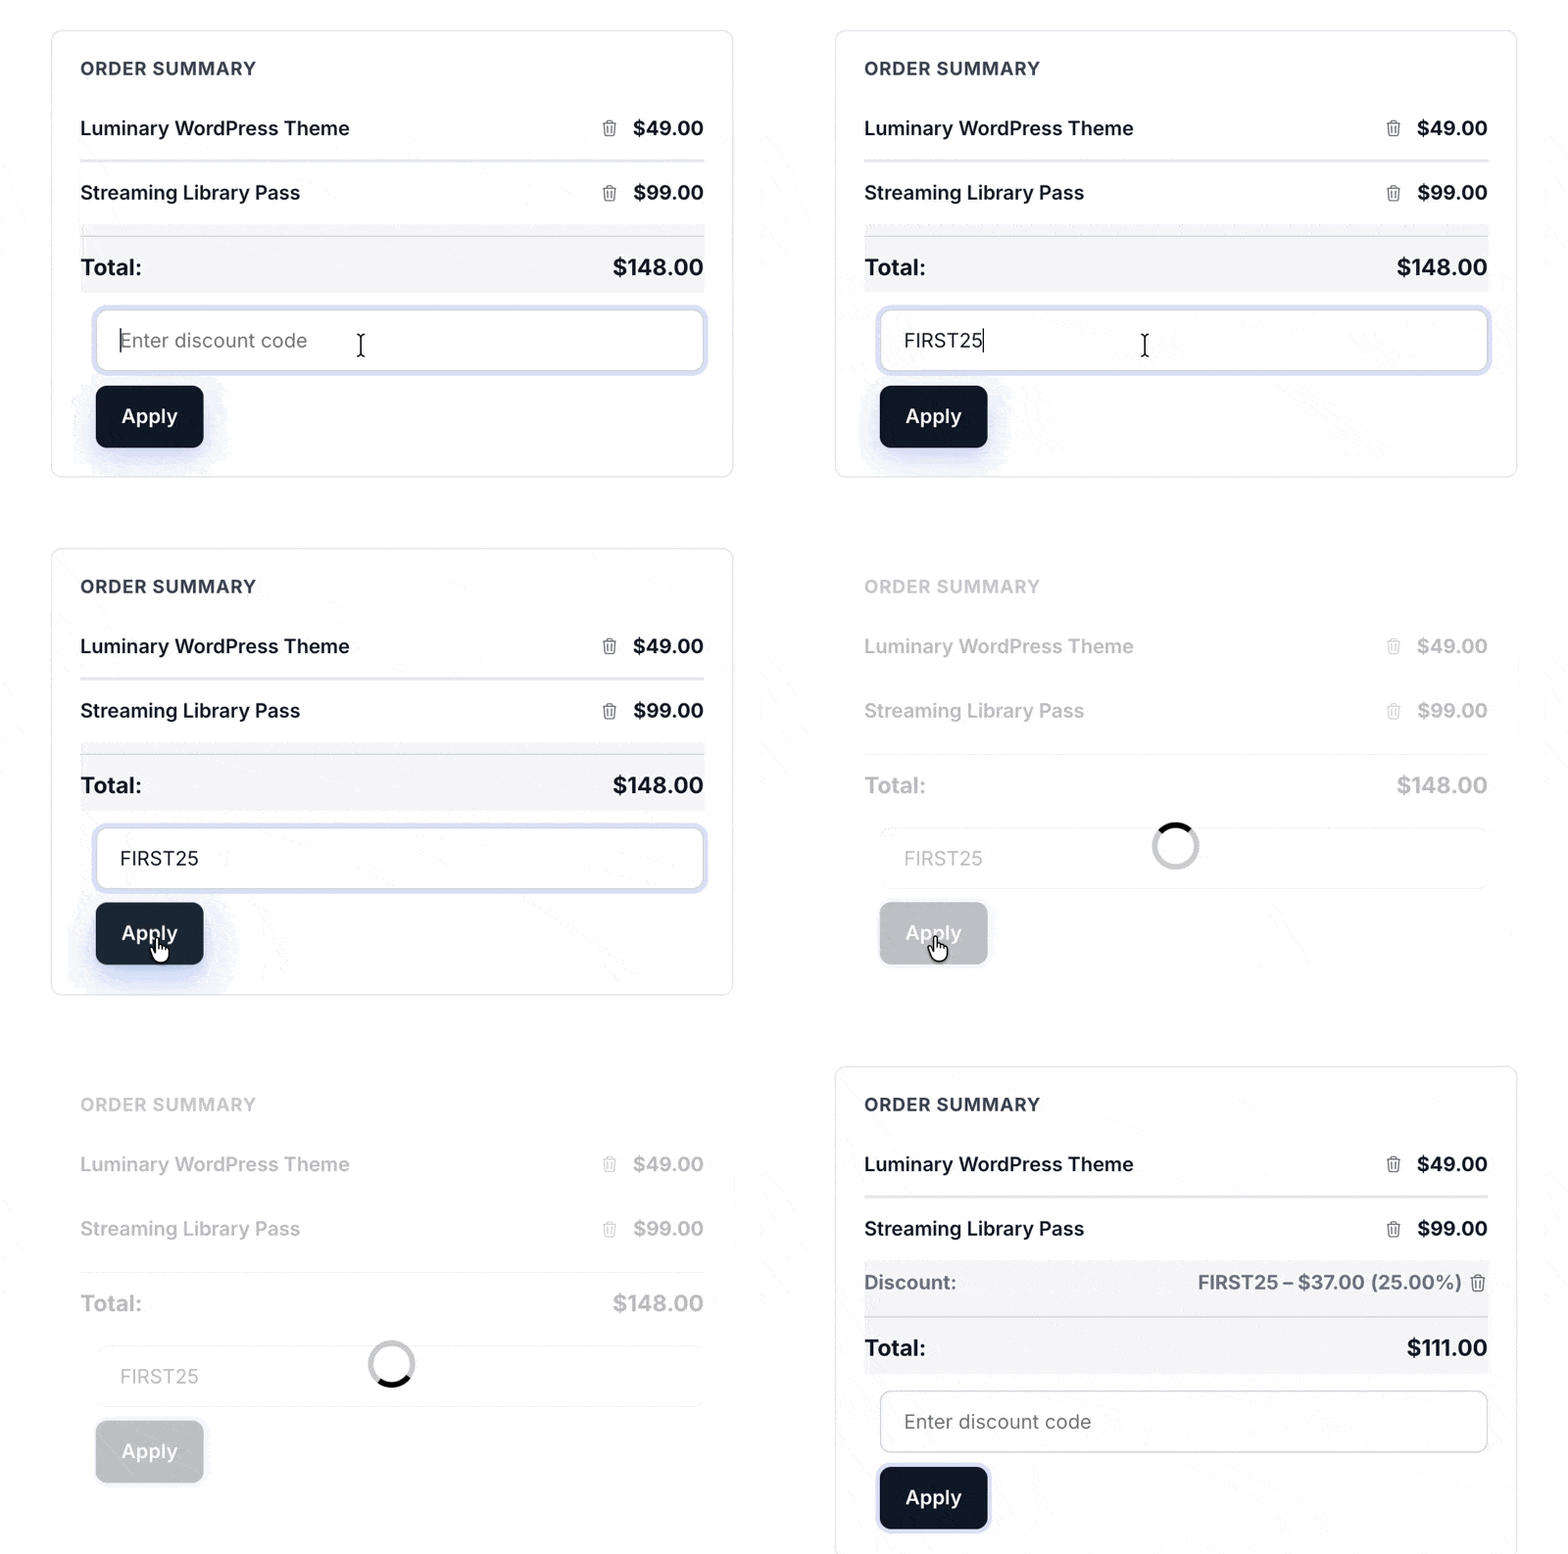
You can also skip the checkout step entirely by sending customers a link with the code built in, using ?discount=YOURCODE at the end of any URL on your site. This is handy for email campaigns or social posts. The code gets applied automatically once they reach checkout.
Step 4. Promote Your Discount Code
A discount code only works if people know it exists. A few simple ways to get it in front of shoppers.
- Add it as a shortcode on any page or post, so it displays wherever you need it.
- Build a dedicated coupons page listing your current promotions, so repeat customers know where to check.
- Add a widget to your sidebar or footer to keep an active discount visible site-wide.
- Share it through email and social media, with a direct link using the URL method from Step 3.
Step 5. Track How Your Discount Codes Are Performing
Once your codes are live, keep an eye on how they’re actually performing. Go to Downloads » Reports » Discounts to see usage and revenue for each code you’ve created.
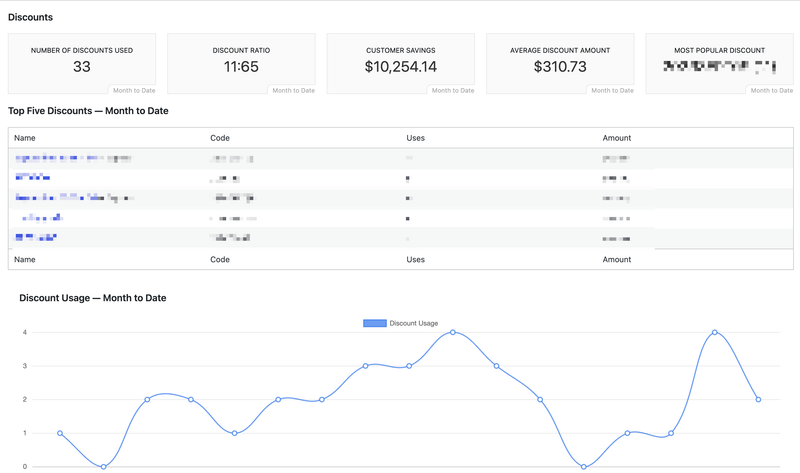
This makes it easy to spot which promotions are worth repeating and which ones aren’t earning their keep, so you can adjust future sales instead of guessing.
More Ways to Get Creative With Discount Codes
A few EDD features can take your discount strategy further:
- Social Discounts: reward customers with a discount for sharing your product on social media.
- Coupon Importer: bulk import existing codes from a CSV file instead of adding them one at a time.
- Discounts Widget: let other sites display your current promotions.
- Discount Code Generator: generate and export large batches of unique codes at once, useful for giveaways or affiliate partners.
Grab an EDD Pass to access these features along with everything else EDD offers.
FAQs: WordPress Discount Codes for Digital Products
How do I create a discount code in WordPress?
With Easy Digital Downloads active, go to Downloads » Discounts and click Add Discount. Fill in a Name, Code, and Amount, then click Create Discount. Your code is live immediately.
Can I limit a discount code to specific digital products or categories?
Yes. Use the Download Requirements field to restrict a code to certain products, or the Categories field to include or exclude an entire category at once.
How do I make a discount apply automatically, without a code?
Discounts Pro, available on an Extended Pass or higher, lets you set conditions like a cart threshold or product quantity that trigger a discount automatically at checkout.
How many times can customers use the same discount code?
As many times as you allow. Set Max Uses to cap the total redemptions site-wide, or turn on Use Once Per Customer to limit each shopper to a single use.
Where do customers enter their discount code at checkout?
On the checkout page, where they’ll see a field to enter a code before completing their purchase. You can also send a direct link with the code built in using the URL method.
How do I track which discount codes are actually working?
Go to Downloads » Reports » Discounts to see usage and revenue for every code you’ve created.
Use Discount Codes to Turn Browsers Into Buyers
Discount codes are one of the fastest ways to sell more digital products and turn hesitant shoppers into paying customers, without touching your regular pricing. Start with one simple code, watch how it performs, and build from there.
Ready to put discount codes to work on your store? Grab an EDD Pass to unlock Discounts Pro and start creating automatic discounts today.
📣 P.S. Be sure to subscribe to our newsletter and follow us on Facebook, Twitter/X, or LinkedIn for more WordPress resources!