

Creating a photography website with WordPress gives you something stock platforms never will: ownership.
Most photographers spend years perfecting their craft, then hand a significant portion of their income to platforms they don’t control. Shutterstock pays contributors as little as 15% per download. Adobe Stock pays a flat 33%. And social media can bury your work whenever the algorithm changes.
With WordPress, you can build a professional photography site that’s entirely yours. Choose your own design, set your own prices, and sell your photos directly to customers. No commission cuts. No marketplace rules.
In this guide, I’ll walk you through exactly how to create a photography website in WordPress, from choosing your hosting to setting up a photo storefront with Easy Digital Downloads (EDD).
- Key Takeaways
- Why Create a Photography Website in WordPress?
- What You Need to Get Started
- How to Create a Photography Website With WordPress
- Step 1: Choose a Domain Name and Hosting
- Step 2: Choose a Photography Theme
- Step 3: Create Your Essential Pages
- Step 4: Add a Gallery Plugin and Build Your Portfolio
- Step 5: Optimize Your Images for Speed
- Step 6: Protect Your Photos
- Step 7: Sell Your Photos With Easy Digital Downloads
- Step 8: Optimize Your Photography Website for SEO
- How to Promote Your Photography Website
- FAQs on Creating a Photography Site in WordPress
- Build the Photography Website Your Work Deserves
Key Takeaways
| Own your audience | Your website puts you in control of your brand, pricing, and customer list. No platform rules. |
| Keep your revenue | Selling with EDD means no listing fees, commission cuts, or marketplace restrictions on your sales. |
| Full creative control | Choose your own theme, layout, and gallery style to match your photography brand. |
| Protect your work | EDD’s Secure File Delivery keeps your high-resolution assets safe after every purchase. |
| No coding required | WordPress, Envira Gallery, and EDD are all beginner-friendly. Your site can be live in a day. |
Why Create a Photography Website in WordPress?
The case for owning your own photography site comes down to three things: revenue, control, and audience.
- Revenue. Stock platforms take a significant cut of every sale. Shutterstock pays contributors between 15% and 40%, depending on their tier. Adobe Stock pays a flat 33%. When you sell through your own site using Easy Digital Downloads, you keep 100% of every sale, minus your payment processor fee.
- Control. Your theme, your layout, your prices, your policies. No marketplace guidelines limiting what you can sell or how you can present your work.
- Audience. Every customer who buys through your site is your customer. You have their email address, their purchase history, and the ability to reach them again. Stock platforms own that relationship. Your website gives it to you.
WordPress makes this straightforward. It powers over 43% of all websites, it’s free to use, and it has a large library of photography-specific themes and plugins. You only pay for hosting and a domain name, which can cost less than $20 a month combined.
Ready to stop losing revenue to platforms? Sell your digital photos directly with EDD and keep what you earn.
What You Need to Get Started
Before diving in, here’s a quick checklist:
- Domain name: your website address (e.g., yournamephoto.com)
- A WordPress hosting plan: where your site lives on the internet
- Photography theme: controls how your site looks and feels
- Gallery plugin: for displaying your portfolio professionally
- Easy Digital Downloads: for selling your photos directly (free to start)
No coding experience required. Each step below walks you through the process from scratch.
How to Create a Photography Website With WordPress
Follow these steps in order and you’ll have a professional photography website live by the end.
Step 1: Choose a Domain Name and Hosting
Photography websites are image-heavy. You need a host that loads high-resolution files quickly, stays reliable under traffic, and keeps your site secure.
I recommend Levamo managed WordPress hosting.

When you sign up, you’ll register your domain name as part of the process. Choose something short, memorable, and easy to spell. Your name paired with “photo” or “photography” works well for a personal brand.
If you’re new to this, WPBeginner has a helpful guide on how to register a domain name, including how to get one for free.
Once your account is live and WordPress is installed, you’re ready for step two.
Step 2: Choose a Photography Theme
Your theme sets the visual tone for your entire site. A good photography theme puts your images front and center with clean layouts, large image displays, and gallery-ready templates.
Here are three options at different price points.
| Sydney by aThemes | Free | – Includes a Portfolio widget with masonry and grid layouts, full block editor support, and a design built around visual portfolios. – A solid starting point for photographers who want a gallery-forward look without any cost. |
| GeneratePress | Free + Premium | – A lightweight, performance-focused theme that pairs well with photography sites. – Pro version includes a photography starter template called Lens, which gives you a clean, editorial portfolio design you can customize from day one. |
| Photocrati | Premium | – A dedicated WordPress photography theme built specifically for photographers. – Includes photographer-focused templates, built-in gallery layouts, and client proofing features. |
To install your theme, go to Appearance » Themes » Add Theme.
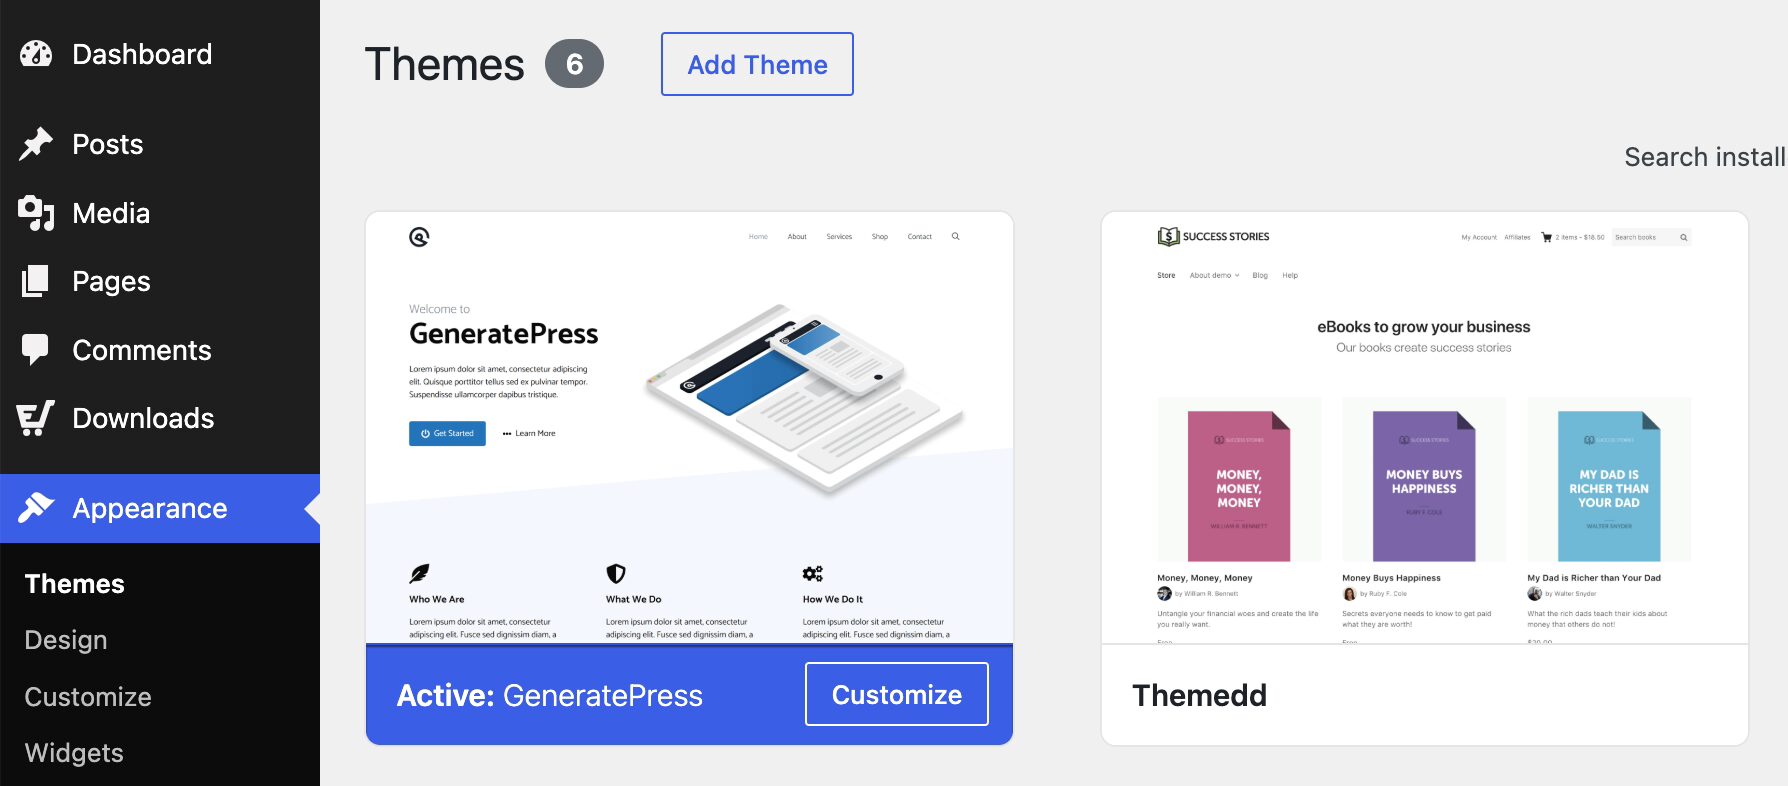
Search for the theme you want, click Install, then Activate.
Want more design flexibility? SeedProd is a drag-and-drop page builder that lets you create custom portfolio pages and landing pages without writing any code.
Step 3: Create Your Essential Pages
Every professional photography website needs three core pages. These build trust with visitors and give them a clear path to hire you or buy your work.
- Portfolio page. Where visitors browse your photography. Organize by category (weddings, portraits, landscapes, commercial) so visitors can find what they’re looking for without clicking through everything.
- About page. Your story, your style, and what makes your work distinct. Include a professional photo of yourself and any notable clients, press mentions, or awards. These social proof signals build trust before a visitor ever reaches out.
- Contact page. How clients reach you for bookings, commissions, or inquiries. Use WPForms to add a contact or inquiry form. It’s spam-protected, mobile-friendly, and takes a few minutes to configure.
To create a page, go to Pages » Add Page from your WordPress dashboard.

Add your title, build out your content, and publish when it’s ready.
Step 4: Add a Gallery Plugin and Build Your Portfolio
WordPress’s built-in media library handles image uploads, but it won’t make your portfolio look like a professional photography site. A dedicated gallery plugin gives you the organized layouts, lightbox previews, and album structure that a real photography portfolio needs.
I recommend Envira Gallery. It’s purpose-built for photographers with a drag-and-drop builder, album organization, lightbox previews, mobile-responsive layouts, and built-in watermarking.
Here’s how to set it up:
- Go to Plugins » Add Plugin and search for Envira.
- Install and activate the plugin.
- Go to Envira Gallery » Add New Gallery.
- Upload and arrange your photos in the order you want.
- Choose your layout (grid, masonry, or justified) and enable the lightbox option.
- Embed the gallery on your Portfolio page using the Envira Gallery block or shortcode.
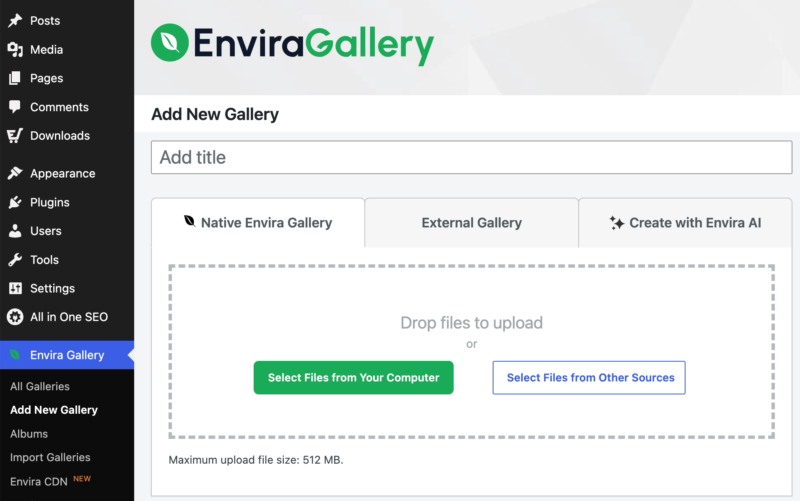
Organize related photos into albums by category. A visitor looking for a wedding photographer and one looking for commercial product photography have completely different needs. Make it easy for each to find what they came for.
Step 5: Optimize Your Images for Speed
High-resolution photo files can be several megabytes each. Without optimization, they’ll slow your site considerably, which hurts both your search rankings and the experience for visitors browsing your portfolio.
Here’s what to do:
- Compress your images. Install ShortPixel or Imagify to automatically compress photos on upload. Both also handle batch compression of images you’ve already uploaded.
- Convert to WebP. WebP images are significantly smaller than JPEGs without visible quality loss. Both ShortPixel and Imagify handle this conversion automatically.
- Enable lazy loading. Lazy loading means images below the fold only load when a visitor scrolls to them. WordPress has lazy loading built in, and an optimization plugin fine-tunes the behavior for gallery-heavy pages.
Set your optimization plugin up once and it handles every new image you upload automatically from that point on.
Step 6: Protect Your Photos
Displaying your work publicly means accepting some exposure risk. A few layers of protection make unauthorized use significantly harder.
Envira Gallery Pro includes image protection features, including watermarking, password protection, and more.
Disable right-click saving and hotlinking. A lightweight plugin can prevent visitors from right-clicking to save your images and block other sites from hotlinking directly to your files.
Add watermarks to displayed images. A subtle copyright overlay on your portfolio images deters casual theft while keeping the focus on your photography.
Use EDD’s Secure File Delivery for paid downloads. When someone purchases a photo through Easy Digital Downloads, their download link is tied to that specific purchase and expires after a set number of downloads or days. The link can’t be shared or reused after the transaction.
For a deeper look at keeping your digital files protected, see Protecting Your Digital Products.
Step 7: Sell Your Photos With Easy Digital Downloads
You’ve built your portfolio. Now turn it into a storefront.
Easy Digital Downloads is built specifically for selling digital products. Unlike WooCommerce, which is designed primarily for physical goods, EDD is focused entirely on digital delivery. There are no platform transaction fees on top of your payment processor, and the core plugin is free to download and use.
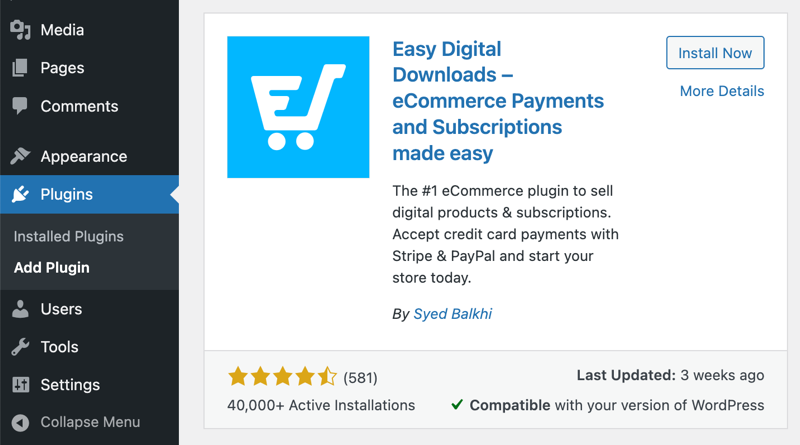
Installing EDD: Go to Plugins » Add Plugin, search for Easy Digital Downloads, and click Install Now, then Activate.
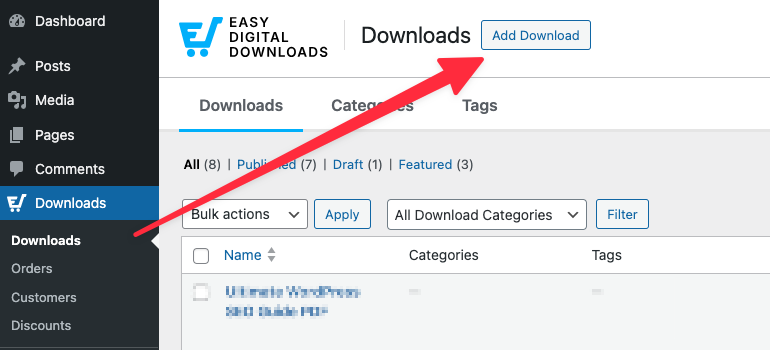
Adding a photo for sale:
- Go to Downloads » Add Download.
- Enter your photo’s name and description.
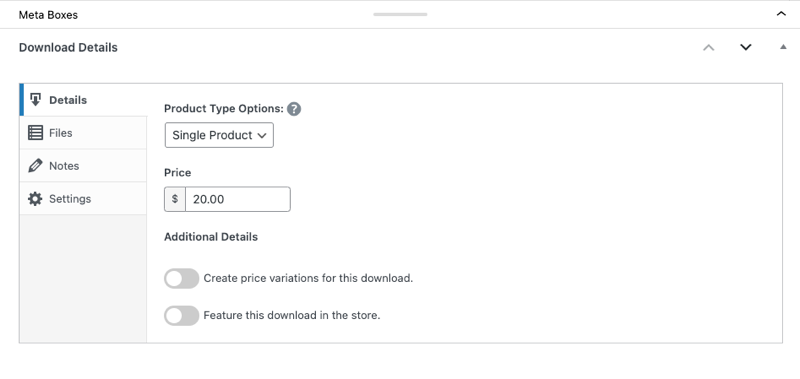
- In the Download Details section (below editor), set your price.
- Click the Files tab, then Upload a File to add your high-resolution photo.
- Set a feature image and configure other settings.
- Preview and publish.
When a customer purchases your photo, EDD sends the download link automatically. The link expires after a set number of uses, so it can’t be shared after the sale.
EDD’s core plugin is free to start. When you’re ready to add features like subscription billing for photo libraries or advanced reporting, see what’s included in EDD Pro.
👉 For a full walkthrough of the EDD selling setup, see How to Sell Photos Online With WordPress.
Selling large, high-resolution files? Also check out How to Sell Large Files in WordPress.
Step 8: Optimize Your Photography Website for SEO
A beautiful site won’t bring you traffic on its own. SEO helps the right people find your work when they search for photographers in your niche or location.
Install All in One SEO (AIOSEO). It analyzes each page on your site and gives you a clear score with specific recommendations to improve.
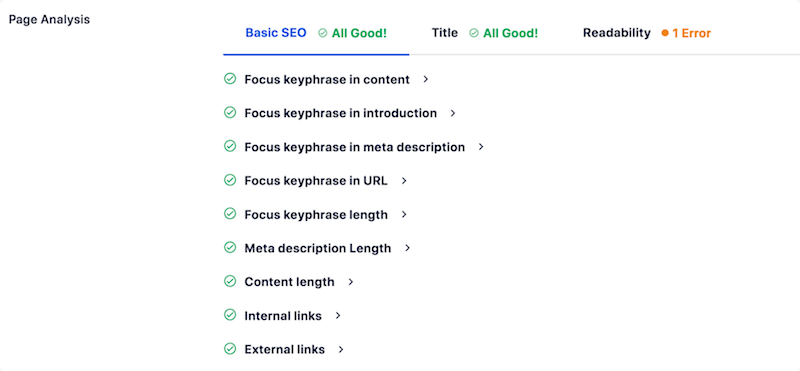
Focus on these three things first:
- Write descriptive alt text for every photo. Alt text tells search engines what’s in your images and makes your site accessible. “Golden hour portrait session in Austin, Texas” is far more useful than “IMG_0492.jpg”.
- Target local and niche keywords. If you photograph weddings in Denver, a page optimized for “Denver wedding photographer” will bring far more relevant traffic than generic terms.
- Set a clear meta title and description for every page. AIOSEO gives you dedicated fields for both and shows you a live character count.
👉 For a deeper look at SEO for digital product sites, see The Basics of SEO for Digital Product Websites.
Want to go further? Check out How to Get Digital Products Found by AI Search to make sure your photography site shows up in AI-powered results too.
How to Promote Your Photography Website
Once your site is live, you need to drive people to it. Here are a few practical ways to grow your photography audience.
Build an email list. Your email list is the one audience you own completely. No algorithm can take it away. Use OptinMonster to add a lead capture popup or inline form to your site. Offer something valuable in exchange for a signup: a free desktop wallpaper, a Lightroom preset pack, or a behind-the-scenes photo guide.
Share your work on social media. Instagram and Pinterest are natural fits for photographers. Always link back to your website, not a third-party portfolio. Drive traffic to a place you own and control.
Create content around your photography. Behind-the-scenes posts, location guides, or photography tips give Google more pages to index and give visitors more reasons to stay on your site.
For a step-by-step guide, see How to Add Lead Magnets in WordPress to Grow Your Email List.
FAQs on Creating a Photography Site in WordPress
Still have questions about building a photography website with WordPress? Here are answers to the most common ones.
Is it worth having a WordPress photography website?
Yes. A WordPress photography website gives you full control over your brand, pricing, and customer relationships. You’re not subject to platform rules, marketplace fees, or algorithm changes. It’s the only way to build a direct audience that belongs to you.
How much does it cost to create a photography website with WordPress?
A basic WordPress photography website typically costs $5 to $15 per month for hosting, plus around $15 per year for a domain name. WordPress is free, and both Envira Gallery and Easy Digital Downloads have free versions to get started. Premium plans and themes add cost as your needs grow, but you can launch with a fully functional site for under $20 a month.
Do I need coding skills to build a WordPress photography site?
No. WordPress, Envira Gallery, and Easy Digital Downloads are all designed for non-developers. You can build, customize, and manage your entire photography website without writing a single line of code.
How do I protect my photos on my photography website?
Use a plugin to disable right-click saving and hotlinking, add watermarks to your displayed images through Envira Gallery, and use Easy Digital Downloads’ Secure File Delivery for any photos you sell. Download links expire automatically after purchase so they can’t be shared or reused.
Can I sell photos directly from my WordPress photography website?
Yes. Easy Digital Downloads lets you sell high-resolution photo files directly from your WordPress site. You set the price, customers check out securely, and EDD delivers the file automatically. There are no listing fees or commission cuts on your sales.
What is the best gallery plugin for a WordPress photography website?
Envira Gallery is purpose-built for photographers. It includes a drag-and-drop gallery builder, album organization, lightbox previews, watermarking, and mobile-responsive layouts. It integrates cleanly with WordPress and is easy to set up without any coding.
Build the Photography Website Your Work Deserves
Your photography deserves more than a stock platform taking 60% and an algorithm deciding who sees it. With WordPress and Easy Digital Downloads, you get a site you own, a storefront with no commission cuts, and an audience that belongs to you.
Ready to get started? Explore EDD’s features for selling photography and see everything that’s included.
📣 P.S. Be sure to subscribe to our newsletter and follow us on Facebook, Twitter/X, or LinkedIn for more WordPress resources!