
Would you like to rearrange your checkout page without writing any code? Easy Digital Downloads builds the checkout page from individual blocks: the cart, the customer’s personal information, payment details, and a discount code field. Each block has its own settings, and the whole layout can be rebuilt right from the WordPress block editor.
This guide walks you through the steps to choose a checkout layout, rearrange its blocks, and configure each block’s settings.
Opening the Checkout Block’s Layout Panel
From the WordPress admin sidebar, go to Pages and open your checkout page. Not sure which page that is? From the WordPress admin sidebar, go to Downloads » Settings » Payments to find the page set in the Checkout Page field.
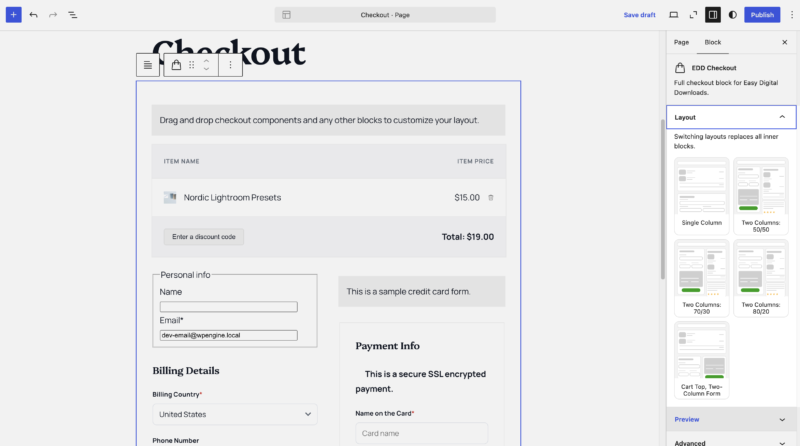
Once the page is open in the block editor, select the EDD Checkout block to see the Layout setting options.
Check out the full list of EDD Blocks.
Choosing a Layout
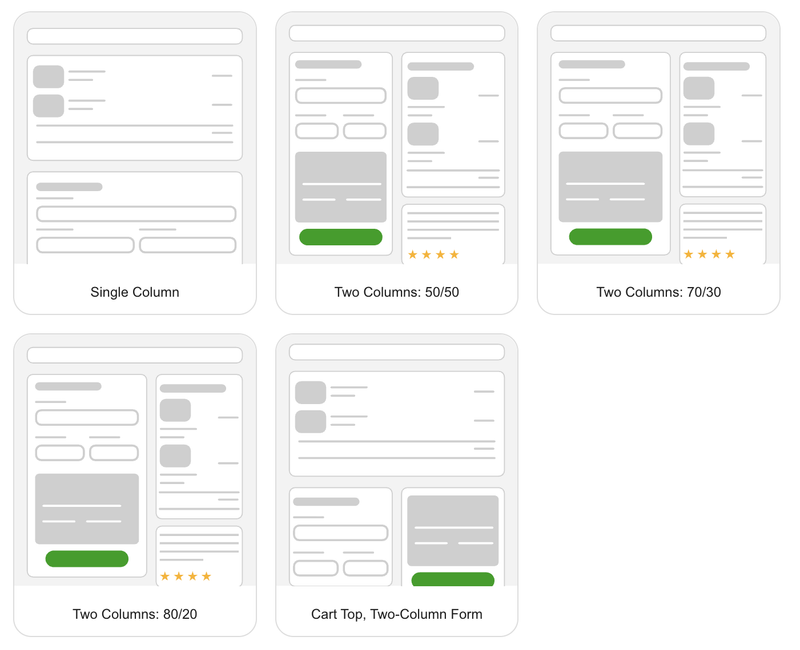
Five layouts are available from the Layout panel:
- Single Column: stacks the cart, personal info, payment info, and discount form in one column. Choose this for a simple, linear checkout.
- Two Columns: 50/50: splits the checkout evenly. Choose this when the cart and the form need equal visual weight.
- Two Columns: 70/30: gives more space to the form side. Choose this when payment and personal info fields need more room.
- Two Columns: 80/20: gives even more space to the form side, with the cart as a narrow summary column.
- Cart Top, Two-Column Form: places the cart across the top, with personal info and payment info in two columns below it.
Note: Switching to a different layout replaces every block already inside the checkout block. Choose a layout before customizing individual blocks, since switching afterward undoes that customizing.
Rearranging Checkout Blocks
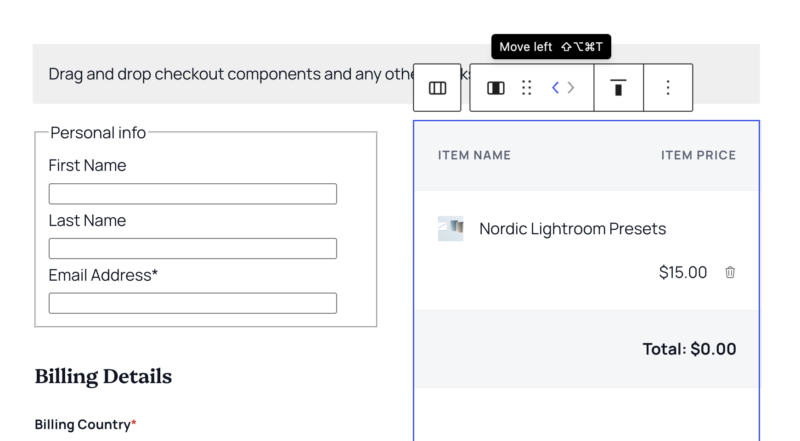
Once a layout is chosen, each section of the checkout, the cart, personal info, payment info, and discount form, is its own block. Selecting any block reveals its own toolbar with options to move, duplicate, or delete it.
To move a block, select it, then use the toolbar’s move controls to drag it to a new position or shift it up, down, left, or right depending on the current layout.
A block can also be removed entirely by selecting it and choosing delete from its toolbar. This is different from turning off the discount form, which uses a setting instead of removing a block. See Troubleshooting below.

Configuring the Cart Block’s Settings
Selecting the cart block opens its own settings in the sidebar:
- Show Header Row shows the “Item Name” and “Item Price” column headers above the cart contents. This is on by default.
- Show Thumbnails shows a product thumbnail next to each cart item. This is on by default, with a Thumbnail Width field (25px by default) to adjust the size.
- Show Quantity Controls lets customers change how many of an item they’re buying right from checkout. This is on by default.
- Show Discount Form shows the discount code field as part of the cart. This is on by default. Turning it off hides the discount field without removing the cart block itself.
Configuring the Personal Info Block’s Settings
Selecting the personal info block opens one setting: Combine First and Last Name. Turning this on merges the two name fields into a single field, which can make the checkout form feel shorter. This is off by default.
Styling a Column
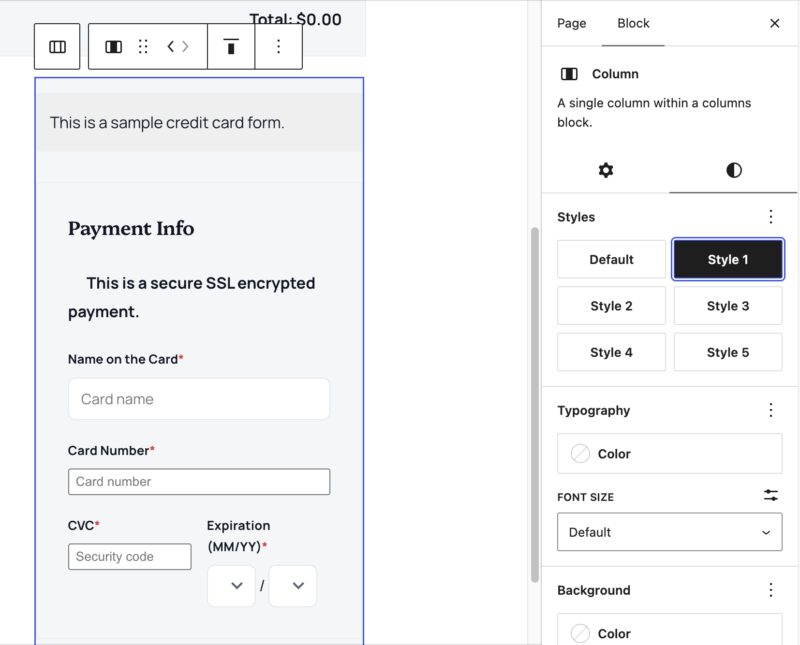
Choosing a two-column layout turns each column into its own block with a Styles tab, separate from the checkout blocks’ own settings. From the Styles tab, a column can be assigned a built-in style preset, or given a custom background color, gradient, padding, and corner rounding.
Testing the Checkout Page
Before publishing any layout changes, the checkout block’s Preview as Guest toggle, found in the parent EDD Checkout block’s own sidebar (not the cart block’s), shows exactly what a customer sees. The sidebar’s Select a Download search can also preview the checkout with a specific product already in the cart.
Testing this way, or completing a real test purchase, confirms the layout looks right before it goes live.
Troubleshooting
The discount code field was removed and won’t come back from the block inserter.
The discount code field isn’t a separate block that can be reinserted. It’s a setting on the cart block instead. To turn it back on, select the cart block, open its settings, and switch Show Discount Form on again.
That’s it! The checkout page can now be rearranged, customized, and styled entirely from the WordPress block editor. For a more advanced, drag-and-drop design approach, see Customizing Your EDD Checkout with Elementor.
Frequently Asked Questions
Below are answers to some of the most common questions about customizing the checkout page layout using EDD’s inner blocks.
Do I need to redo my checkout page after updating Easy Digital Downloads?
No, not until the page is opened and saved. Once it’s saved, the checkout page updates to the new block structure automatically, and any settings already chosen, like the layout or whether the discount form shows, carry over.
Do I need a specific plan to customize my checkout page layout?
No. The EDD checkout blocks and their layout options are available to every user. If you wanted to import a design from the EDD Checkout Templates library, you would need an active Pro license.
What can I customize on my checkout page?
The cart, the personal information fields, the payment details, and the discount code field can each be rearranged, removed, or adjusted. Each one is its own block. Standard WordPress blocks, like a paragraph, heading, or testimonial quote, can go in alongside them too.
Will changing my checkout layout break anything?
No. Every checkout layout available is a working design, and rearranging the inner blocks uses the same tools used to edit any other page in WordPress.
Can I still use Elementor to design my checkout page?
Yes. For more advanced design control, customizing your EDD checkout with Elementor works. These blocks are for anyone who wants a simpler, built-in way to customize the layout without a page builder plugin.
Will EDD checkout blocks work with my WordPress theme?
In most cases, yes. Since these are standard WordPress blocks, they work with most themes. If a theme has unusual custom styling, check how the checkout page looks before publishing changes.