Software Licensing – Usage Instructions
This document will walk you through the setup instructions for the Software Licensing add-on.
Supported Software
While this add-on has been built specifically for WordPress plugin and theme authors, due to the included API, most software can take advantage of the features it provides.
Table of Contents
- Software Licensing Extension Settings
- Configuring the Product Options
- Preset Keys
- Managing Sold License Keys
- License Status
- License Renewals
- License Upgrades
- Adding License Keys to the Emailed Purchase Receipt
- Generating License Keys on Past Purchases
- Implementing With Your Software
- Reports & Export
Once installed & activated, settings will exist in:
1. EDD Settings: Downloads > Settings > Extensions > Software Licensing
2. Product Settings: Downloads > All Downloads > Edit
Software Licensing Extension Settings
Disable Unique Activations: Enable this setting if you do not require a unique identifier when activating a license key. When enabled, each activation counts against the license limit, and deactivating does not increase your activation limit. When disabled, customers can deactivate on a site (or system ID) and activate on a new site (or system ID), which would count as a single activation. This will remove the Manage Sites options from your Order History page.
Ignore Local Host URLs?: Allow local development domains and IPs to be activated without counting towards the activation limit totals. The URL will still be logged. See How can I ignore Local Host URLs for Activation? for details.
Selling WordPress Plugins?: Check this box if you are selling WordPress plugins and wish to enable advanced ReadMe.txt file parsing. Checking this will add a metabox to each download, which allows for plugin data to be auto-filled based on the included ReadMe.txt file in your plugin. Note that this is optional even if you are selling WordPress plugins.
Display Inline Upgrade Links: Check this box if you want to display inline upgrade links for customers who have upgradable purchases.
Proration Method: Specify if you want to use Cost-Based or Time-Based to calculate proration for license upgrades. See more about proration below.
Allow Renewals: Check this box if you want customers to be able to renew their license keys. They’ll also get renewal reminders to their email, and can also renew from their account page (if that page uses the [edd_license_keys] shortcode). NOTE: If the product is a Recurring product and the customer’s subscription is still active, it will automatically renew even if this option is disabled.
Enforce Email Matching: Check this box if you want to enforce email matching on license renewals. Email matching restricts renewal of licenses to the email address used to originally purchase the license. This prevents license keys from being renewed by a different customer than purchased it.
Renewal Discount: Enter a discount amount as a percentage, such as 10. Or enter 0 (or blank) for no discount. When the user is on the checkout page renewing their license, this discount will be automatically applied to their renewal purchase. NOTE: If the product is a Recurring product and the customer’s subscription is still active, it will automatically renew with this discount applied.
Disable Discount Codes on Renewals: Check this box if you want to prevent customers from using non-renewal discounts in conjunction with renewals. This will disable the option to redeem discount codes when the cart contains a license renewal.
Show Expiration: Enable this setting to show the license expiration date on the checkout screen for purchases.
Configuring the Product Options
License key generation is set up on a product-by-product basis, so not all products sold through your store are required to have license key generation. To set up a product to generate license keys when purchased, go to your Downloads page, then click Edit on the download you wish to configure.
In the main Download Details section, toggle the “Create licenses for this product.” option. Once that option is enabled, the main Licensing Settings box will appear on the page.
On the Download product edit screen, there will be a new “Licensing Settings” meta box added. All setup for the license specific to the current product will be done in this box.
Below is a screenshot of part of the user interface inside a single download for setting up software licensing for that product.
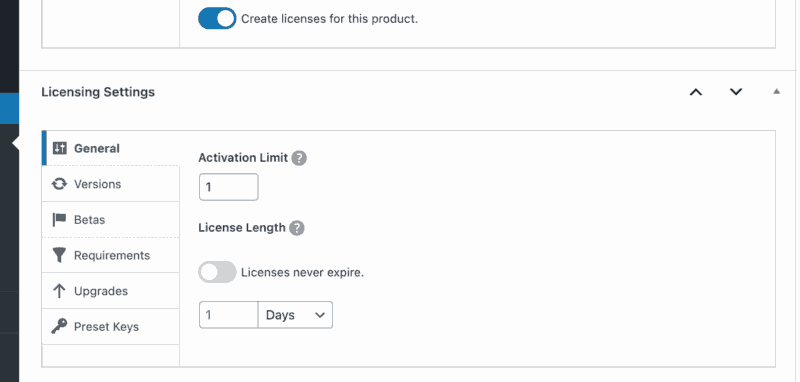
The settings are split into different sections such as General, Versions, Upgrades, and more.
General:
- Activation Limit:
- This is the maximum number of times each license key can be activated. If you’d like to limit a license key to 10 uses per customer, enter 10. If you do not want to impose any limit restrictions, leave this blank or enter 0.
- License Length
- How long are license keys valid for? Licenses can be set to never expire or after a specific amount of time. Once expired, license keys cannot be activated without being renewed first.
Versions:
- Version Number:
- This corresponds to the current version number of your software that is available. If you are selling version 1.0, then enter 1.0 here. If the current version available is 1.5, then enter 1.5 here. This version number is used specifically for WordPress plugins and themes that have implemented the automatic upgrade system, but can also be used by any other kind of software by utilizing the included API.
- This corresponds to the current version number of your software that is available. If you are selling version 1.0, then enter 1.0 here. If the current version available is 1.5, then enter 1.5 here. This version number is used specifically for WordPress plugins and themes that have implemented the automatic upgrade system, but can also be used by any other kind of software by utilizing the included API.
- Update File
- This lets you set the .zip file (or perhaps other format) that is sent to users when performing an automatic upgrade. This option is used specifically for WordPress plugins and themes that have implemented the automatic upgrade system, but can also be used by any other kind of software by utilizing the included API. If you are selling a WordPress plugin or theme, this option should be set to a .zip that contains only the necessary plugin or theme files. This .zip file is set up through the main Download Files configuration section.
- Changelog
- This is a documentation of the changes that have been made with each version of the software. Anytime a new version is released, you should add notes about what changed here. These notes will be displayed in the “What’s New” upgrade notices that users can view when upgrading their WordPress plugins or themes. If you are not selling a WordPress plugin or theme, this changelog can still be utilized via the included API.
- See Software Licensing – Changelogs for more details on using the changelog.
- Upgrade Notice
- Enter the notice that will be displayed to customers when a new version is available.
- Staged Rollouts
- To learn more about this, read our dedicated article here: Staged Rollouts.
Betas:
We have a dedicated page about configuring and using beta releases here: Releasing Beta Versions with EDD.
Requirements:
This section will allow you to restrict who can get updates to your software based on specific requirements. Please read more about configuring this in our Requirements settings article.
Preset Keys:
The Preset License Keys textarea will allow you to list your own available license keys, one per line.
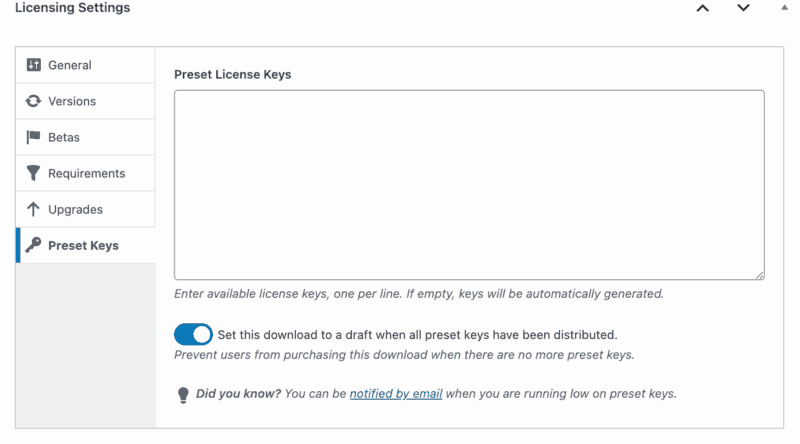
You can enter your own keys that each purchase will pull from. Each key will be pulled from the top of the list and will no longer be available to purchasers once issued. Your list could look something like this:
customkey1
customkey2
customkey3
customkey4
customkey5
It is important to note that once your custom license keys have been exhausted, Software Licensing will automatically begin generating its own license keys again. There are only two ways to prevent this from happening:
- Keep adding custom keys to the list so that they do not run out.
- Use our Purchase Limit extension to ensure that the number of keys you have remaining always matches the number of remaining purchases allowed.
You can also enable the option to set the Download as a Draft as soon as the last custom key is sold. This way, no new purchases for this product can be made. You can also receive an email when your product starts to run out of custom keys.
Upgrades:
If desired, upgrade paths can be configured for products that permit customers to upgrade their license keys. To create an upgrade path, first select the Download product that customers can upgrade to. This can be the same product or another product in your store’s catalog that has licensing enabled. If the Download you have chosen has variable prices enabled, a Price Option drop-down field will appear that lets you select the price option the upgrade is for.
After selecting the product and the price option (if any), you can choose whether to prorate the license upgrade and whether to offer an additional discount.
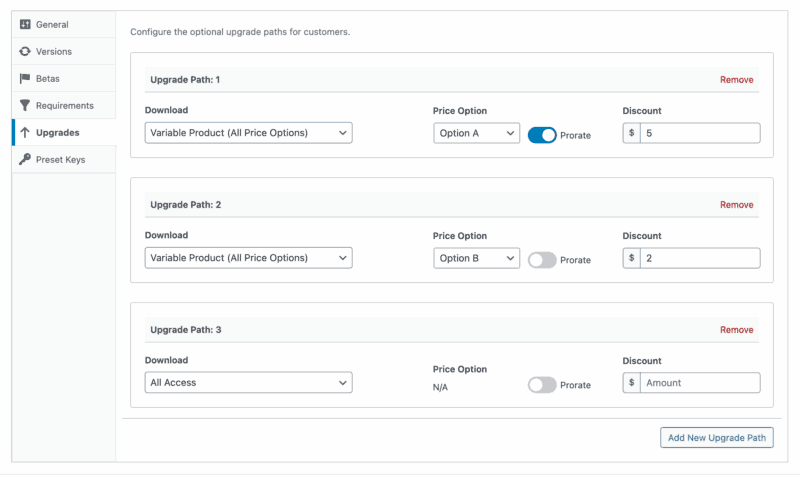
Proration
Site admins can configure the Proration settings in Downloads > Settings > Extensions > Software Licensing. Two options are available for the Proration Method – Cost-Based Calculations and Time-Based Calculations.
Cost-Based Proration
Cost-Based Proration will charge customers the difference between the Download they currently have a subscription for and the price of the Download they wish to upgrade to.
Example: A customer purchased a Single Site license for Product A for $89 on October 1, 2024. On March 1, 2025, the customer upgrades their license to 2-5 Sites, which is $129. The customer will pay $40 to upgrade. On October 1, 2025, the subscription will renew, and the customer will pay $129 for Product A (2-5 Sites) and have an active license key until October 1, 2026.
Time-Based Proration
When a customer chooses to upgrade and you’ve selected Time-Based Proration, the amount the customer will be charged to upgrade is based on the price difference between the two options, and the time left in their current subscription before it renews.
Example: A customer purchased a Single Site license for Product A for $89 on October 1, 2024. On March 1, 2025, the customer upgrades their license to 2-5 Sites, which is $129. The price difference is $40, and there are 6 months left in their current subscription. The customer will pay $20 to upgrade. On October 1, 2025, the subscription will renew, and the customer will pay $129 for Product A (2-5 Sites) and have an active license key until October 1, 2026.
Upgrading to a Lifetime License
For lifetime licenses, proration applies a discount to the cost of the lifetime license. Cost-Based Proration will discount the full cost of the original license from the lifetime license cost. Time-Based will calculate a pro-rated discount based on the amount of time left in the license’s term.
The expiration date of the license will not change; an upgraded license will still expire on the original expiration date, whether prorated or not. An exception is if the upgrade is for a different term; in that case, the expiration date will change.
How a customer upgrades their license
When a customer wishes to upgrade their license key, they can log into their account (user accounts are required to upgrade a license) and go to their purchase history. From there, they will click on View Licenses and then on View Upgrades. Once an upgrade has been chosen, the customer will click Upgrade License to proceed to the checkout screen, where they can complete their purchase.
Expiration Date
Software Licensing upgrades will not affect/change the original expiration date of the license unless the term is different.
Upgrade Revenue
Site admins can view revenue generated by license upgrades in Downloads > Reports > License Upgrades.
Adding License Keys to the Emailed Purchase Receipt
The Software Licensing extension will make a new template tag available for the purchase receipts: {license_keys}
In order to send the license key to the buyer, this template tag must be included with the purchase receipt email that you configure under Downloads > Emails.
License Renewals
License renewals must be enabled from Downloads > Settings > Extensions > Software Licensing.
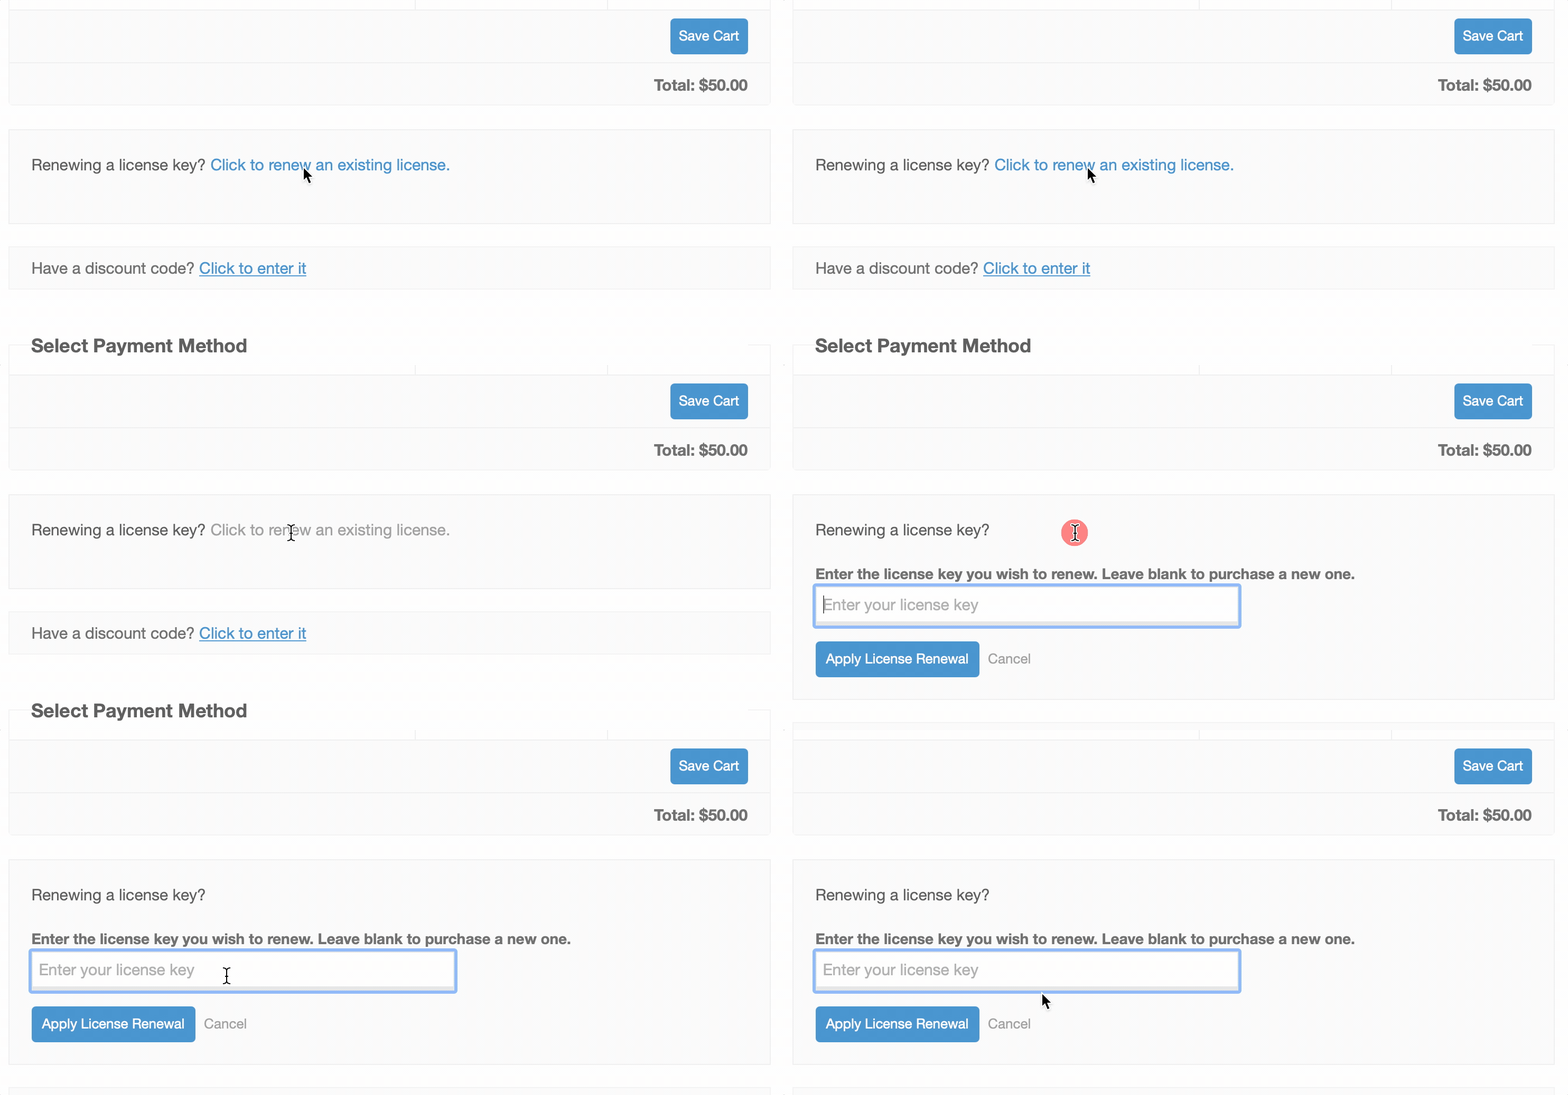
Customers can renew licenses via Email Renewal Notices, the Checkout page, or by manually entering a license in the License key renewal form:
Sending Email License Renewal Notices
Software Licensing can automatically send renewal notice emails when license keys are within the specified expiration period set in the renewal notice options. See License Renewal & Expiration Reminder Emails for instructions on how to configure.
License key renewal notices can be manually resent on a key-by-key basis, or via a bulk action ( Downloads > Licenses). To send renewal notices for multiple keys at once, select the licenses to send a renewal for, then select “Send Renewal Notice” from the dropdown menu at the top left.
Checkout Page Renewals
If renewals are enabled, there will be a section added to your checkout screen that allows customers to enter an existing license key to renew it:
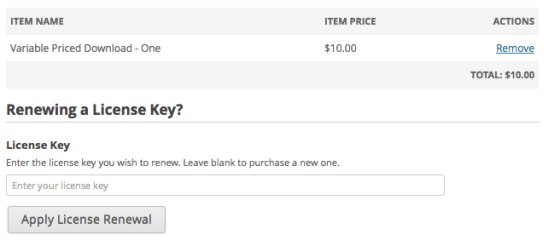
Renewal Form
You can add the shortcode [edd_renewal_form] to any page on your site to allow customers to input a license key that they wish to renew. Submitting the form will add the product/key to cart.

License Key History
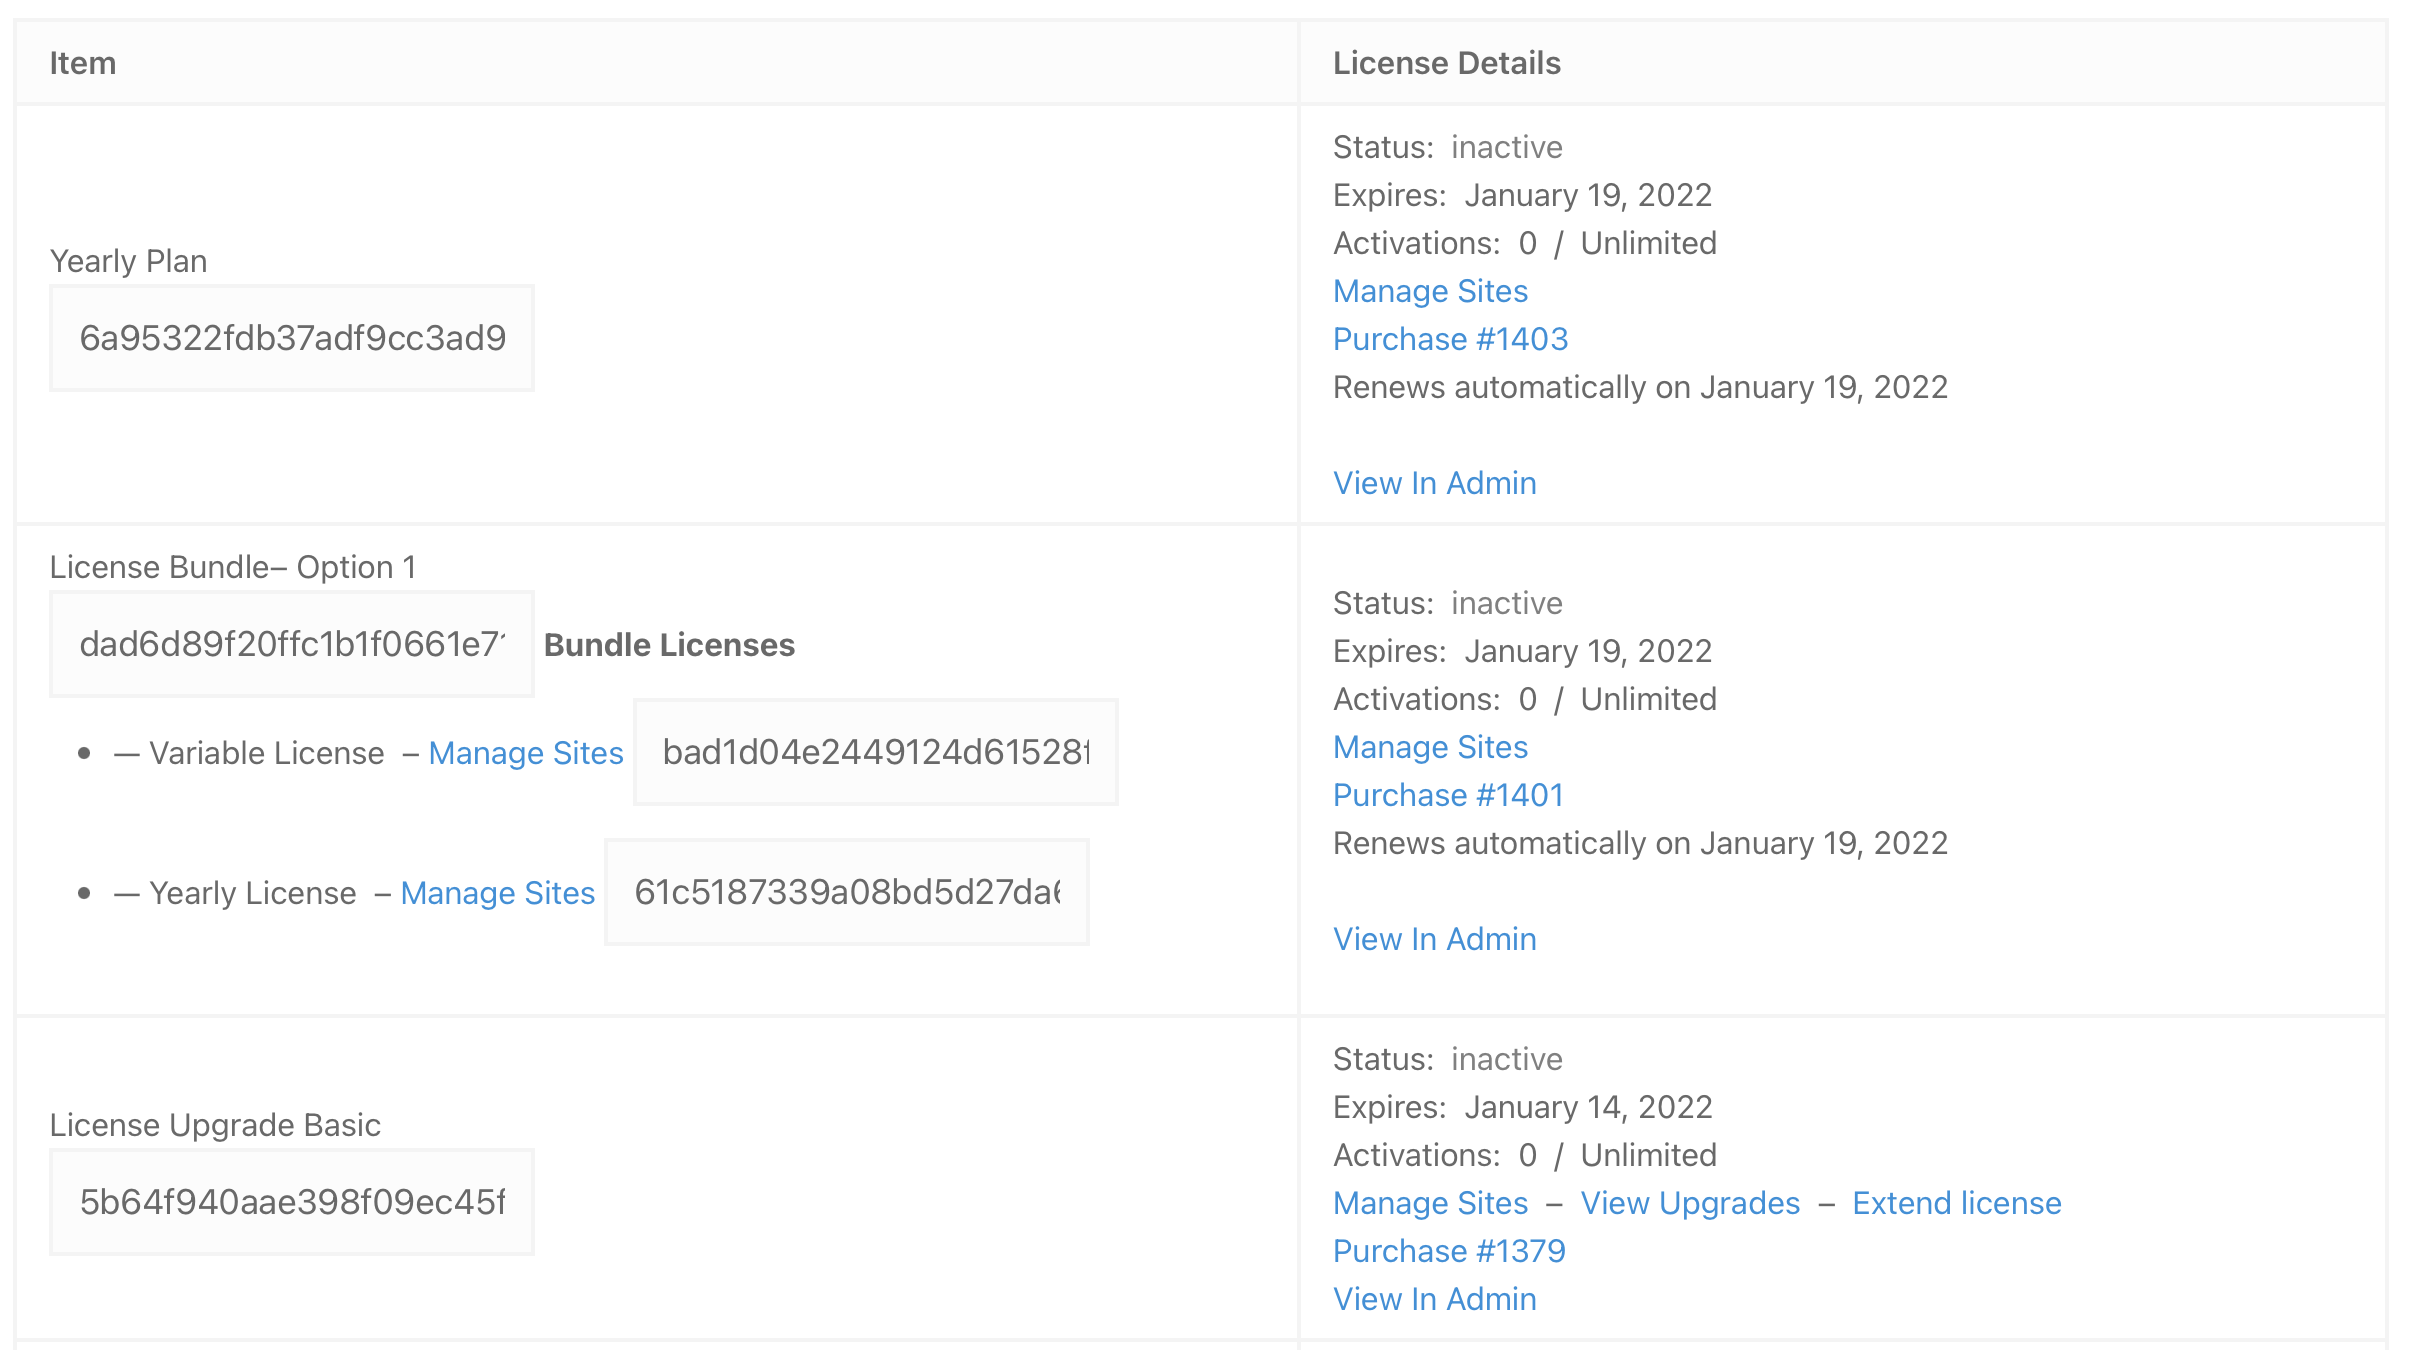
Customers’ license keys can be shown in their account page using the [edd_license_keys] shortcode. This will display all license keys that belong to a customer (requires that they are logged in), along with relevant information about the license, such as expiration date, status, renewal options, upgrade options, and a link to view the purchase record for the license.
Managing Sold License Keys
The Downloads > Licenses page provides an overview of all the license keys you have sold. Clicking the key will open the License Details. Several pieces of information are listed with each key:
- License Key – This is the actual license key sent to the user.
- You can generate a replacement key by clicking the reload icon next to the key in the manage details.
- Customer – This shows the product the key was purchased for and contains a link.
- Status – This indicates one of these possible license statuses:
- Active: An active status means the key has been activated by a customer and is valid. A key is set to be active only by being activated by a customer.
- Inactive: Inactive is the default status for keys. These are keys that either have never been used or have been made available and reset to inactive manually.
- Expired: Each key is given an expiration date when it is generated. When that date passes, the key is marked as Expired.
- Disabled: A key will be set as Disabled when a purchase is Revoked or Refunded, or may be set so manually.
- Activation Limit – This is the number of sites (or times) the license can be activated on.
- Expiration Date – This is the date that the license expires.
- Purchase Date – This is the date the license was purchased.
- Term – Length of time the license is available to the customer.
- Related Payments – List of all payments (initial and renewal) for the license.
- Upgrade Path – This shows the available upgrades, upgrade price, and a direct link to add the upgrade to the cart
- Renewal URL – This is a direct link to add the download/license to the cart to renew.
- Unsubscribe URL – This URL will unsubscribe the customer from renewal notices for the license.
There are four filters at the top of the page, just below the page title, that let you view license keys by status.

You can Manage, Extend (renew), Disable, or Delete a license at any time by hovering over the license and clicking the appropriate link in the main Downloads > Licenses page.

License Logs
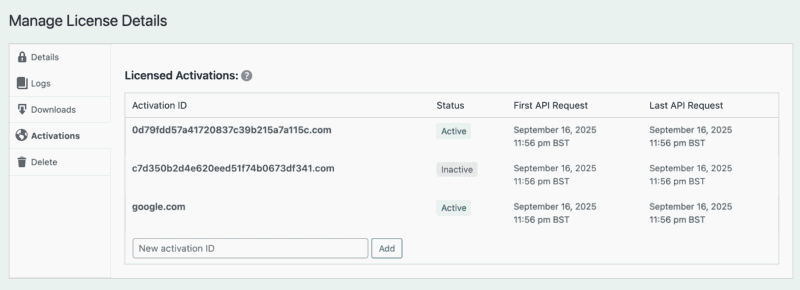
You can also view the activation log for any license by clicking the “Logs” tab in the Manage License Details. This log will show you relevant data each time this license has been activated.
Activations Section
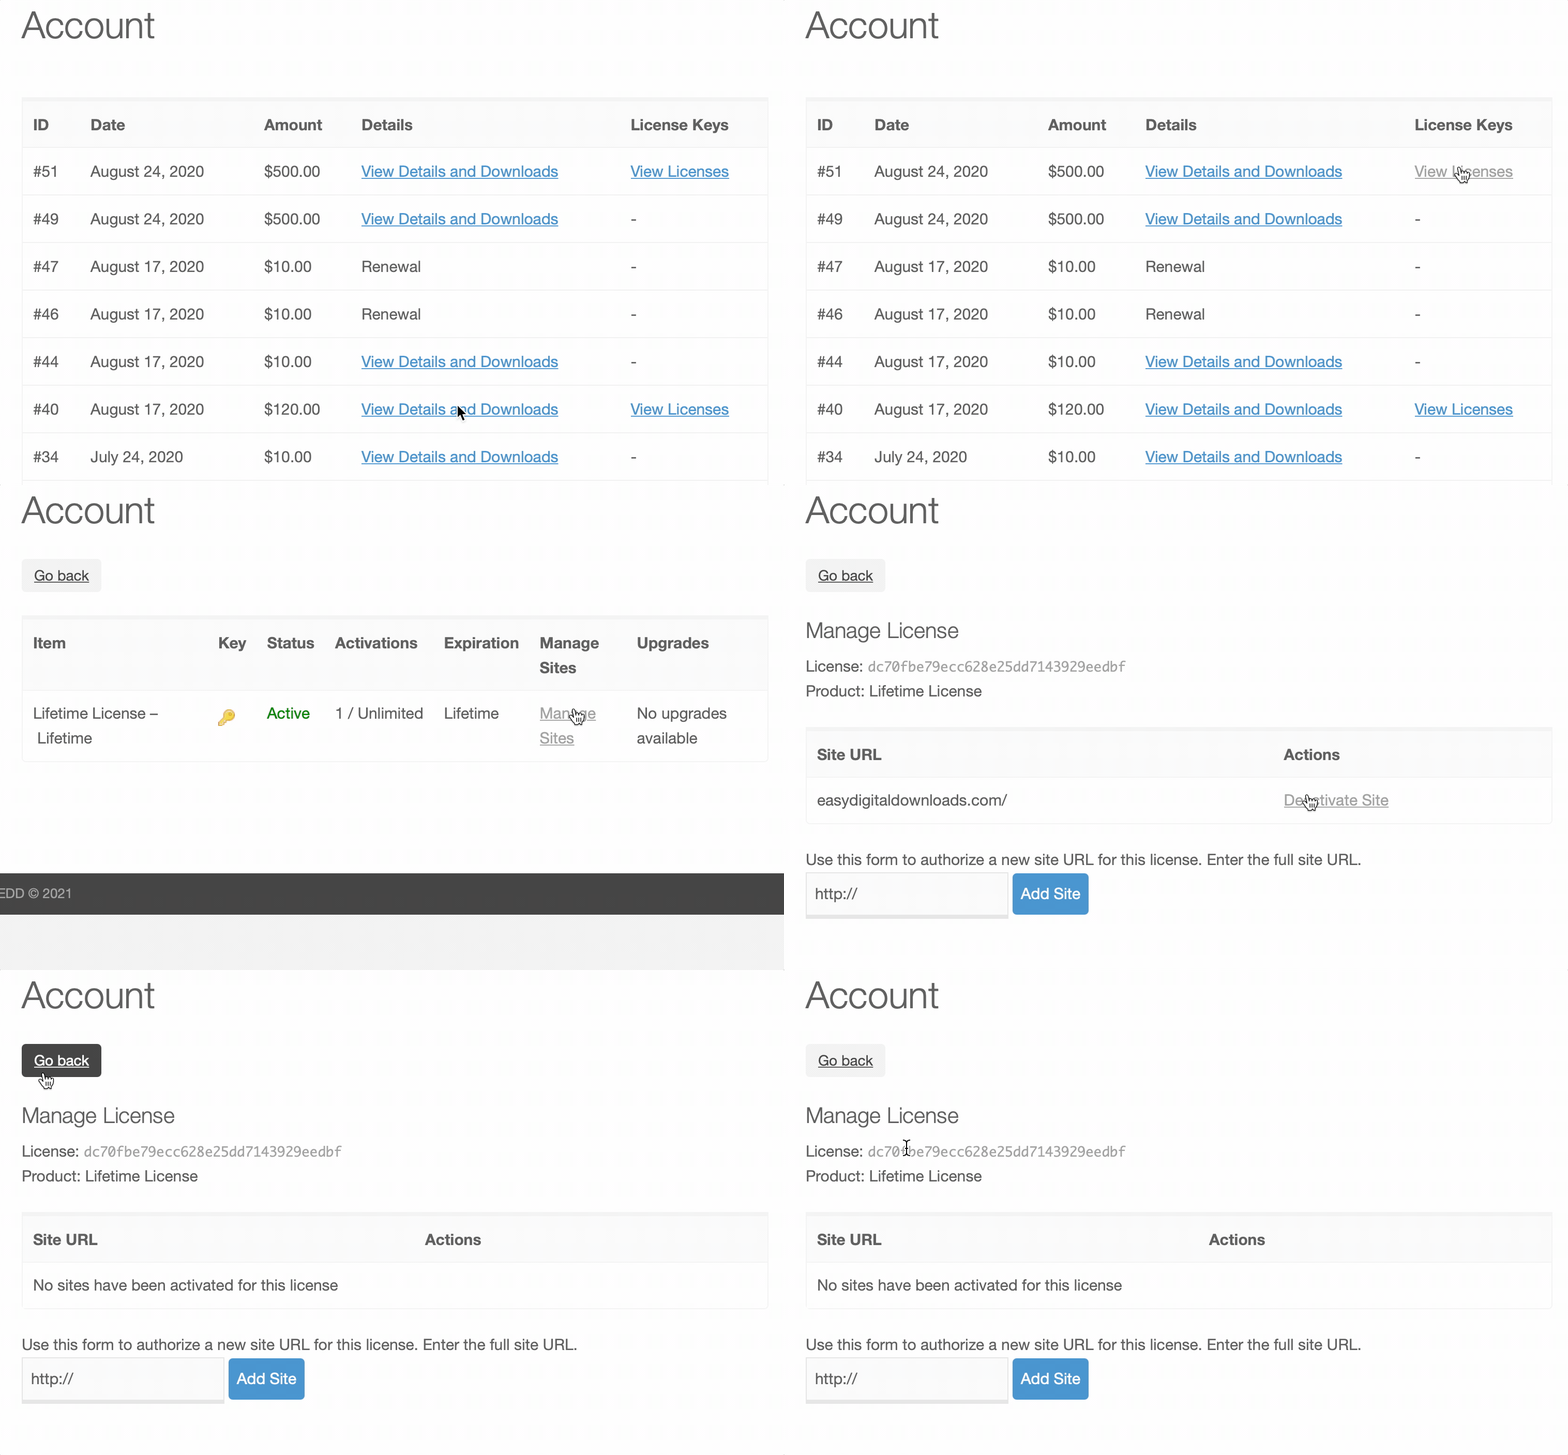
Activations can be managed by both the store admin and/or the customer via the account page.
Admins can manually manage the Activations on a per-license basis from the Manage License Details screen. If you wish to add or remove activations from the license, you can do it on this page:
Customers can also manage active sites via the account page.
Generating License Keys on Past Purchases
If you have been selling for some time before activating Software Licensing and you wish to go back and generate license keys for those orders, you can do that by going to Downloads > Tools and using the missing licenses tool.
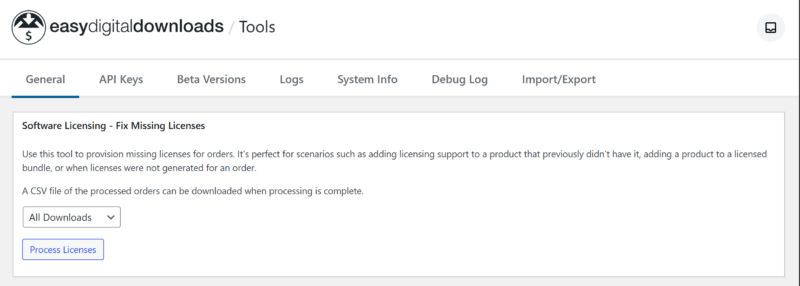
You can also generate licenses on a per-order basis in the Order Details > Licenses section:

Reports & Exports
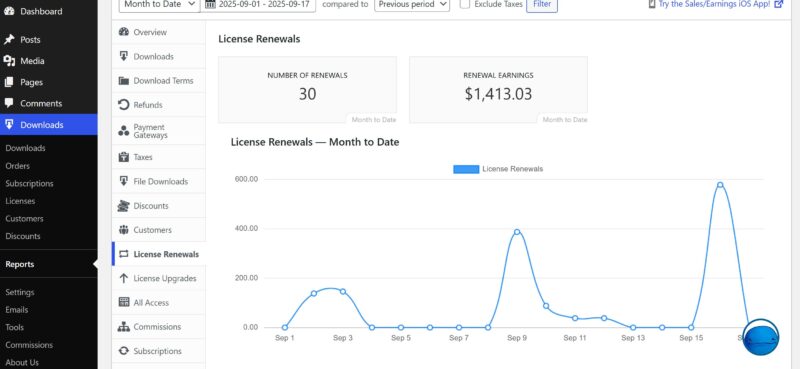
Software Licensing provides reporting for License Renewals & License Upgrades. As well as the ability to export licenses to a csv file.
Reports
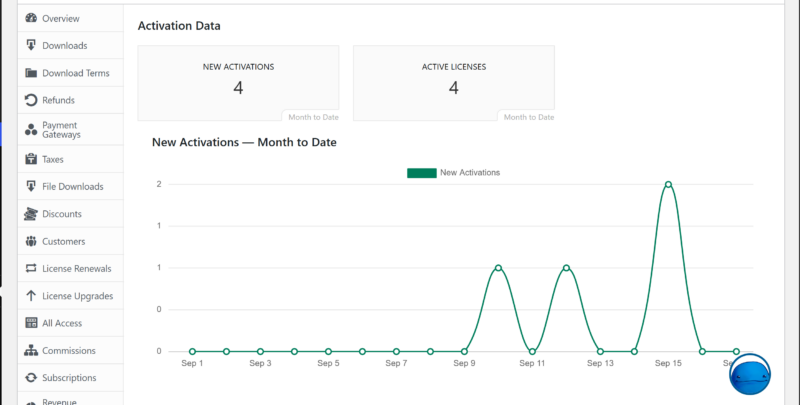
Software Licensing reports are located under Downloads > Reports > License Renewals, License Upgrades, and Activation Data (this last requires Software Licensing 3.9.0 and EDD 3.5.1).
Export Licenses
Licenses are exported under Downloads > Tools > Import / Export instead of being located under the reports export, in order to limit what roles can access licenses. You can export all licenses or export licenses by status. The file includes license key, status, customer information, product name, dates, and activation information.

Implementing With Your Software
Software Licensing can be implemented with:
- WordPress Plugins
- WordPress Themes
- Most software languages (Web and Desktop software).
Adding Automatic Upgrades to Your WordPress Product
See our documentation about how to integrate automatic upgrades for your WordPress plugins.
See our documentation about how to integrate automatic upgrades for your WordPress themes.
Steps to release a new version
- Replace the download file with the new one by clicking “Upload a File”.
- Then enter appropriate text into the Changelog field in the Licensing meta box.
- Increment the version number and save the download.
- Click Update to save changes.
- Select the filename in the “Update File” dropdown if the correct file is not already selected.
- Your customers’ sites will be notified that there’s a new version, and they will be able to click Update.
ReadMe.txt Configuration for WordPress Plugins
ReadMe.txt files can be parsed to appear in the plugin update information. See Parsing ReadMe.txt files in WordPress Plugins for more information on these settings.
Working with the API for Other Kinds of Software
This add-on provides a complete API that you can use for activating and validating license keys. You can also use the API for checking if new versions of the software are available, and for downloading installation files for the latest version.
For documentation for working with the API, click here.